Page 32 of 97
Page 1 text
Cake ! Cake ! MAGAZINE
Page 2 text
PUBLISHER : Cake ! Magazine is published by the Australian Cake Decorating Network Pty Ltd . ACN : 91 164 927 584 . © All content copyright 2022 Australian Cake Decorating Network Pty Ltd . All rights reserved . Reproduction any part of the magazine without written permission is prohibited . All prices included in Cake ! Magazine are approximate and are in AUD unless otherwise stated . Prices quoted are correct at the time of publishing and may vary or be subject to change . The Australian Cake Decorating Network Pty Ltd accepts no responsibility for damage or loss as a result of material submitted for , published in or as a result of this publication . The Australian Cake Decorating Network does not have an affiliation with any other magazine . The views and opinions expressed within this publication are not necessarily the views of the publisher or it ' s affiliates . While every effort has been made to ensure the accuracy of the information contained within Cake ! Magazine the publisher and Cake ! Magazine hold no responsibility for any errors , omissions , or consequences subsequent or otherwise , including loss or damage arising from reliance on information in this publication . Content is supplied for publication in Cake ! Magazine by parties external to the Australian Cake Decorating Network and it is the external party ' s responsibility to ensure content and credits are accurate . Cake ! Magazine contains advertising through individual arrangements , which may include paid affiliate arrangements . Cake ! Magazine may also contain affiliate links . The agreements are held between the advertiser or affiliate and the Australian Cake Decorating Network Ptd Ltd . To advertise in Cake ! magazine , contact : liz @ acdn . me
Page 3 text
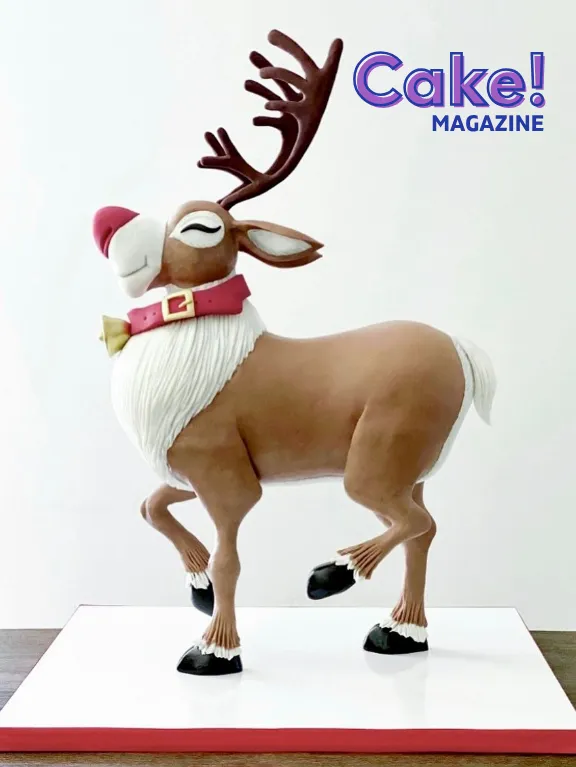
letter from the editor Hello and welcome to our final issue of Cake ! Magazine for 2022 ! ( Can you believe it ' s already December !?) It ' s no secret that the ACDN team love Christmas and we love publishing this issue ! We love seeing the new cakes , cookies and sweet treats our members have been creating , and to bring together an issue to inspire your own creativity this festive season . On the 5th of November we celebrated ACDN ' s 10th Birthday Awards Night in Melbourne and loved seeing so many of you there ! We also announced the launch of Cake ! TV at the awards night which the ACDN team have been working hard on behind the scenes for many months . A big congratulations to all of our Awards winners and thank you to both our Event and Category sponsors for your ongoing support to help us continue to host this event each year . In this issue , we interview Rikki , the Founder of Sweet Sheets and have Amber Comadira-Smith back with her regular column for Cake ! Magazine talking all things imitation vs natural flavourings ! We wish you and your family a safe and happy holiday season . Thank you for your ongoing support throughout the year and we hope you enjoy this issue of Cake ! Magazine ! Liz Enjoy ! COVER IMAGE : Margarita Tan ButterSweet Sugar Art

Page 4 text
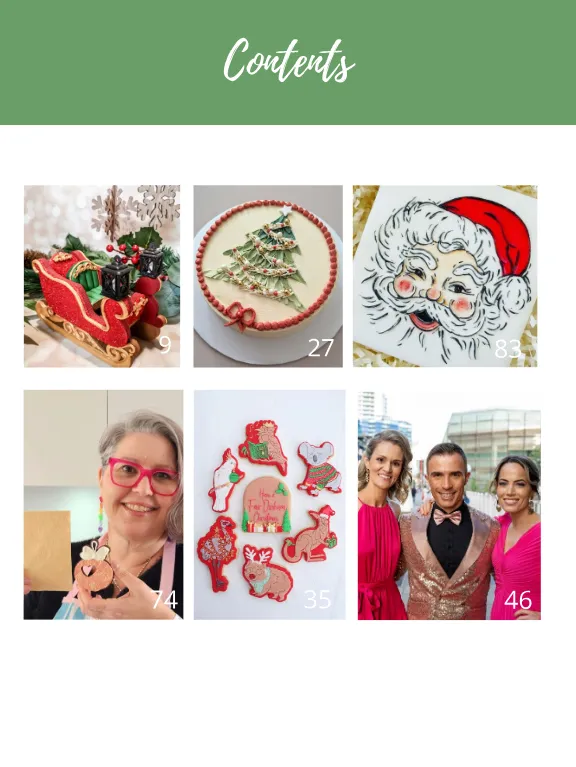
Contents 9 27 83 74 35 46
Page 5 text
December 2022 Features 46 2022 Awards Night Wrap Up 57 74 2022 Award Winners Interview with Rikki Clay , Founder of Sweet Sheets 9 27 35 Tutorials Santa ' s Sleigh Tutorial Christmas Tree Cake Tutorial Two Tone Design Tutorial Regulars 83 ACDN Member Gallery




Page 7 text
T U T O R I A L S T O B A K E T H I S T U T O R I A L S T O B A K E T H I S Christmas


Page 9 text
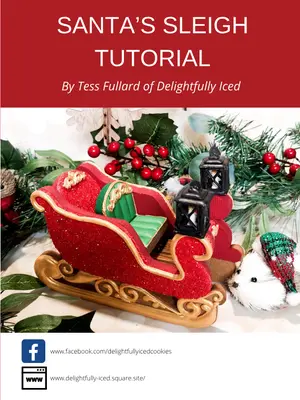
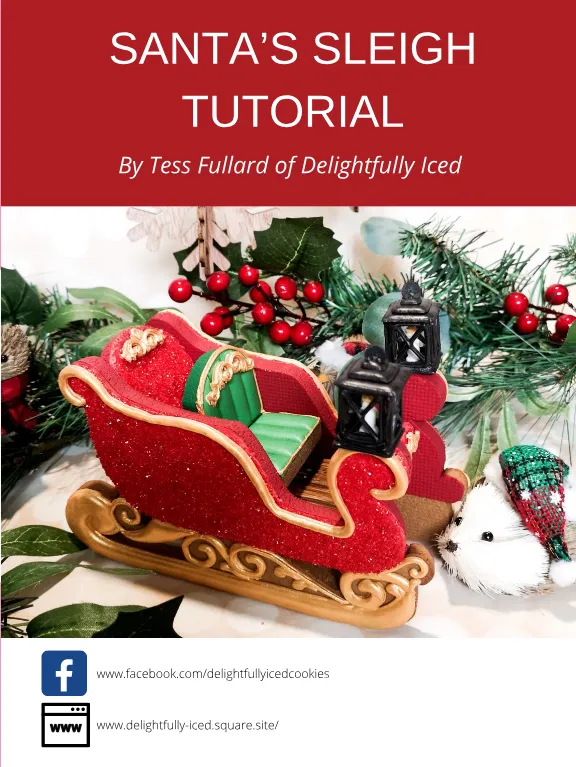
SANTA ’ S SLEIGH TUTORIAL By Tess Fullard of Delightfully Iced www . facebook . com / delight fully iced cookies www . delightfully-iced . square . site /
Page 10 text
YOU WILL NEED : Prepared and ready to use gingerbread cookie dough – enough to fill 1 regular sized baking tray . I made a ½ portion of the Cookie Countess recipe and had plenty to spare . The Cookie Countess recipe is easy to make , is mild but tasty and has very little spread : https :// www . thecookiecountess . com / blogs / recipes-andtutorials / gingerbread-house-cookie-recipe-no-spread-holds-up-delicious Printed template sheet – print to A4 size Penblade – or small stanley knife Lined baking tray – I use perforated silicone sheets but baking paper is also fine Rolling pin – with 6mm spacers Straight edged file / grater – something like one of these : https :// amzn . asia / d / 7dGlSDr Edible marker – colour doesn ’ t matter About 300g of royal icing in green , red , light brown , gold , black and white in the following consistencies in disposable piping bags x 10 : o Dark green – medium / single consistency to pipe and flood + - 30g o Red – Piping + -15g, Flood + - 100g , and Thick / glue + -25g consistencies o Light brown – Piping + -10g, 2 . Flood + - 20g , and Thick / glue + - 25g consistencies o Gold – medium / single consistency to pipe and flood + - 50g o Black – soft piping consistency + - 30g o White – soft piping consistency + -10g This is a great tutorial if you need help with making your royal icing : https :// www . lilaloa . com / 2020 / 01 / royal-icing-cookie-decorating-what-howto-make . html ? m = 1 # moreRed
Page 11 text
YOU WILL NEED : Red sugar sand – or edible glitter if you prefer Paint palette 4 x Paint brushes - Fan brush , small brush – size 0 , 1 or 2 , flat brush – size 6 or 7 and a puffy soft bristled brush Tweezers Chocolate brown gel food colour Vodka / rose spirit / powder to paint solution Red edible paint ( or powder colour mixed with vodka / rose spirit / paint solution ) Green edible paint ( or powder colour mixed with vodka / rose spirit / paint solution ) Gold edible paint ( or powder colour mixed with vodka / rose spirit / paint solution ) Gold dusting powder – if not already using as paint Silicone mold / s – I used some small filigree molds for my sleigh but you can use whatever you have on hand to make holly / leaves / flowers / Christmas characters or anything else you like , or none at all . White fondant / sugar paste – if making fondant shapes as above . You only need a small amount . 1 x Gelatine sheet 12 x 12cm ( or similar size ) cellophane bag ( or a few smaller size bags ) Dehydrator ( useful but not essential ), you could also use a fan or your oven on the warmer drawer / lowest setting .
Page 12 text
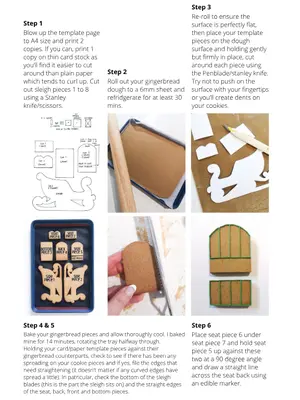
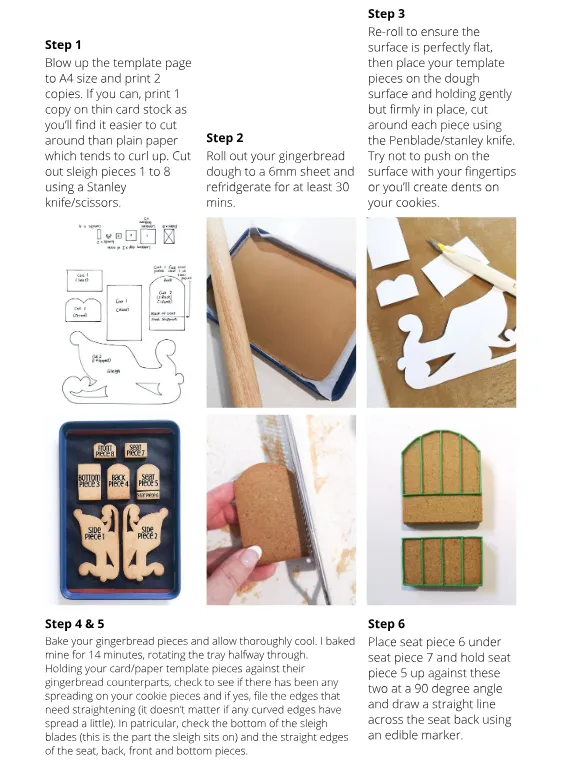
Step 1 Blow up the template page to A4 size and print 2 copies . If you can , print 1 copy on thin card stock as you ’ ll find it easier to cut around than plain paper which tends to curl up . Cut out sleigh pieces 1 to 8 using a Stanley knife / scissors . Step 2 Roll out your gingerbread dough to a 6mm sheet and refridgerate for at least 30 mins . Step 3 Re-roll to ensure the surface is perfectly flat , then place your template pieces on the dough surface and holding gently but firmly in place , cut around each piece using the Penblade / stanley knife . Try not to push on the surface with your fingertips or you ’ ll create dents on your cookies . Step 4 & 5 Bake your gingerbread pieces and allow thoroughly cool . I baked mine for 14 minutes , rotating the tray halfway through . Holding your card / paper template pieces against their gingerbread counterparts , check to see if there has been any spreading on your cookie pieces and if yes , file the edges that need straightening ( it doesn ’ t matter if any curved edges have spread a little ). In patricular , check the bottom of the sleigh blades ( this is the part the sleigh sits on ) and the straight edges of the seat , back , front and bottom pieces . Step 6 Place seat piece 6 under seat piece 7 and hold seat piece 5 up against these two at a 90 degree angle and draw a straight line across the seat back using an edible marker .
Page 13 text
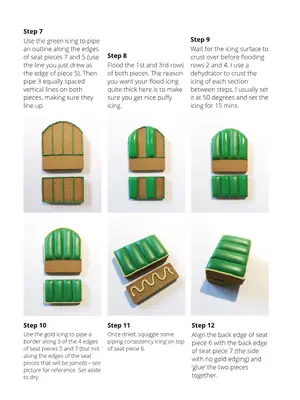
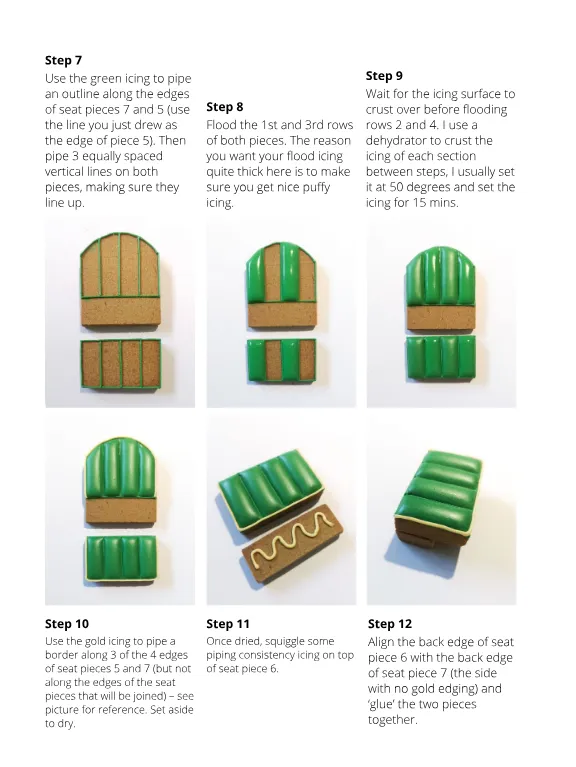
Step 7 Use the green icing to pipe an outline along the edges of seat pieces 7 and 5 ( use the line you just drew as the edge of piece 5 ). Then pipe 3 equally spaced vertical lines on both pieces , making sure they line up . Step 8 Flood the 1st and 3rd rows of both pieces . The reason you want your flood icing quite thick here is to make sure you get nice puffy icing . Step 9 Wait for the icing surface to crust over before flooding rows 2 and 4 . I use a dehydrator to crust the icing of each section between steps , I usually set it at 50 degrees and set the icing for 15 mins . Step 10 Use the gold icing to pipe a border along 3 of the 4 edges of seat pieces 5 and 7 ( but not along the edges of the seat pieces that will be joined ) – see picture for reference . Set aside to dry . Step 11 Once dried , squiggle some piping consistency icing on top of seat piece 6 . Step 12 Align the back edge of seat piece 6 with the back edge of seat piece 7 ( the side with no gold edging ) and ‘ glue ’ the two pieces together .
Page 14 text
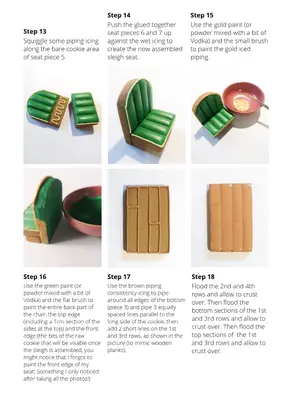
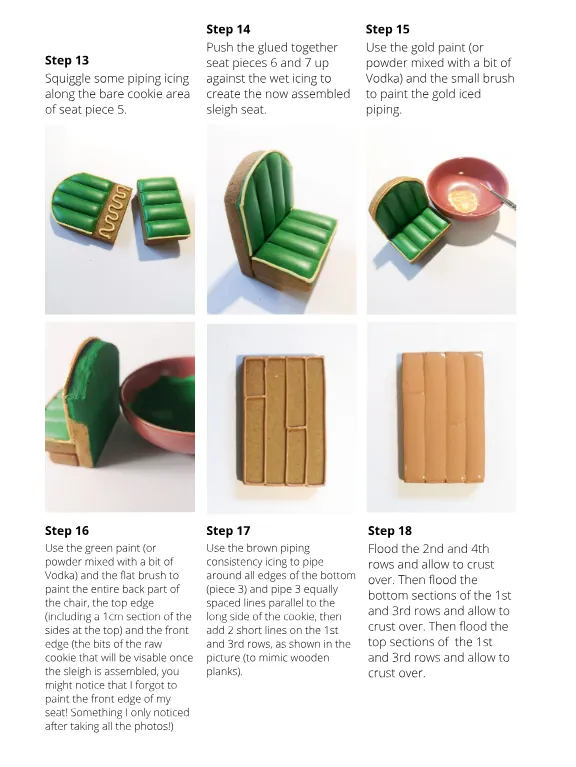
Step 13 Squiggle some piping icing along the bare cookie area of seat piece 5 . Step 14 Step 15 Push the glued together seat pieces 6 and 7 up against the wet icing to create the now assembled sleigh seat . Use the gold paint ( or powder mixed with a bit of Vodka ) and the small brush to paint the gold iced piping . Step 16 Use the green paint ( or powder mixed with a bit of Vodka ) and the flat brush to paint the entire back part of the chair , the top edge ( including a 1cm section of the sides at the top ) and the front edge ( the bits of the raw cookie that will be visable once the sleigh is assembled , you might notice that I forgot to paint the front edge of my seat ! Something I only noticed after taking all the photos !) Step 17 Use the brown piping consistency icing to pipe around all edges of the bottom ( piece 3 ) and pipe 3 equally spaced lines parallel to the long side of the cookie , then add 2 short lines on the 1st and 3rd rows , as shown in the picture ( to mimic wooden planks ). Step 18 Flood the 2nd and 4th rows and allow to crust over . Then flood the bottom sections of the 1st and 3rd rows and allow to crust over . Then flood the top sections of the 1st and 3rd rows and allow to crust over .
Page 15 text
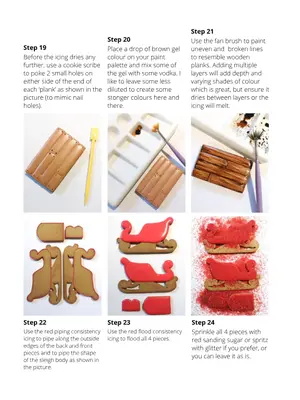
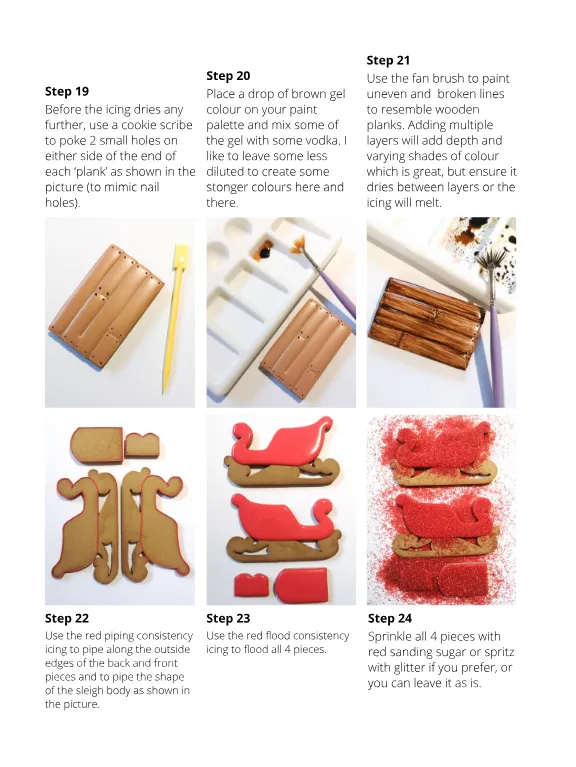
Step 19 Before the icing dries any further , use a cookie scribe to poke 2 small holes on either side of the end of each ‘ plank ’ as shown in the picture ( to mimic nail holes ). Step 20 Place a drop of brown gel colour on your paint palette and mix some of the gel with some vodka . I like to leave some less diluted to create some stonger colours here and there . Step 21 Use the fan brush to paint uneven and broken lines to resemble wooden planks . Adding multiple layers will add depth and varying shades of colour which is great , but ensure it dries between layers or the icing will melt . Step 22 Use the red piping consistency icing to pipe along the outside edges of the back and front pieces and to pipe the shape of the sleigh body as shown in the picture . Step 23 Use the red flood consistency icing to flood all 4 pieces . Step 24 Sprinkle all 4 pieces with red sanding sugar or spritz with glitter if you prefer , or you can leave it as is .
Page 16 text
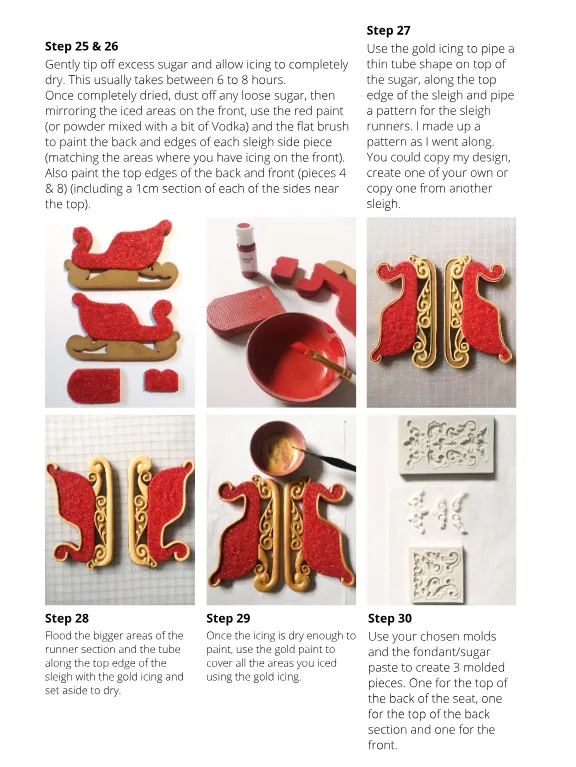
Step 25 & 26 Gently tip off excess sugar and allow icing to completely dry . This usually takes between 6 to 8 hours . Once completely dried , dust off any loose sugar , then mirroring the iced areas on the front , use the red paint ( or powder mixed with a bit of Vodka ) and the flat brush to paint the back and edges of each sleigh side piece ( matching the areas where you have icing on the front ). Also paint the top edges of the back and front ( pieces 4 & 8 ) ( including a 1cm section of each of the sides near the top ). Step 27 Use the gold icing to pipe a thin tube shape on top of the sugar , along the top edge of the sleigh and pipe a pattern for the sleigh runners . I made up a pattern as I went along . You could copy my design , create one of your own or copy one from another sleigh . Step 28 Flood the bigger areas of the runner section and the tube along the top edge of the sleigh with the gold icing and set aside to dry . Step 29 Once the icing is dry enough to paint , use the gold paint to cover all the areas you iced using the gold icing . Step 30 Use your chosen molds and the fondant / sugar paste to create 3 molded pieces . One for the top of the back of the seat , one for the top of the back section and one for the front .
Page 17 text
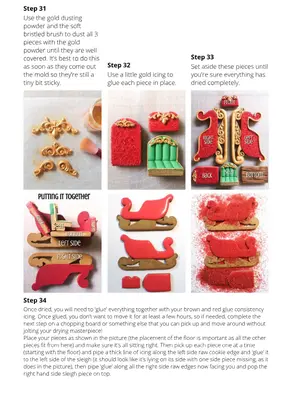
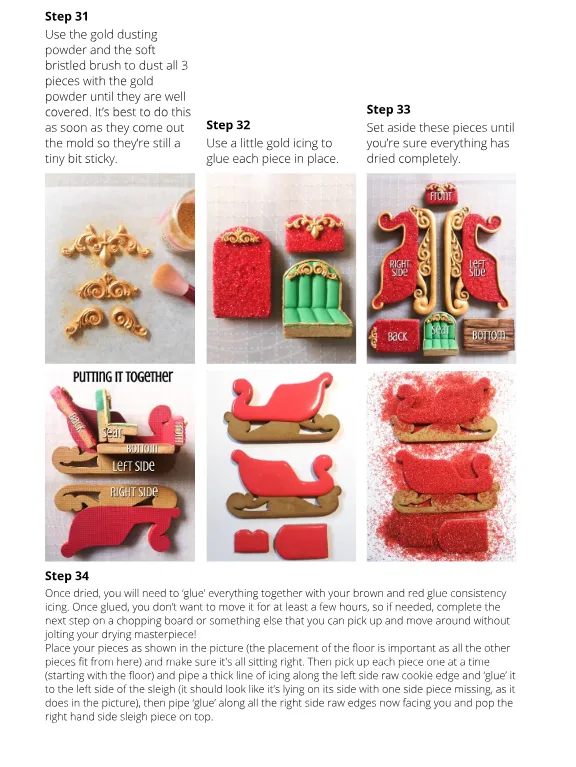
Step 31 Use the gold dusting powder and the soft bristled brush to dust all 3 pieces with the gold powder until they are well covered . It ’ s best to do this as soon as they come out the mold so they ’ re still a tiny bit sticky . Step 32 Use a little gold icing to glue each piece in place . Step 33 Set aside these pieces until you ’ re sure everything has dried completely . Step 34 Once dried , you will need to ‘ glue ’ everything together with your brown and red glue consistency icing . Once glued , you don ’ t want to move it for at least a few hours , so if needed , complete the next step on a chopping board or something else that you can pick up and move around without jolting your drying masterpiece ! Place your pieces as shown in the picture ( the placement of the floor is important as all the other pieces fit from here ) and make sure it ' s all sitting right . Then pick up each piece one at a time ( starting with the floor ) and pipe a thick line of icing along the left side raw cookie edge and ‘ glue ’ it to the left side of the sleigh ( it should look like it ’ s lying on its side with one side piece missing , as it does in the picture ), then pipe ‘ glue ’ along all the right side raw edges now facing you and pop the right hand side sleigh piece on top .
Page 18 text
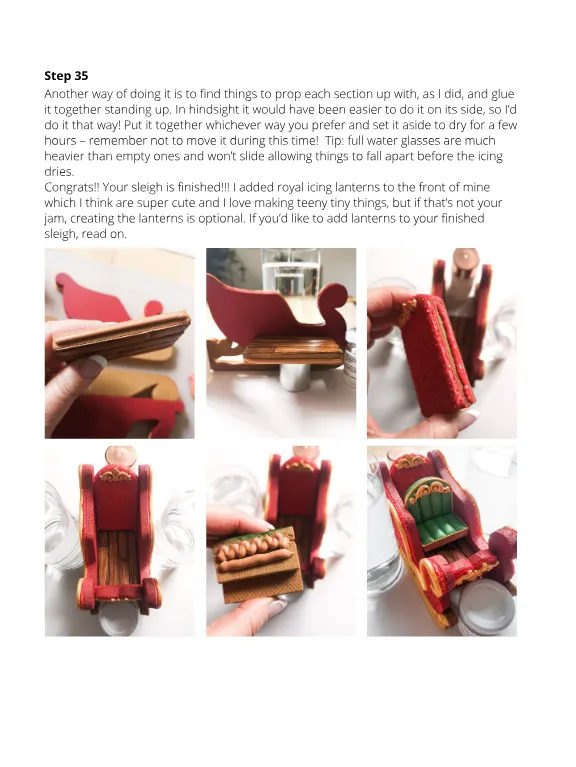
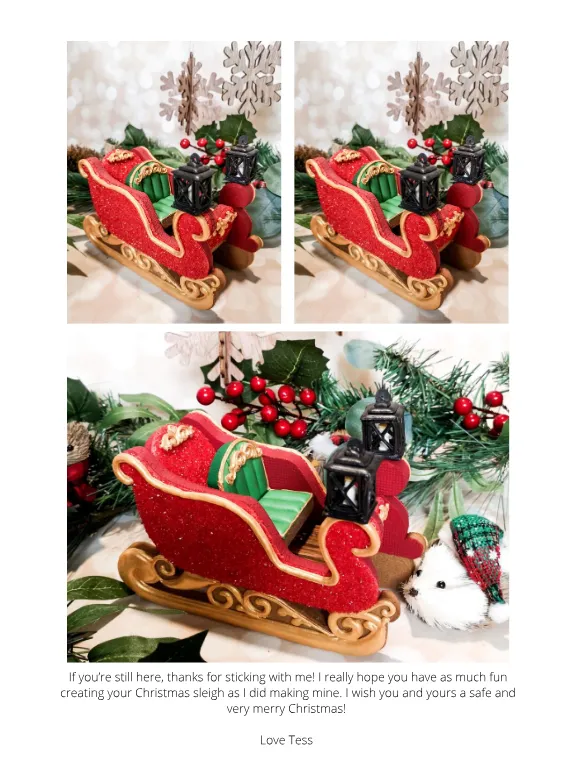
Step 35 Another way of doing it is to find things to prop each section up with , as I did , and glue it together standing up . In hindsight it would have been easier to do it on its side , so I ’ d do it that way ! Put it together whichever way you prefer and set it aside to dry for a few hours – remember not to move it during this time ! Tip : full water glasses are much heavier than empty ones and won ’ t slide allowing things to fall apart before the icing dries . Congrats !! Your sleigh is finished !!! I added royal icing lanterns to the front of mine which I think are super cute and I love making teeny tiny things , but if that ’ s not your jam , creating the lanterns is optional . If you ’ d like to add lanterns to your finished sleigh , read on .




Page 21 text
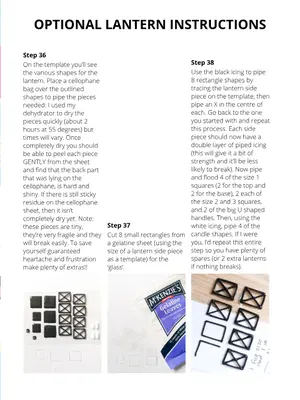
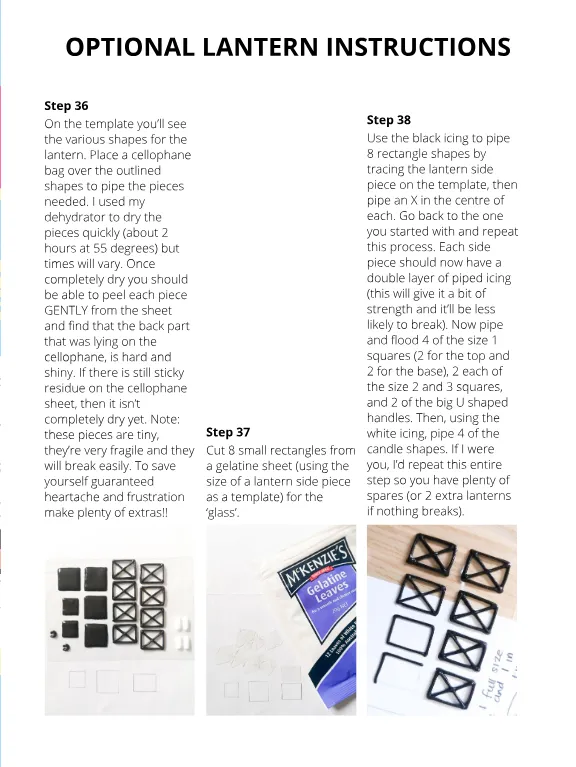
OPTIONAL LANTERN INSTRUCTIONS Step 36 On the template you ’ ll see the various shapes for the lantern . Place a cellophane bag over the outlined shapes to pipe the pieces needed . I used my dehydrator to dry the pieces quickly ( about 2 hours at 55 degrees ) but times will vary . Once completely dry you should be able to peel each piece GENTLY from the sheet and find that the back part that was lying on the cellophane , is hard and shiny . If there is still sticky residue on the cellophane sheet , then it isn ’ t completely dry yet . Note : these pieces are tiny , they ’ re very fragile and they will break easily . To save yourself guaranteed heartache and frustration make plenty of extras !! Step 37 Cut 8 small rectangles from a gelatine sheet ( using the size of a lantern side piece as a template ) for the ‘ glass ’. Step 38 Use the black icing to pipe 8 rectangle shapes by tracing the lantern side piece on the template , then pipe an X in the centre of each . Go back to the one you started with and repeat this process . Each side piece should now have a double layer of piped icing ( this will give it a bit of strength and it ’ ll be less likely to break ). Now pipe and flood 4 of the size 1 squares ( 2 for the top and 2 for the base ), 2 each of the size 2 and 3 squares , and 2 of the big U shaped handles . Then , using the white icing , pipe 4 of the candle shapes . If I were you , I ’ d repeat this entire step so you have plenty of spares ( or 2 extra lanterns if nothing breaks ).
Page 22 text
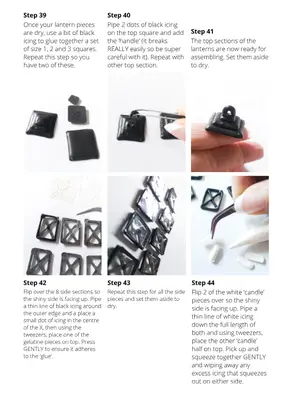
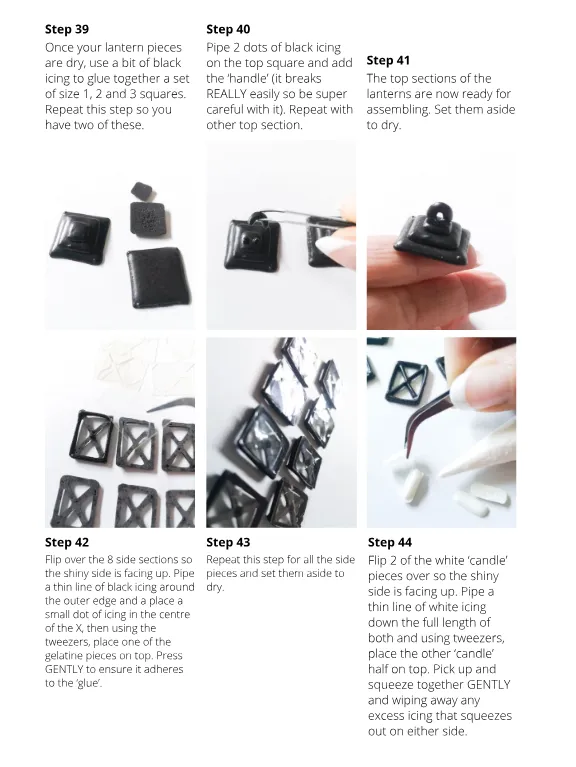
Step 39 Once your lantern pieces are dry , use a bit of black icing to glue together a set of size 1 , 2 and 3 squares . Repeat this step so you have two of these . Step 40 Pipe 2 dots of black icing on the top square and add the ‘ handle ’ ( it breaks REALLY easily so be super careful with it ). Repeat with other top section . Step 41 The top sections of the lanterns are now ready for assembling . Set them aside to dry . Step 42 Flip over the 8 side sections so the shiny side is facing up . Pipe a thin line of black icing around the outer edge and a place a small dot of icing in the centre of the X , then using the tweezers , place one of the gelatine pieces on top . Press GENTLY to ensure it adheres to the ‘ glue ’. Step 43 Repeat this step for all the side pieces and set them aside to dry . Step 44 Flip 2 of the white ‘ candle ’ pieces over so the shiny side is facing up . Pipe a thin line of white icing down the full length of both and using tweezers , place the other ‘ candle ’ half on top . Pick up and squeeze together GENTLY and wiping away any excess icing that squeezes out on either side .
Page 23 text
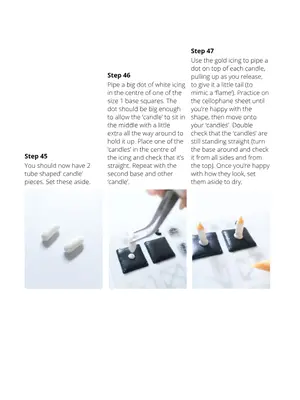
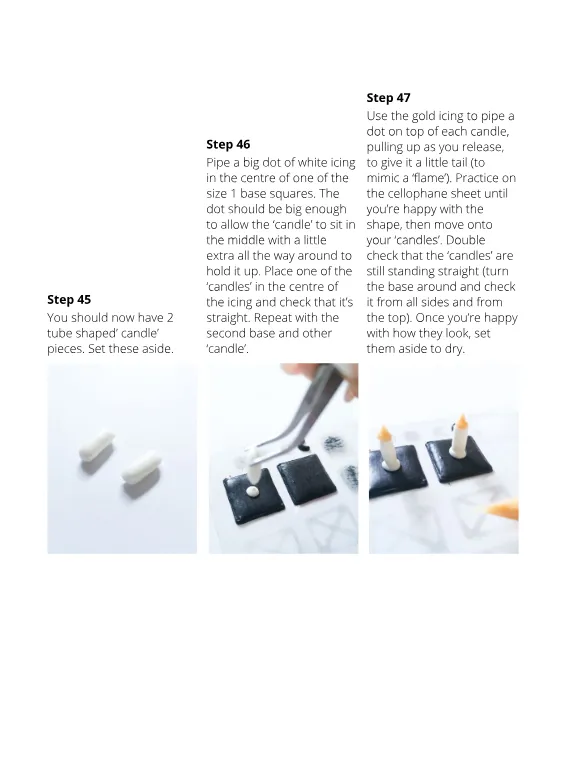
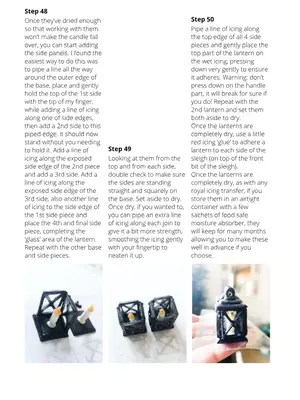
Step 45 You should now have 2 tube shaped ’ candle ’ pieces . Set these aside . Step 46 Pipe a big dot of white icing in the centre of one of the size 1 base squares . The dot should be big enough to allow the ‘ candle ’ to sit in the middle with a little extra all the way around to hold it up . Place one of the ‘ candles ’ in the centre of the icing and check that it ’ s straight . Repeat with the second base and other ‘ candle ’. Step 47 Use the gold icing to pipe a dot on top of each candle , pulling up as you release , to give it a little tail ( to mimic a ‘ flame ’). Practice on the cellophane sheet until you ’ re happy with the shape , then move onto your ‘ candles ’. Double check that the ‘ candles ’ are still standing straight ( turn the base around and check it from all sides and from the top ). Once you ’ re happy with how they look , set them aside to dry .
Page 24 text
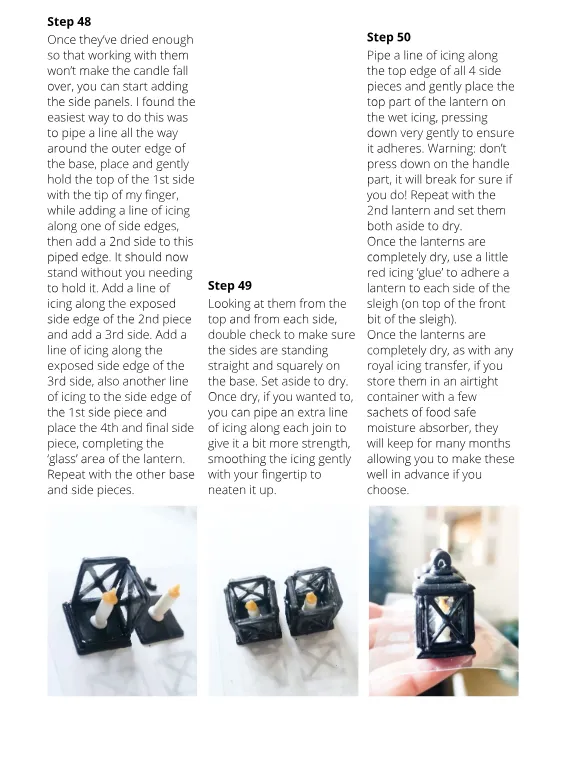
Step 48 Once they ’ ve dried enough so that working with them won ’ t make the candle fall over , you can start adding the side panels . I found the easiest way to do this was to pipe a line all the way around the outer edge of the base , place and gently hold the top of the 1st side with the tip of my finger , while adding a line of icing along one of side edges , then add a 2nd side to this piped edge . It should now stand without you needing to hold it . Add a line of icing along the exposed side edge of the 2nd piece and add a 3rd side . Add a line of icing along the exposed side edge of the 3rd side , also another line of icing to the side edge of the 1st side piece and place the 4th and final side piece , completing the ‘ glass ’ area of the lantern . Repeat with the other base and side pieces . Step 49 Looking at them from the top and from each side , double check to make sure the sides are standing straight and squarely on the base . Set aside to dry . Once dry , if you wanted to , you can pipe an extra line of icing along each join to give it a bit more strength , smoothing the icing gently with your fingertip to neaten it up . Step 50 Pipe a line of icing along the top edge of all 4 side pieces and gently place the top part of the lantern on the wet icing , pressing down very gently to ensure it adheres . Warning : don ’ t press down on the handle part , it will break for sure if you do ! Repeat with the 2nd lantern and set them both aside to dry . Once the lanterns are completely dry , use a little red icing ‘ glue ’ to adhere a lantern to each side of the sleigh ( on top of the front bit of the sleigh ). Once the lanterns are completely dry , as with any royal icing transfer , if you store them in an airtight container with a few sachets of food safe moisture absorber , they will keep for many months allowing you to make these well in advance if you choose .
Page 25 text
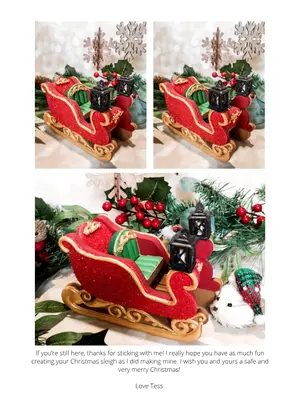
If you ’ re still here , thanks for sticking with me ! I really hope you have as much fun creating your Christmas sleigh as I did making mine . I wish you and yours a safe and very merry Christmas ! Love Tess


Page 27 text
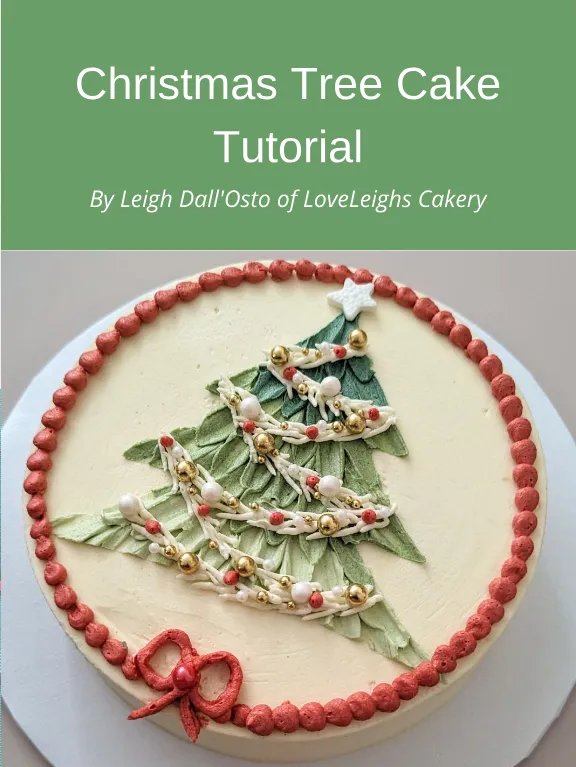
Christmas Tree Cake Tutorial By Leigh Dall ' Osto of LoveLeighs Cakery
Page 28 text
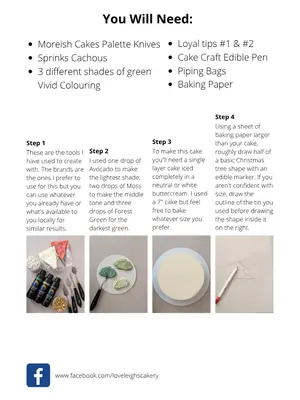
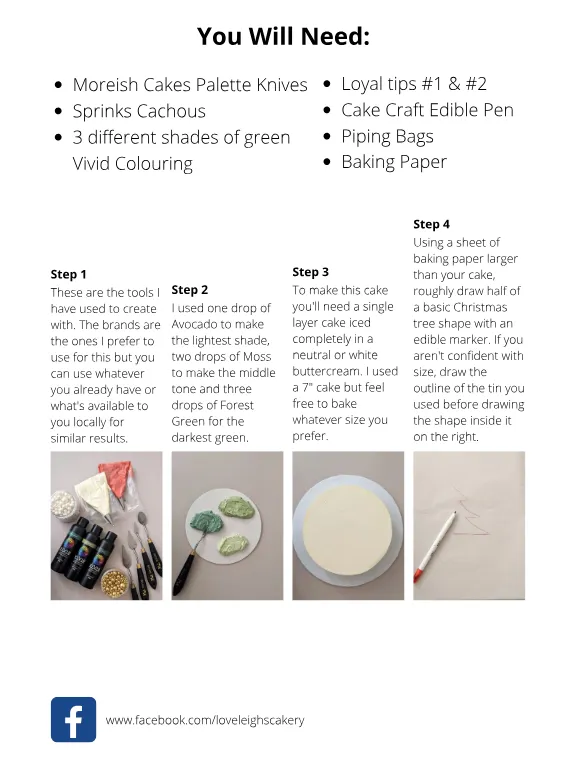
Moreish Cakes Palette Knives Sprinks Cachous 3 different shades of green Vivid Colouring Loyal tips # 1 & # 2 Cake Craft Edible Pen Piping Bags Baking Paper You Will Need : Moreish Cakes Palette Knives Sprinks Cachous 3 different shades of green Vivid Colouring Loyal tips # 1 & # 2 Cake Craft Edible Pen Piping Bags Baking Paper Step 4 Step 1 These are the tools I have used to create with . The brands are the ones I prefer to use for this but you can use whatever you already have or what ' s available to you locally for similar results . Step 2 I used one drop of Avocado to make the lightest shade , two drops of Moss to make the middle tone and three drops of Forest Green for the darkest green . Step 3 To make this cake you ' ll need a single layer cake iced completely in a neutral or white buttercream . I used a 7 " cake but feel free to bake whatever size you prefer . Using a sheet of baking paper larger than your cake , roughly draw half of a basic Christmas tree shape with an edible marker . If you aren ' t confident with size , draw the outline of the tin you used before drawing the shape inside it on the right . www . facebook . com / loveleighscakery
Page 29 text
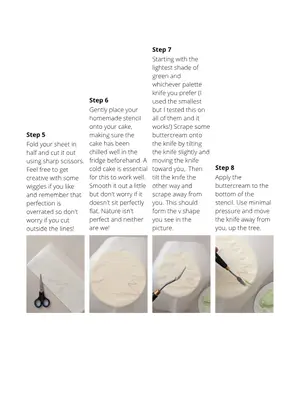
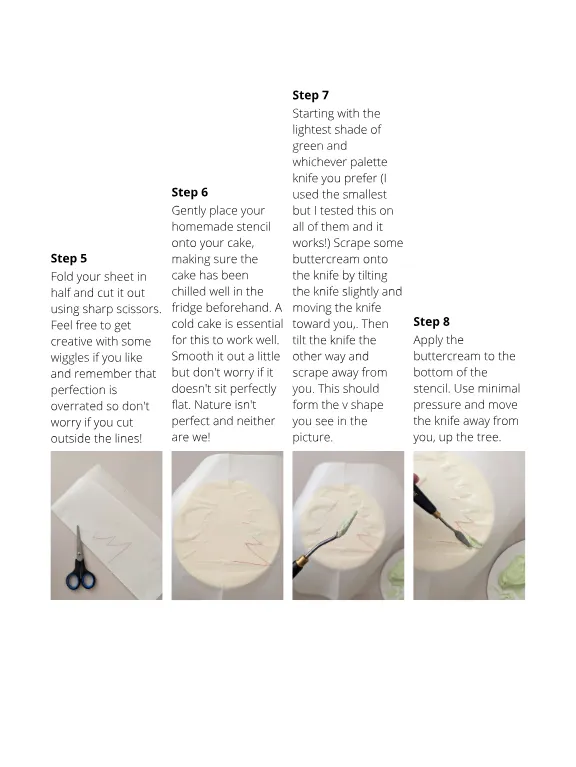
Step 7 Step 5 Fold your sheet in half and cut it out using sharp scissors . Feel free to get creative with some wiggles if you like and remember that perfection is overrated so don ' t worry if you cut outside the lines ! Step 6 Gently place your homemade stencil onto your cake , making sure the cake has been chilled well in the fridge beforehand . A cold cake is essential for this to work well . Smooth it out a little but don ' t worry if it doesn ' t sit perfectly flat . Nature isn ' t perfect and neither are we ! Starting with the lightest shade of green and whichever palette knife you prefer ( I used the smallest but I tested this on all of them and it works !) Scrape some buttercream onto the knife by tilting the knife slightly and moving the knife toward you ,. Then tilt the knife the other way and scrape away from you . This should form the v shape you see in the picture . Step 8 Apply the buttercream to the bottom of the stencil . Use minimal pressure and move the knife away from you , up the tree .


Page 31 text
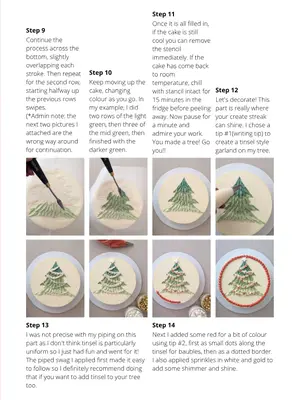
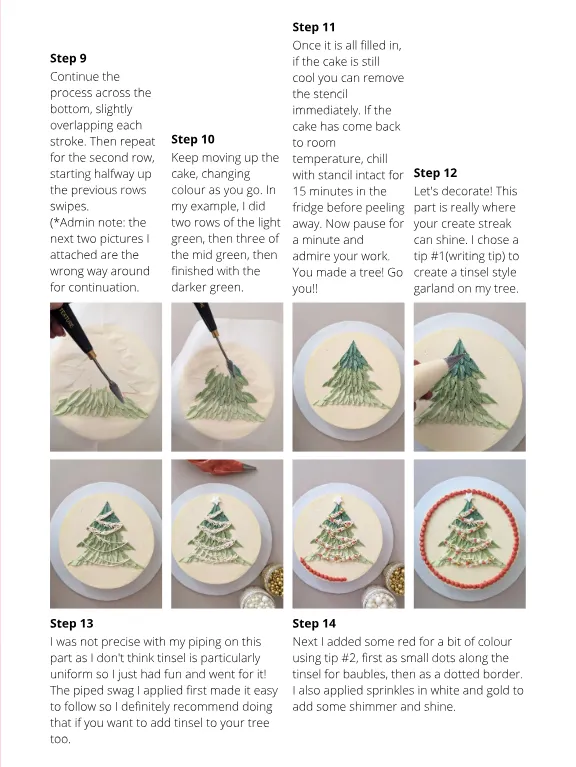
Step 11 Step 9 Continue the process across the bottom , slightly overlapping each stroke . Then repeat for the second row , starting halfway up the previous rows swipes . (* Admin note : the next two pictures I attached are the wrong way around for continuation . Step 10 Keep moving up the cake , changing colour as you go . In my example , I did two rows of the light green , then three of the mid green , then finished with the darker green . Once it is all filled in , if the cake is still cool you can remove the stencil immediately . If the cake has come back to room temperature , chill with stancil intact for 15 minutes in the fridge before peeling away . Now pause for a minute and admire your work . You made a tree ! Go you !! Step 12 Let ' s decorate ! This part is really where your create streak can shine . I chose a tip # 1 ( writing tip ) to create a tinsel style garland on my tree . Step 13 I was not precise with my piping on this part as I don ' t think tinsel is particularly uniform so I just had fun and went for it ! The piped swag I applied first made it easy to follow so I definitely recommend doing that if you want to add tinsel to your tree too . Step 14 Next I added some red for a bit of colour using tip # 2 , first as small dots along the tinsel for baubles , then as a dotted border . I also applied sprinkles in white and gold to add some shimmer and shine .
Page 32 text
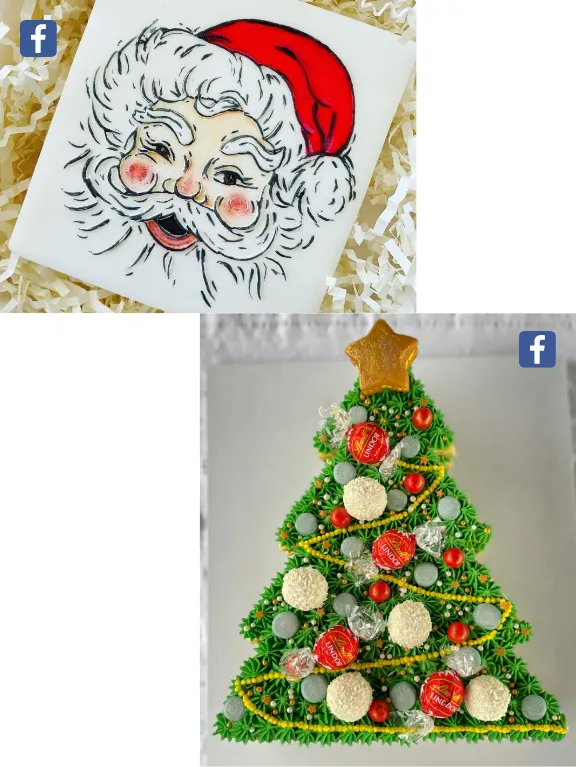
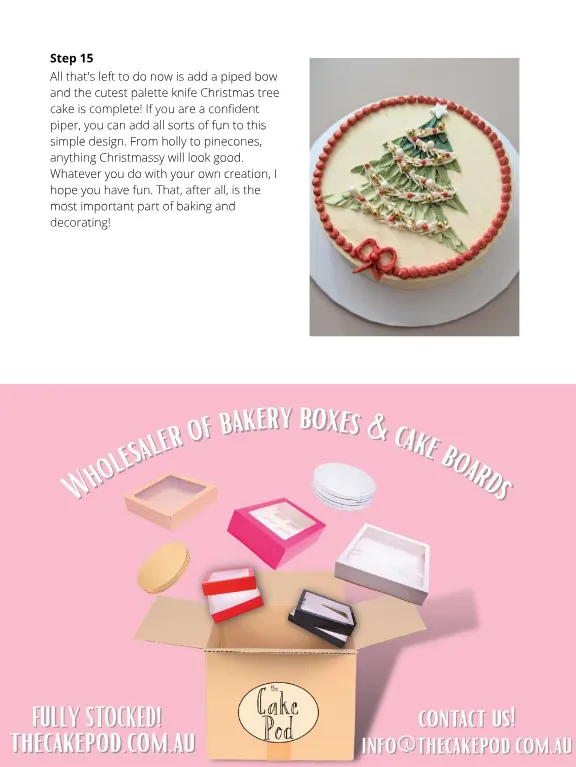
Step 15 All that ' s left to do now is add a piped bow and the cutest palette knife Christmas tree cake is complete ! If you are a confident piper , you can add all sorts of fun to this simple design . From holly to pinecones , anything Christmassy will look good . Whatever you do with your own creation , I hope you have fun . That , after all , is the most important part of baking and decorating !


Page 35 text
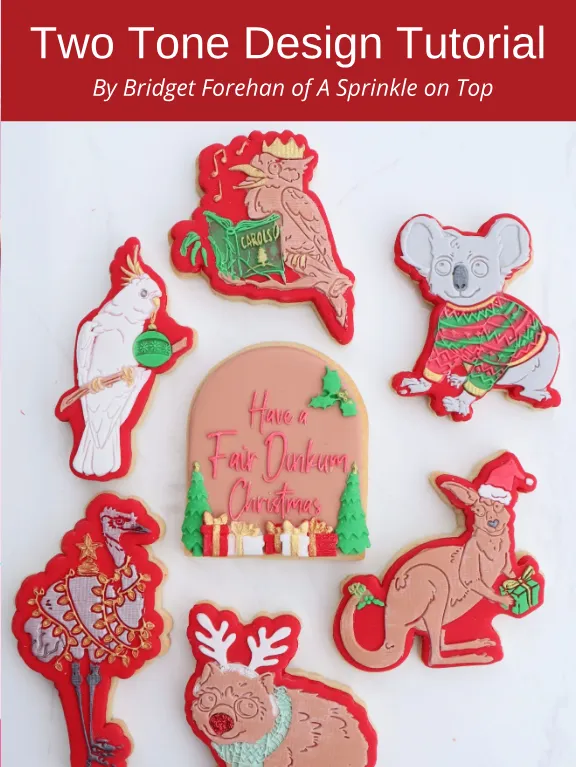
Two Tone Design Tutorial By Bridget Forehan of A Sprinkle on Top
Page 36 text
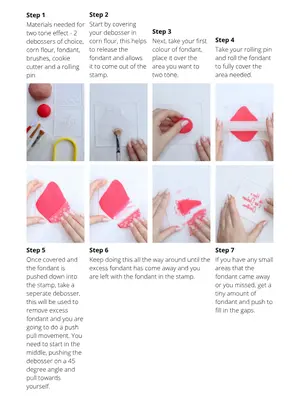
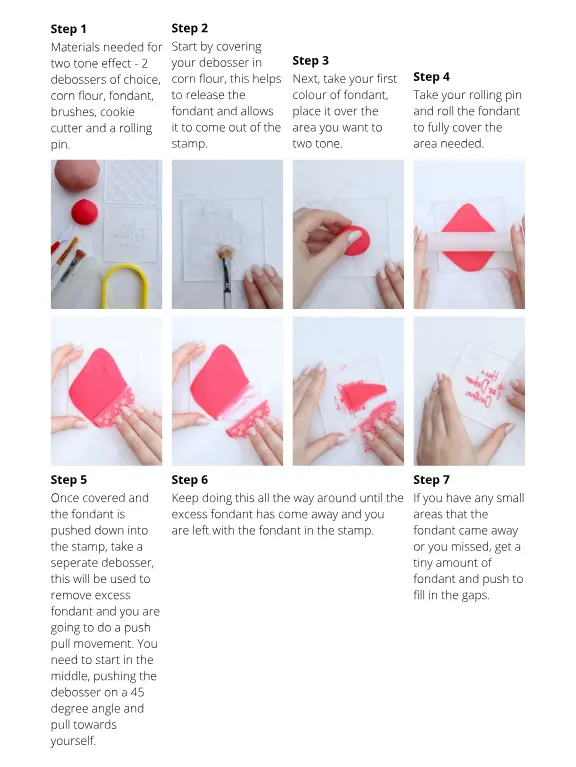
Step 1 Step 2 Materials needed for two tone effect - 2 debossers of choice , corn flour , fondant , brushes , cookie cutter and a rolling pin . Start by covering your debosser in corn flour , this helps to release the fondant and allows it to come out of the stamp . Step 3 Next , take your first colour of fondant , place it over the area you want to two tone . Step 4 Take your rolling pin and roll the fondant to fully cover the area needed . Step 5 Once covered and the fondant is pushed down into the stamp , take a seperate debosser , this will be used to remove excess fondant and you are going to do a push pull movement . You need to start in the middle , pushing the debosser on a 45 degree angle and pull towards yourself . Step 6 Keep doing this all the way around until the excess fondant has come away and you are left with the fondant in the stamp . Step 7 If you have any small areas that the fondant came away or you missed , get a tiny amount of fondant and push to fill in the gaps .
Page 37 text
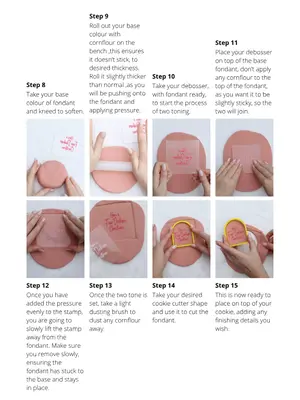
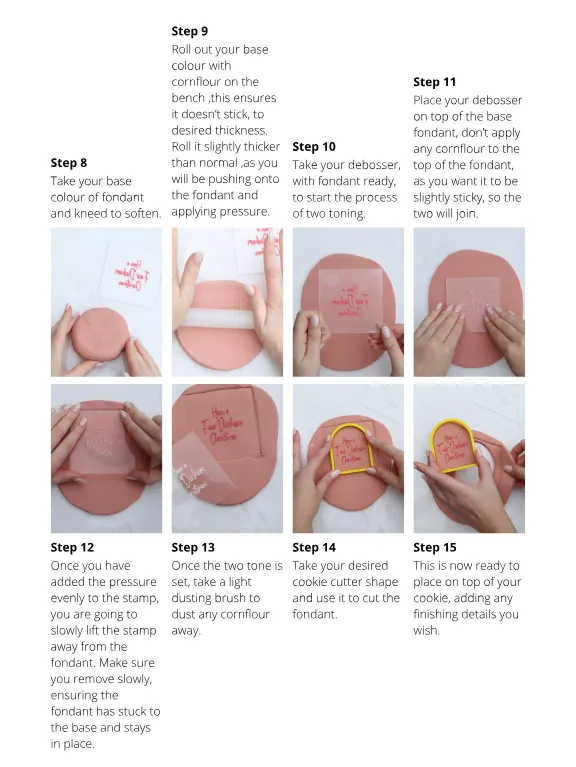
Step 9 Step 8 Take your base colour of fondant and kneed to soften . Roll out your base colour with cornflour on the bench , this ensures it doesn ’ t stick , to desired thickness . Roll it slightly thicker than normal , as you will be pushing onto the fondant and applying pressure . Step 10 Take your debosser , with fondant ready , to start the process of two toning . Step 11 Place your debosser on top of the base fondant , don ’ t apply any cornflour to the top of the fondant , as you want it to be slightly sticky , so the two will join . Step 12 Step 13 Step 14 Step 15 Once you have added the pressure evenly to the stamp , you are going to slowly lift the stamp away from the fondant . Make sure you remove slowly , ensuring the fondant has stuck to the base and stays in place . Once the two tone is set , take a light dusting brush to dust any cornflour away . Take your desired cookie cutter shape and use it to cut the fondant . This is now ready to place on top of your cookie , adding any finishing details you wish .
Page 38 text
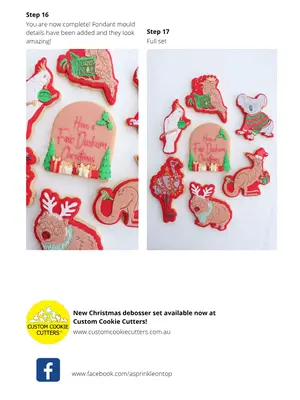
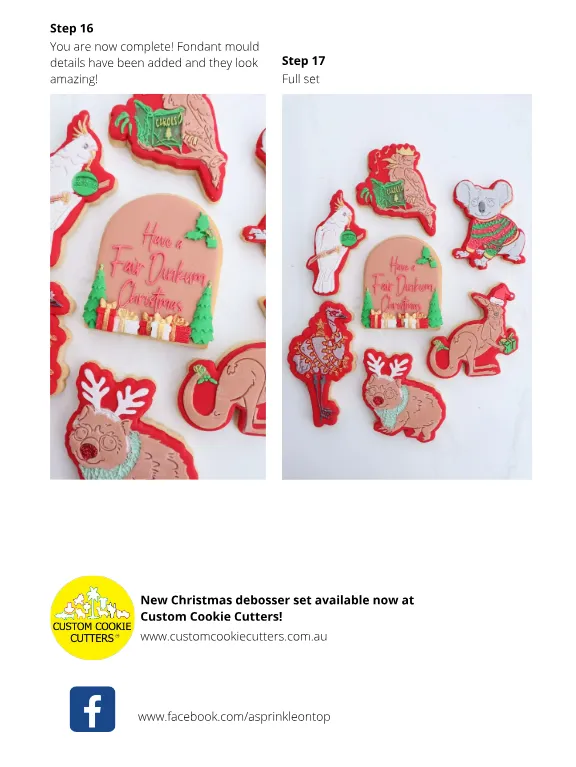
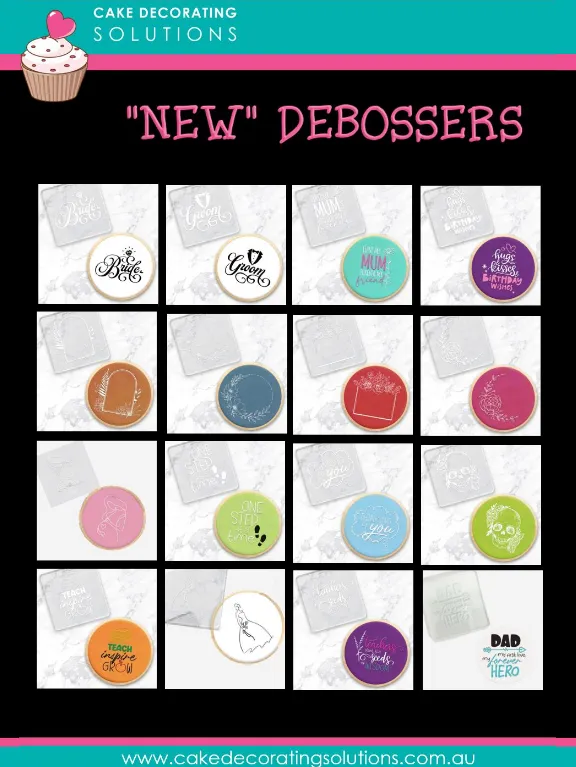
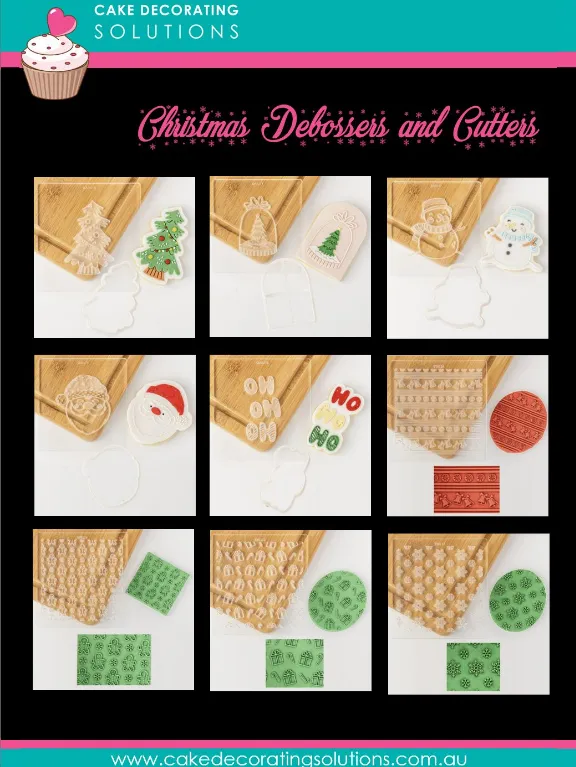
Step 16 You are now complete ! Fondant mould details have been added and they look amazing ! Step 17 Full set New Christmas debosser set available now at Custom Cookie Cutters ! www . customcookiecutters . com . au www . facebook . com / asprinkleontop






Page 44 text
Now live ! Cake ! TV PREMIUM TUTORIALS FROM DECORATORS AROUND THE WORLD caketv . online




Page 46 text
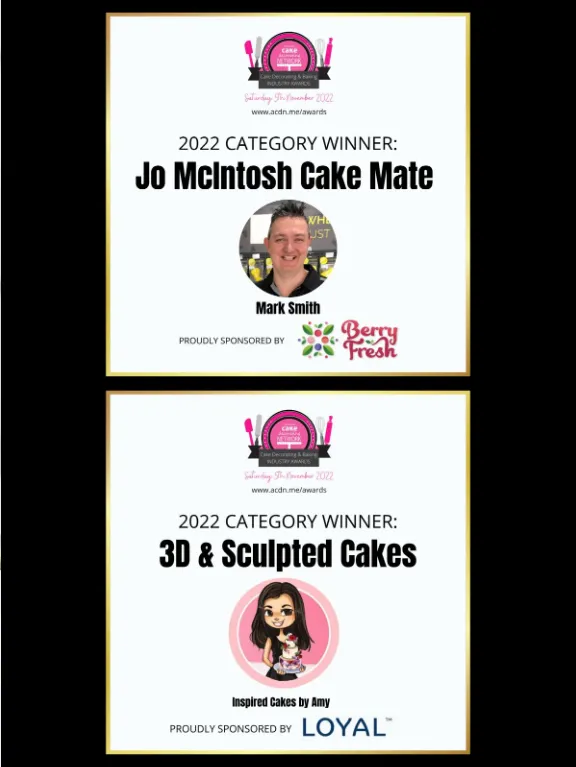
2022 ACDN 10th birthday Awards Night celebration Wrap Up MELBOURNE 5TH NOVEMBER 2022 We had an amazing time at the Cake Decorating & Baking Industry Awards night held on the 5th November in Melbourne . It was great to be able to hold the event again in person after 2 years of having it online . Congratulations again to all of the award winners and a big thank you to our Event Partners ! SAVE THE DATE ! We are looking forward to next years awards night on Saturday the 23rd of September 2023 in Sydney !
















Page 57 text
ACDN 10th Birthday Awards Night Celebration AND THE WINNERS ARE ... MELBOURNE 5TH NOVEMBER 2022 www . acdn . me / awards






























Page 75 text
An interview with Rikki Clay Founder of Sweet Sheets

Page 76 text
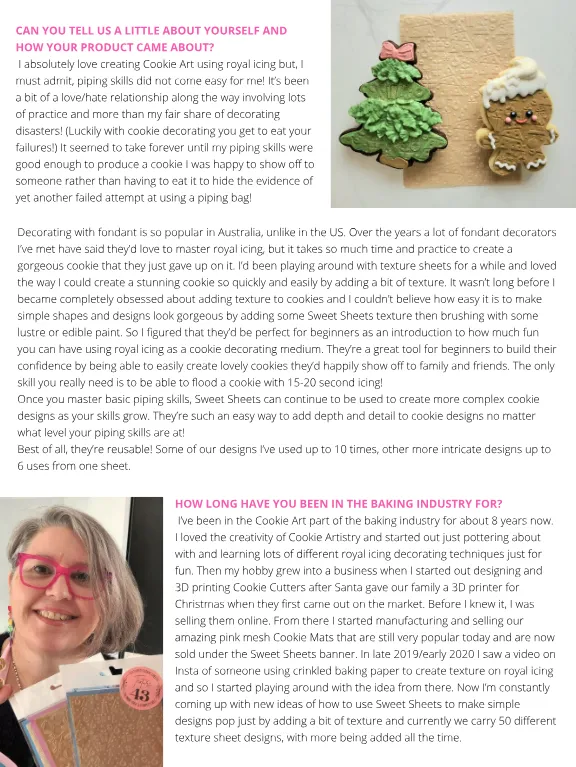
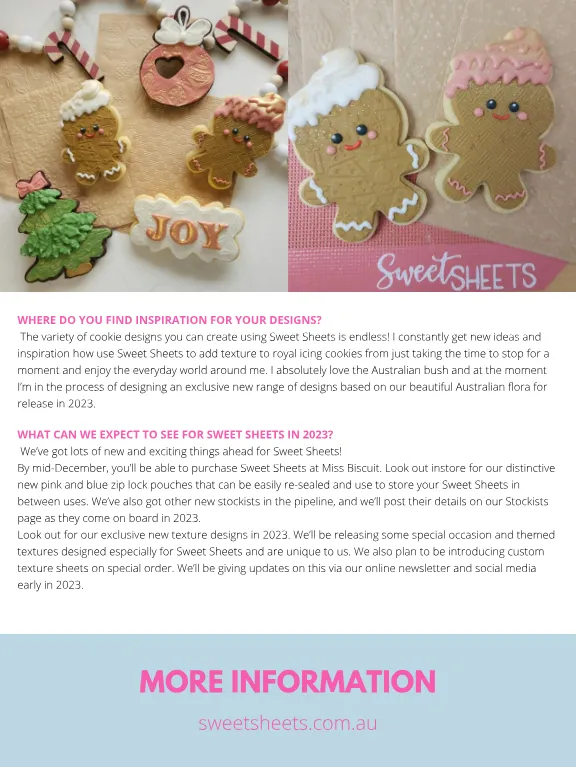
CAN YOU TELL US A LITTLE ABOUT YOURSELF AND HOW YOUR PRODUCT CAME ABOUT ? I absolutely love creating Cookie Art using royal icing but , I must admit , piping skills did not come easy for me ! It ’ s been a bit of a love / hate relationship along the way involving lots of practice and more than my fair share of decorating disasters ! ( Luckily with cookie decorating you get to eat your failures !) It seemed to take forever until my piping skills were good enough to produce a cookie I was happy to show off to someone rather than having to eat it to hide the evidence of yet another failed attempt at using a piping bag ! Decorating with fondant is so popular in Australia , unlike in the US . Over the years a lot of fondant decorators I ’ ve met have said they ’ d love to master royal icing , but it takes so much time and practice to create a gorgeous cookie that they just gave up on it . I ’ d been playing around with texture sheets for a while and loved the way I could create a stunning cookie so quickly and easily by adding a bit of texture . It wasn ’ t long before I became completely obsessed about adding texture to cookies and I couldn ’ t believe how easy it is to make simple shapes and designs look gorgeous by adding some Sweet Sheets texture then brushing with some lustre or edible paint . So I figured that they ’ d be perfect for beginners as an introduction to how much fun you can have using royal icing as a cookie decorating medium . They ’ re a great tool for beginners to build their confidence by being able to easily create lovely cookies they ’ d happily show off to family and friends . The only skill you really need is to be able to flood a cookie with 15-20 second icing ! Once you master basic piping skills , Sweet Sheets can continue to be used to create more complex cookie designs as your skills grow . They ’ re such an easy way to add depth and detail to cookie designs no matter what level your piping skills are at ! Best of all , they ’ re reusable ! Some of our designs I ’ ve used up to 10 times , other more intricate designs up to 6 uses from one sheet . HOW LONG HAVE YOU BEEN IN THE BAKING INDUSTRY FOR ? I ’ ve been in the Cookie Art part of the baking industry for about 8 years now . I loved the creativity of Cookie Artistry and started out just pottering about with and learning lots of different royal icing decorating techniques just for fun . Then my hobby grew into a business when I started out designing and 3D printing Cookie Cutters after Santa gave our family a 3D printer for Christmas when they first came out on the market . Before I knew it , I was selling them online . From there I started manufacturing and selling our amazing pink mesh Cookie Mats that are still very popular today and are now sold under the Sweet Sheets banner . In late 2019 / early 2020 I saw a video on Insta of someone using crinkled baking paper to create texture on royal icing and so I started playing around with the idea from there . Now I ’ m constantly coming up with new ideas of how to use Sweet Sheets to make simple designs pop just by adding a bit of texture and currently we carry 50 different texture sheet designs , with more being added all the time .
Page 77 text
OUTSIDE OF RUNNING YOUR BUSINESS , WHAT ARE YOUR FAVOURITE THINGS TO DO ? I ’ ve recently become a Nanna so right now my number one favourite thing to do on my days off is cuddle my gorgeous little granddaughter ! Though I will admit to holding her in one arm and packing orders with the other occasionally when on babysitting duty ! WHAT RESULTS ARE DECORATORS ABLE TO GET USING YOUR PRODUCTS ? If you follow our Tips and Tricks to getting the best out of Sweet Sheets you can expect to end up with a beautifully textured cookie that will have friends and family thinking you spent hours piping intricate details when all you really did was some simple flooding , lay down the sheets and then wait for it to dry ! Being able to create a lovely cookie with just basic piping skills will help build your confidence and inspire you to keep on practising your piping . CAN YOU SHARE 3 TOP TIPS ON HOW TO USE YOUR PRODUCTS ? The number one secret to getting the best result with Sweet Sheets is “ consistency ”. Your icing really needs to be at that perfect point where it ’ s not too stiff and not too runny . The ideal point is somewhere between 15- 20 seconds . This means if you were to cut a line through your icing in the bowl with a knife , that it would take 15-20 seconds for the icing to heal over and the line to disappear . My sweet spot is at about 16-17 seconds . If your icing is too wet you ’ ll have lots of problems with bubbles . And whilst I love bubbles in my bathtub , I really don ’ t like them in my icing ! Before you lay down your Sweet Sheet pop or rub out any bubbles in your flooded icing with your scribe tool otherwise those pesky bubbles will leave little craters on your cookie . If this happens don ’ t despair , you can fill those little holes with a small dob of icing brushed over with a slightly damp brush to blend it in . Or you can leave it be if you like the rustic edge it adds to your cookie . The second little secret is being sure to lay your Sweet Sheet carefully . I like to apply it from the right and use a rolling motion towards the left as it lay it down . A bit like when you cover a book with contact . As you ’ re laying it down give it a light brush over with a dry paint or sugar craft brush . This helps the Sweet Sheet bond with the icing and smooths out any bubbles that may be forming underneath the texture sheet . There ’ s a “ How To ” clip on the Tips ‘ n Tricks page of our website that shows how to lay your sheet and use the drybrush technique for better results and less bubbles . The last tip is to make sure the icing is fully dry before you try and remove the Sweet Sheet . If you try to remove it too soon , you ’ ll pull away large chunks of your still damp icing from the Cookie and nobody wants that ! Pop your cookie in a dehydrator on the lowest temperature setting for 10 minutes or so just to get your icing starting to set . As a general rule I like to leave it sitting for 12 hours before it is completely dry and the Sweet Sheet is ready to peel . Start by peeling your Sweet Sheet away slowly from the nearest edge , if the texture sheet comes away freely then you ’ re good to go . It you notice small grains and blobs of icing sticking to the sheet then it ’ s not ready to be removed so you ’ ll have to wait a little longer .
Page 78 text
WHERE DO YOU FIND INSPIRATION FOR YOUR DESIGNS ? The variety of cookie designs you can create using Sweet Sheets is endless ! I constantly get new ideas and inspiration how use Sweet Sheets to add texture to royal icing cookies from just taking the time to stop for a moment and enjoy the everyday world around me . I absolutely love the Australian bush and at the moment I ’ m in the process of designing an exclusive new range of designs based on our beautiful Australian flora for release in 2023 . WHAT CAN WE EXPECT TO SEE FOR SWEET SHEETS IN 2023 ? We ’ ve got lots of new and exciting things ahead for Sweet Sheets ! By mid-December , you ’ ll be able to purchase Sweet Sheets at Miss Biscuit . Look out instore for our distinctive new pink and blue zip lock pouches that can be easily re-sealed and use to store your Sweet Sheets in between uses . We ’ ve also got other new stockists in the pipeline , and we ’ ll post their details on our Stockists page as they come on board in 2023 . Look out for our exclusive new texture designs in 2023 . We ’ ll be releasing some special occasion and themed textures designed especially for Sweet Sheets and are unique to us . We also plan to be introducing custom texture sheets on special order . We ’ ll be giving updates on this via our online newsletter and social media early in 2023 . MORE INFORMATION sweetsheets . com . au