Page 29 of 89
Page 1 text
Cake ! Cake ! MAGAZINE
Page 2 text
PUBLISHER : Cake ! Magazine is published by the Australian Cake Decorating Network Pty Ltd . ACN : 91 164 927 584 . © All content copyright 2022 Australian Cake Decorating Network Pty Ltd . All rights reserved . Reproduction any part of the magazine without written permission is prohibited . All prices included in Cake ! Magazine are approximate and are in AUD unless otherwise stated . Prices quoted are correct at the time of publishing and may vary or be subject to change . The Australian Cake Decorating Network Pty Ltd accepts no responsibility for damage or loss as a result of material submitted for , published in or as a result of this publication . The Australian Cake Decorating Network does not have an affiliation with any other magazine . The views and opinions expressed within this publication are not necessarily the views of the publisher or it ' s affiliates . While every effort has been made to ensure the accuracy of the information contained within Cake ! Magazine the publisher and Cake ! Magazine hold no responsibility for any errors , omissions , or consequences subsequent or otherwise , including loss or damage arising from reliance on information in this publication . Content is supplied for publication in Cake ! Magazine by parties external to the Australian Cake Decorating Network and it is the external party ' s responsibility to ensure content and credits are accurate . Cake ! Magazine contains advertising through individual arrangements , which may include paid affiliate arrangements . Cake ! Magazine may also contain affiliate links . The agreements are held between the advertiser or affiliate and the Australian Cake Decorating Network Ptd Ltd . To advertise in Cake ! magazine , contact : liz @ acdn . me
Page 3 text
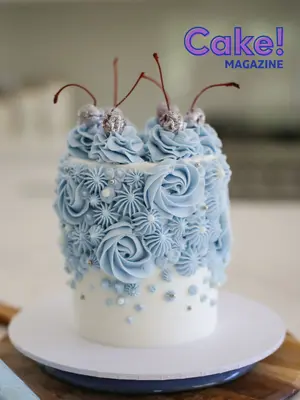
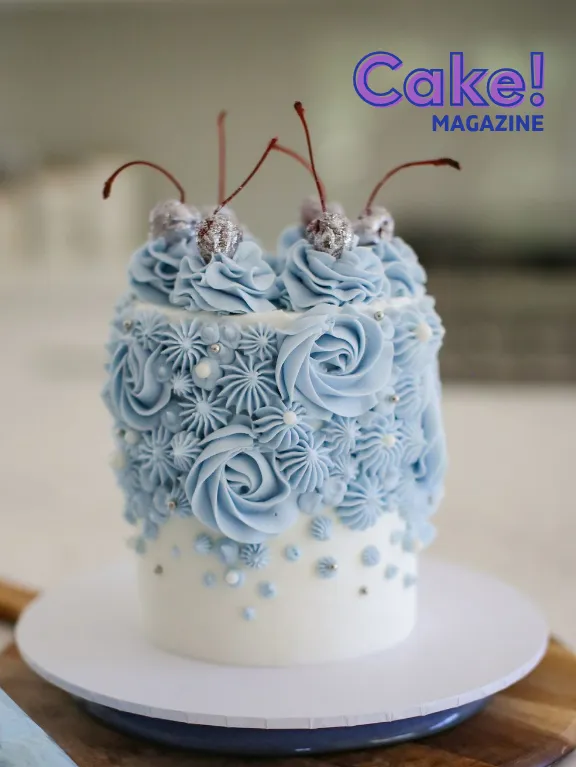
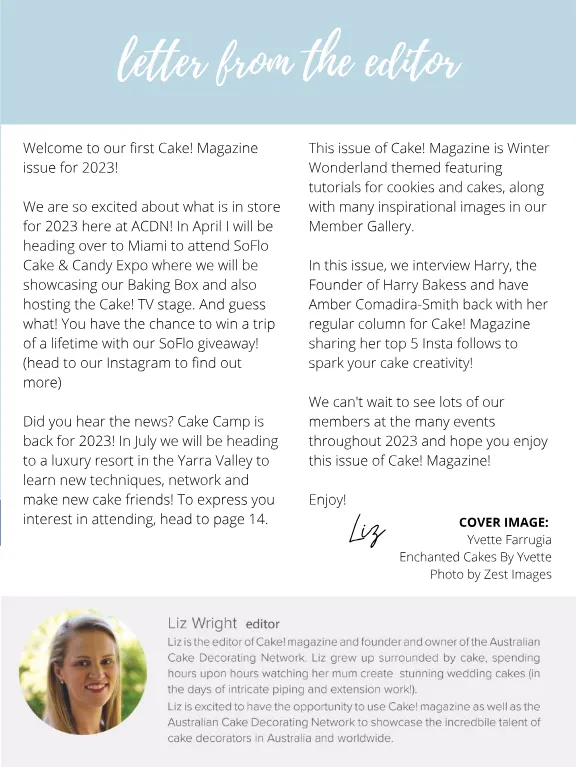
letter from the editor Welcome to our first Cake ! Magazine issue for 2023 ! We are so excited about what is in store for 2023 here at ACDN ! In April I will be heading over to Miami to attend SoFlo Cake & Candy Expo where we will be showcasing our Baking Box and also hosting the Cake ! TV stage . And guess what ! You have the chance to win a trip of a lifetime with our SoFlo giveaway ! ( head to our Instagram to find out more ) Did you hear the news ? Cake Camp is back for 2023 ! In July we will be heading to a luxury resort in the Yarra Valley to learn new techniques , network and make new cake friends ! To express you interest in attending , head to page 14 . This issue of Cake ! Magazine is Winter Wonderland themed featuring tutorials for cookies and cakes , along with many inspirational images in our Member Gallery . In this issue , we interview Harry , the Founder of Harry Bakess and have Amber Comadira-Smith back with her regular column for Cake ! Magazine sharing her top 5 Insta follows to spark your cake creativity ! We can ' t wait to see lots of our members at the many events throughout 2023 and hope you enjoy this issue of Cake ! Magazine ! Enjoy ! Liz COVER IMAGE : Yvette Farrugia Enchanted Cakes By Yvette Photo by Zest Images
Page 4 text
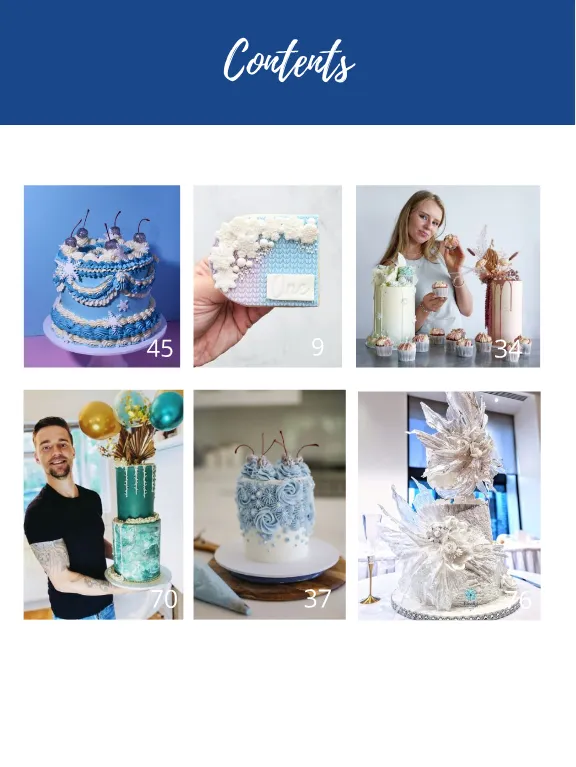
Contents 45 9 34 70 37 76
Page 5 text
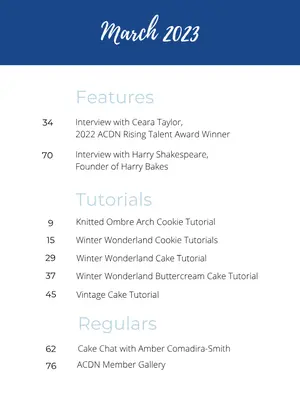
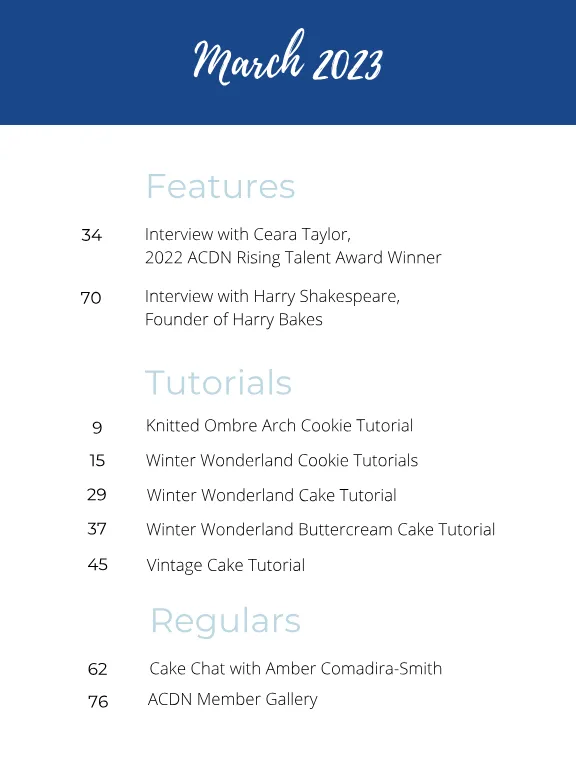
March 2023 Features 34 Interview with Ceara Taylor , 2022 ACDN Rising Talent Award Winner 70 Interview with Harry Shakespeare , Founder of Harry Bakes Tutorials 9 15 29 37 45 Knitted Ombre Arch Cookie Tutorial Winter Wonderland Cookie Tutorials Winter Wonderland Cake Tutorial Winter Wonderland Buttercream Cake Tutorial Vintage Cake Tutorial Regulars 62 76 Cake Chat with Amber Comadira-Smith ACDN Member Gallery




Page 7 text
Winter Wonderland Tutorials


Page 9 text
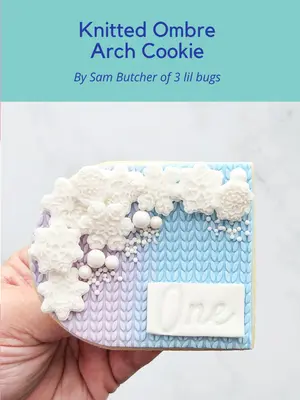
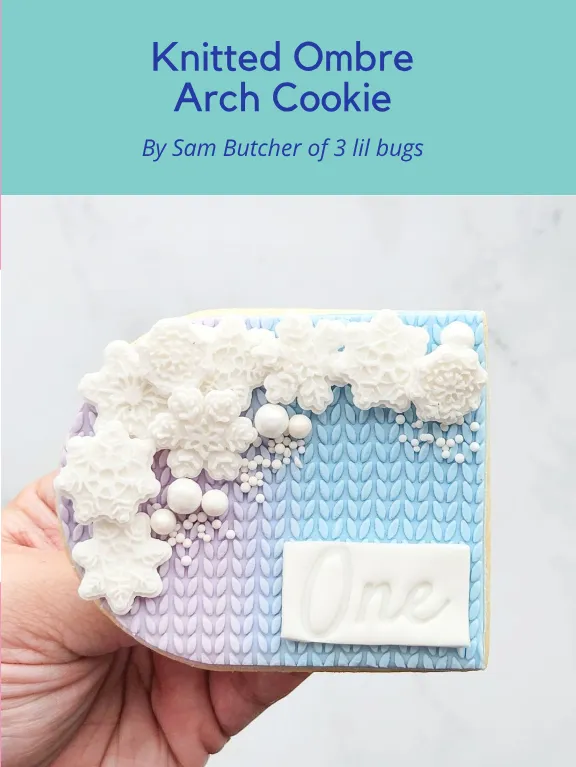
Knitted Ombre Arch Cookie By Sam Butcher of 3 lil bugs
Page 10 text
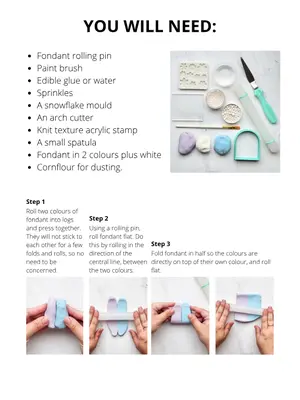
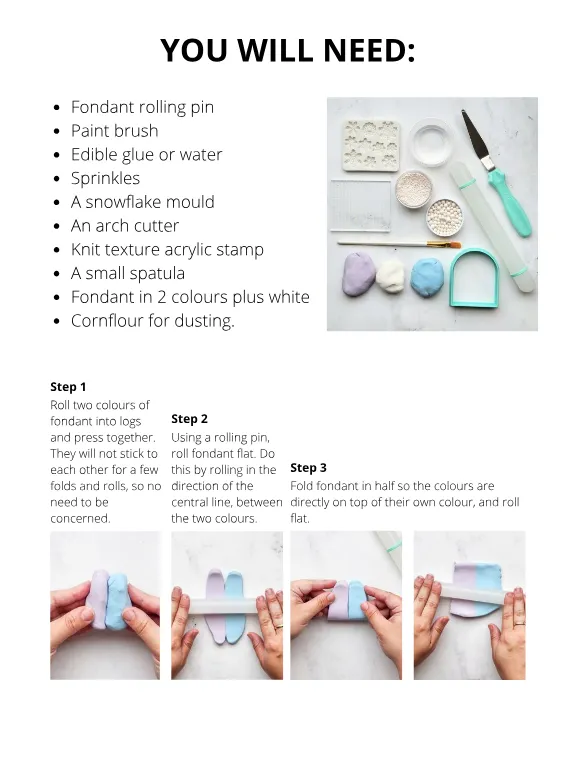
Fondant rolling pin Paint brush Edible glue or water Sprinkles A snowflake mould An arch cutter Knit texture acrylic stamp A small spatula Fondant in 2 colours plus white Cornflour for dusting . YOU WILL NEED : Fondant rolling pin Paint brush Edible glue or water Sprinkles A snowflake mould An arch cutter Knit texture acrylic stamp A small spatula Fondant in 2 colours plus white Cornflour for dusting . Step 1 Roll two colours of fondant into logs and press together . They will not stick to each other for a few folds and rolls , so no need to be concerned . Step 2 Using a rolling pin , roll fondant flat . Do this by rolling in the direction of the central line , between the two colours . Step 3 Fold fondant in half so the colours are directly on top of their own colour , and roll flat .
Page 11 text
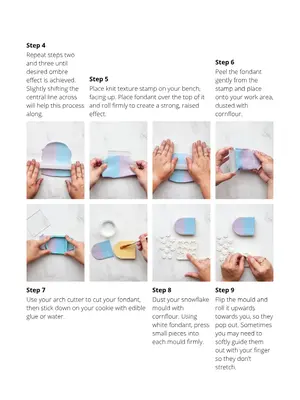
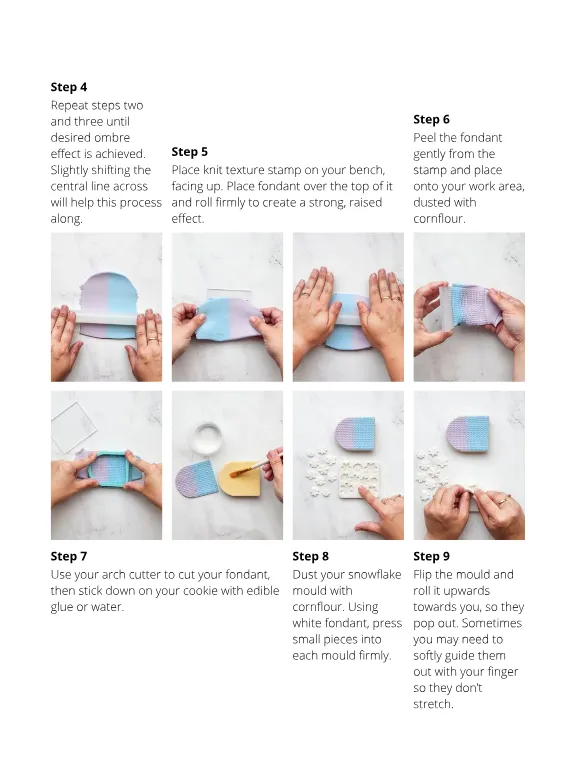
Step 4 Repeat steps two and three until desired ombre effect is achieved . Slightly shifting the central line across will help this process along . Step 5 Place knit texture stamp on your bench , facing up . Place fondant over the top of it and roll firmly to create a strong , raised effect . Step 6 Peel the fondant gently from the stamp and place onto your work area , dusted with cornflour . Step 7 Step 8 Step 9 Use your arch cutter to cut your fondant , then stick down on your cookie with edible glue or water . Dust your snowflake mould with cornflour . Using white fondant , press small pieces into each mould firmly . Flip the mould and roll it upwards towards you , so they pop out . Sometimes you may need to softly guide them out with your finger so they don ’ t stretch .
Page 12 text
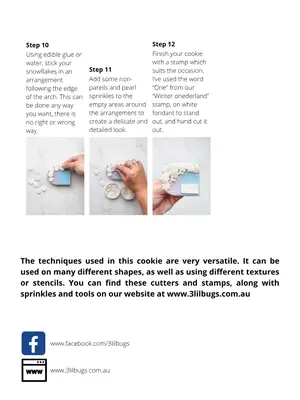
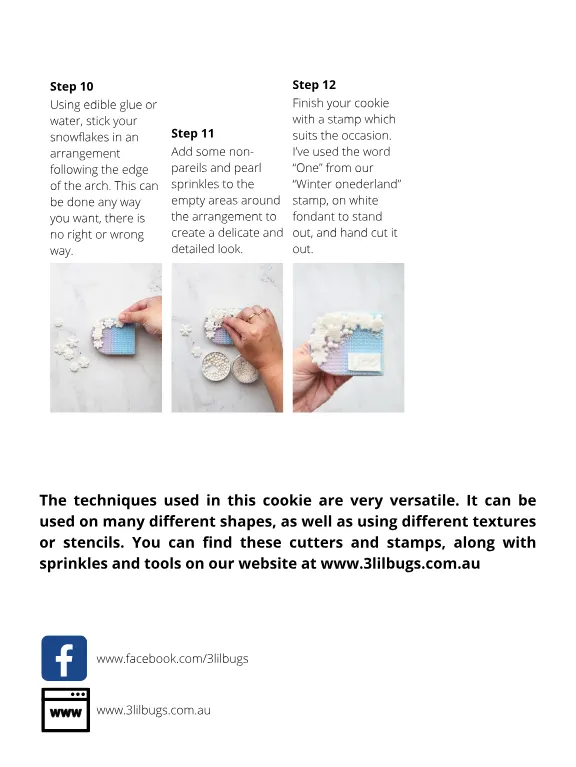
Step 10 Using edible glue or water , stick your snowflakes in an arrangement following the edge of the arch . This can be done any way you want , there is no right or wrong way . Step 11 Add some nonpareils and pearl sprinkles to the empty areas around the arrangement to create a delicate and detailed look . Step 12 Finish your cookie with a stamp which suits the occasion . I ’ ve used the word “ One ” from our “ Winter onederland ” stamp , on white fondant to stand out , and hand cut it out . The techniques used in this cookie are very versatile . It can be used on many different shapes , as well as using different textures or stencils . You can find these cutters and stamps , along with sprinkles and tools on our website at www . 3lilbugs . com . au www . facebook . com / 3lilbugs www . 3lilbugs . com . au
Page 14 text
CAKE C MP S A V E T H E D A T E ! 2 8 T H - 3 0 T H J U L Y 2 0 2 3 Y A R R A V A L L E Y , V I C C L I C K H E R E T O F I N D O U T M O R E

Page 15 text
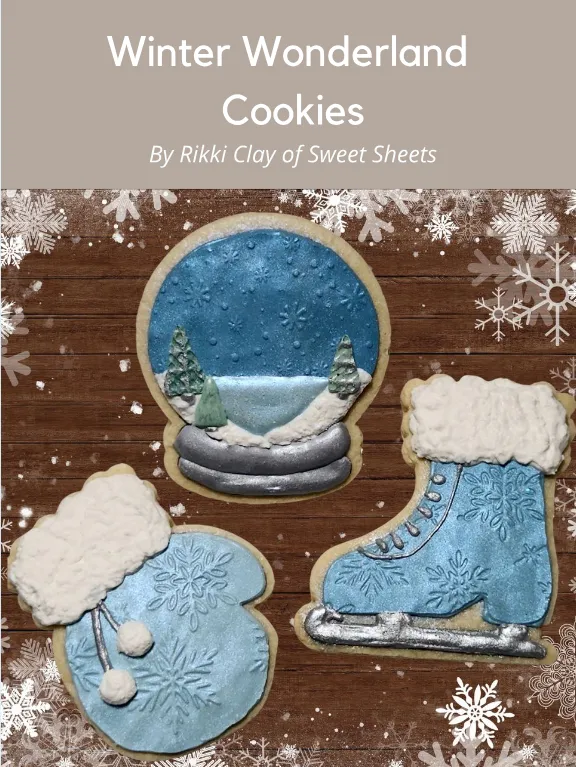
Winter Wonderland Cookies By Rikki Clay of Sweet Sheets
Page 16 text
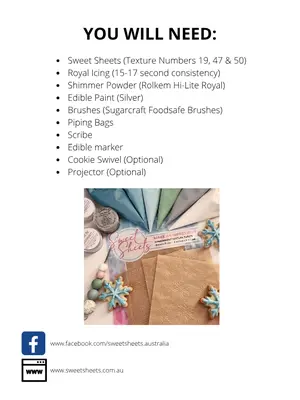
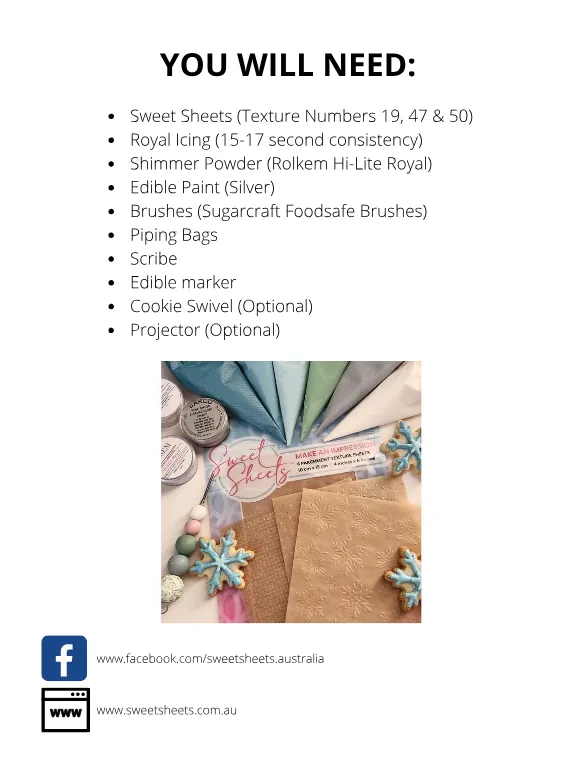
Sweet Sheets ( Texture Numbers 19 , 47 & 50 ) Royal Icing ( 15-17 second consistency ) Shimmer Powder ( Rolkem Hi-Lite Royal ) Edible Paint ( Silver ) Brushes ( Sugarcraft Foodsafe Brushes ) Piping Bags Scribe Edible marker Cookie Swivel ( Optional ) Projector ( Optional ) YOU WILL NEED : Sweet Sheets ( Texture Numbers 19 , 47 & 50 ) Royal Icing ( 15-17 second consistency ) Shimmer Powder ( Rolkem Hi-Lite Royal ) Edible Paint ( Silver ) Brushes ( Sugarcraft Foodsafe Brushes ) Piping Bags Scribe Edible marker Cookie Swivel ( Optional ) Projector ( Optional ) www . facebook . com / sweetsheets . australia www . sweetsheets . com . au
Page 17 text
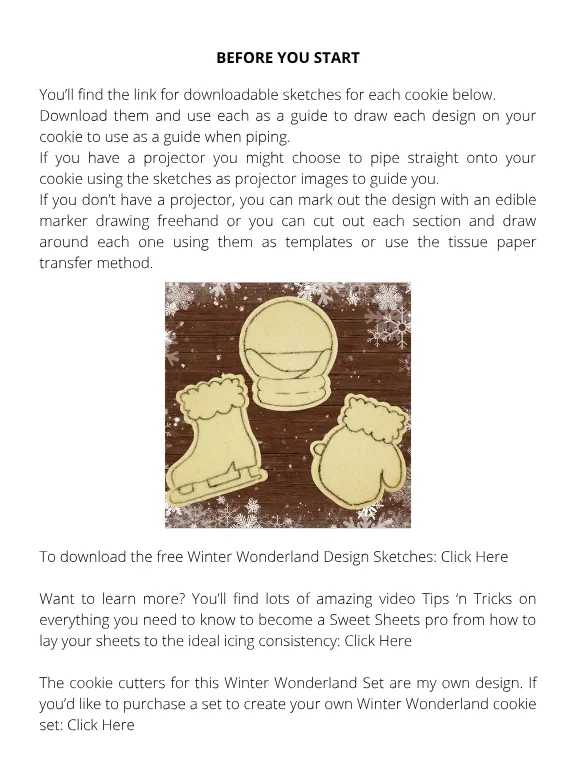
BEFORE YOU START You ’ ll find the link for downloadable sketches for each cookie below . Download them and use each as a guide to draw each design on your cookie to use as a guide when piping . If you have a projector you might choose to pipe straight onto your cookie using the sketches as projector images to guide you . If you don ’ t have a projector , you can mark out the design with an edible marker drawing freehand or you can cut out each section and draw around each one using them as templates or use the tissue paper transfer method . To download the free Winter Wonderland Design Sketches : Click Here Want to learn more ? You ’ ll find lots of amazing video Tips ‘ n Tricks on everything you need to know to become a Sweet Sheets pro from how to lay your sheets to the ideal icing consistency : Click Here The cookie cutters for this Winter Wonderland Set are my own design . If you ’ d like to purchase a set to create your own Winter Wonderland cookie set : Click Here
Page 18 text
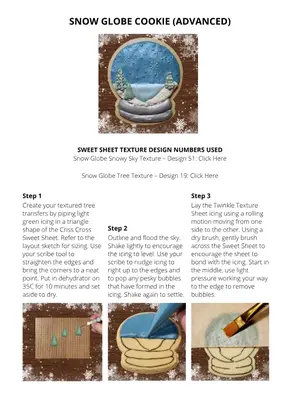
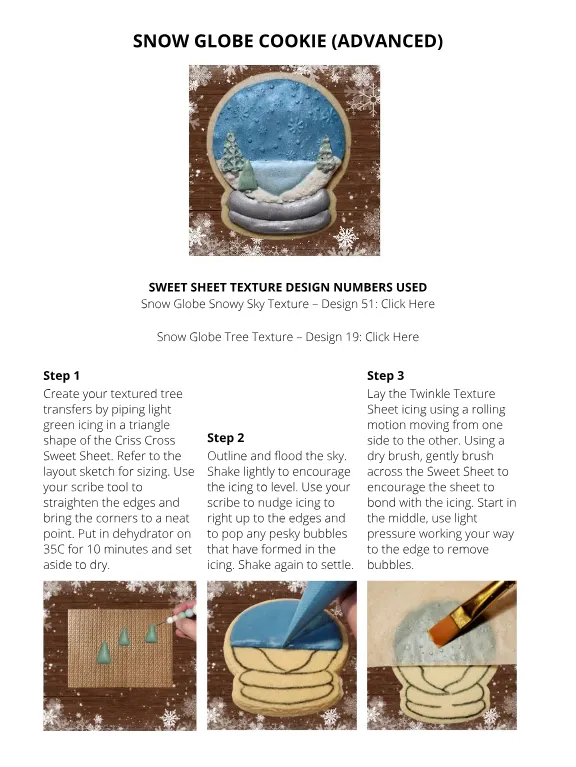
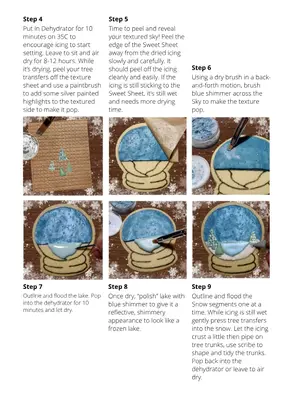
SNOW GLOBE COOKIE ( ADVANCED ) SNOW GLOBE COOKIE ( ADVANCED ) SWEET SHEET TEXTURE DESIGN NUMBERS USED Snow Globe Snowy Sky Texture – Design 51 : Click Here Snow Globe Tree Texture – Design 19 : Click Here Step 1 Create your textured tree transfers by piping light green icing in a triangle shape of the Criss Cross Sweet Sheet . Refer to the layout sketch for sizing . Use your scribe tool to straighten the edges and bring the corners to a neat point . Put in dehydrator on 35C for 10 minutes and set aside to dry . Step 2 Outline and flood the sky . Shake lightly to encourage the icing to level . Use your scribe to nudge icing to right up to the edges and to pop any pesky bubbles that have formed in the icing . Shake again to settle . Step 3 Lay the Twinkle Texture Sheet icing using a rolling motion moving from one side to the other . Using a dry brush , gently brush across the Sweet Sheet to encourage the sheet to bond with the icing . Start in the middle , use light pressure working your way to the edge to remove bubbles .
Page 19 text
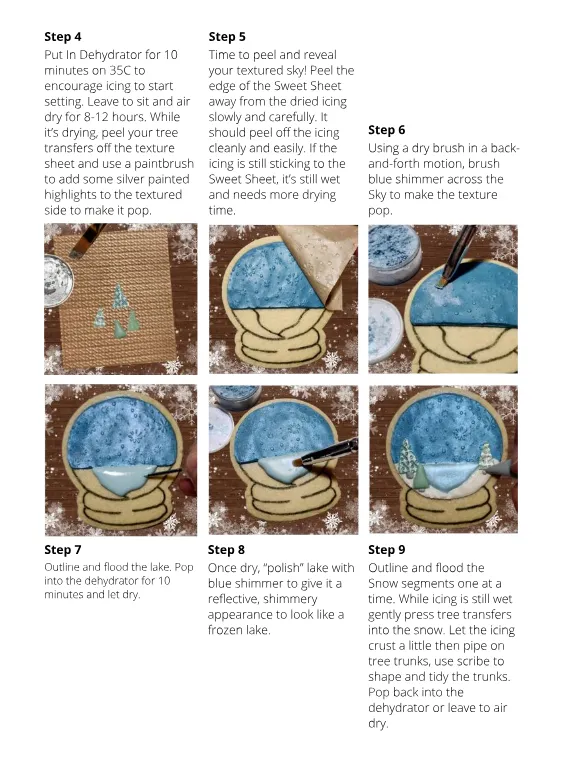
Step 4 Put In Dehydrator for 10 minutes on 35C to encourage icing to start setting . Leave to sit and air dry for 8-12 hours . While it ’ s drying , peel your tree transfers off the texture sheet and use a paintbrush to add some silver painted highlights to the textured side to make it pop . Step 5 Time to peel and reveal your textured sky ! Peel the edge of the Sweet Sheet away from the dried icing slowly and carefully . It should peel off the icing cleanly and easily . If the icing is still sticking to the Sweet Sheet , it ’ s still wet and needs more drying time . Step 6 Using a dry brush in a backand-forth motion , brush blue shimmer across the Sky to make the texture pop . Step 7 Outline and flood the lake . Pop into the dehydrator for 10 minutes and let dry . Step 8 Step 9 Once dry , “ polish ” lake with blue shimmer to give it a reflective , shimmery appearance to look like a frozen lake . Outline and flood the Snow segments one at a time . While icing is still wet gently press tree transfers into the snow . Let the icing crust a little then pipe on tree trunks , use scribe to shape and tidy the trunks . Pop back into the dehydrator or leave to air dry .
Page 20 text
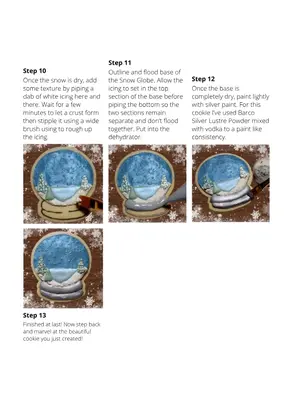
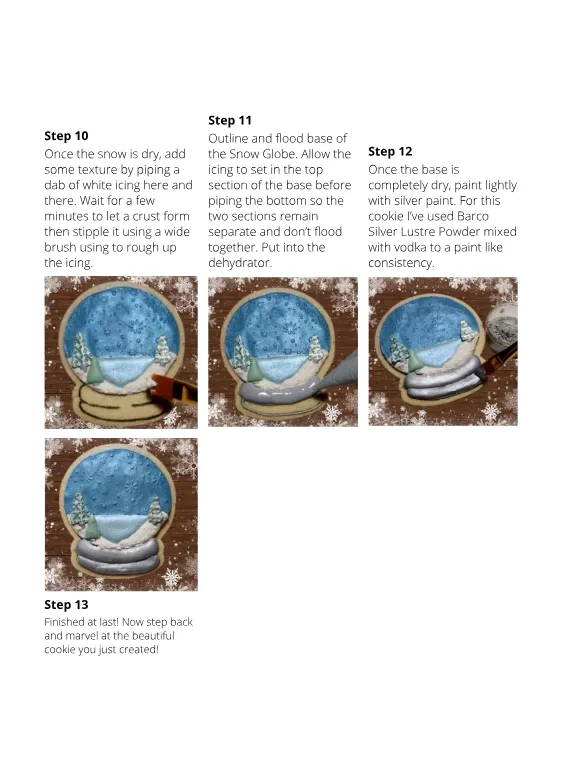
Step 10 Once the snow is dry , add some texture by piping a dab of white icing here and there . Wait for a few minutes to let a crust form then stipple it using a wide brush using to rough up the icing . Step 11 Outline and flood base of the Snow Globe . Allow the icing to set in the top section of the base before piping the bottom so the two sections remain separate and don ’ t flood together . Put into the dehydrator . Step 12 Once the base is completely dry , paint lightly with silver paint . For this cookie I ’ ve used Barco Silver Lustre Powder mixed with vodka to a paint like consistency . Step 13 Finished at last ! Now step back and marvel at the beautiful cookie you just created !
Page 22 text
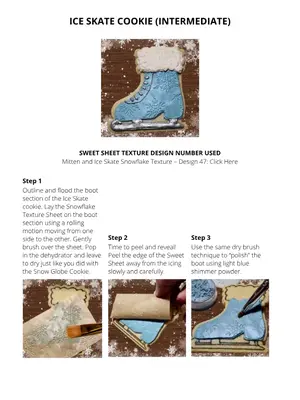
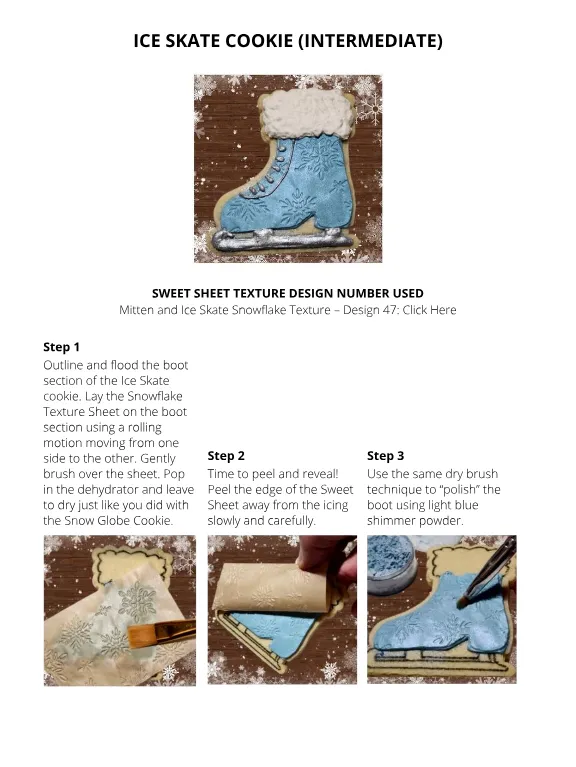
ICE SKATE COOKIE ( INTERMEDIATE ) ICE SKATE COOKIE ( INTERMEDIATE ) SWEET SHEET TEXTURE DESIGN NUMBER USED Mitten and Ice Skate Snowflake Texture – Design 47 : Click Here Step 1 Outline and flood the boot section of the Ice Skate cookie . Lay the Snowflake Texture Sheet on the boot section using a rolling motion moving from one side to the other . Gently brush over the sheet . Pop in the dehydrator and leave to dry just like you did with the Snow Globe Cookie . Step 2 Step 3 Time to peel and reveal ! Peel the edge of the Sweet Sheet away from the icing slowly and carefully . Use the same dry brush technique to “ polish ” the boot using light blue shimmer powder .
Page 23 text
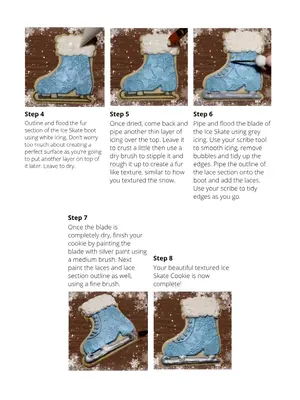
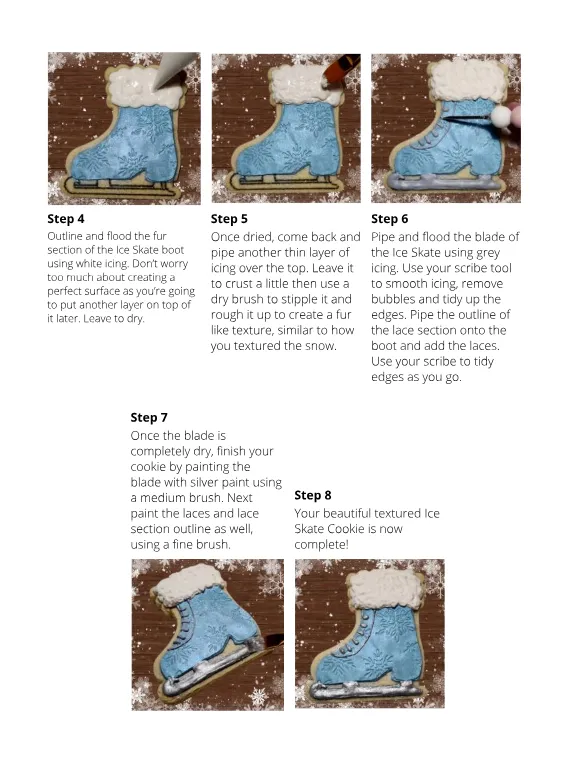
Step 4 Outline and flood the fur section of the Ice Skate boot using white icing . Don ’ t worry too much about creating a perfect surface as you ’ re going to put another layer on top of it later . Leave to dry . Step 5 Step 6 Once dried , come back and pipe another thin layer of icing over the top . Leave it to crust a little then use a dry brush to stipple it and rough it up to create a fur like texture , similar to how you textured the snow . Pipe and flood the blade of the Ice Skate using grey icing . Use your scribe tool to smooth icing , remove bubbles and tidy up the edges . Pipe the outline of the lace section onto the boot and add the laces . Use your scribe to tidy edges as you go . Step 7 Once the blade is completely dry , finish your cookie by painting the blade with silver paint using a medium brush . Next paint the laces and lace section outline as well , using a fine brush . Step 8 Your beautiful textured Ice Skate Cookie is now complete !
Page 24 text
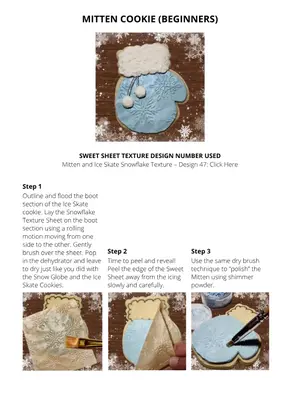
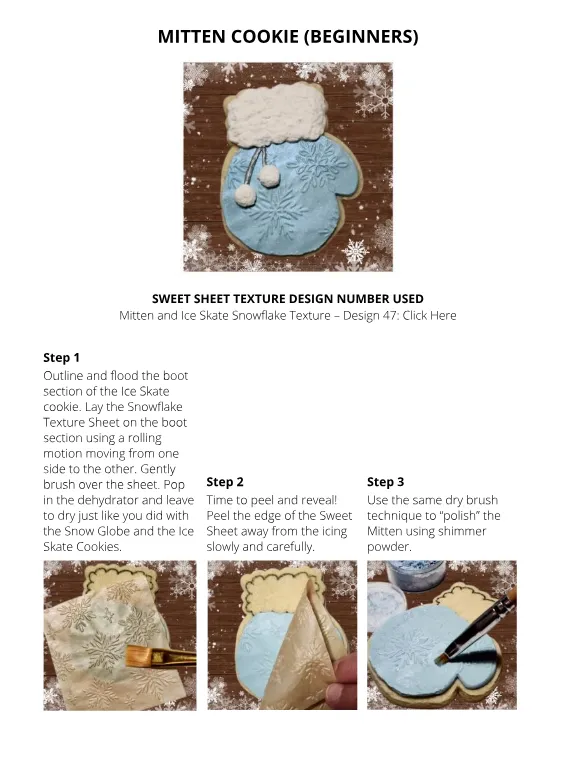
MITTEN COOKIE ( BEGINNERS ) MITTEN COOKIE ( BEGINNERS ) SWEET SHEET TEXTURE DESIGN NUMBER USED Mitten and Ice Skate Snowflake Texture – Design 47 : Click Here Step 1 Outline and flood the boot section of the Ice Skate cookie . Lay the Snowflake Texture Sheet on the boot section using a rolling motion moving from one side to the other . Gently brush over the sheet . Pop in the dehydrator and leave to dry just like you did with the Snow Globe and the Ice Skate Cookies . Step 2 Step 3 Time to peel and reveal ! Peel the edge of the Sweet Sheet away from the icing slowly and carefully . Use the same dry brush technique to “ polish ” the Mitten using shimmer powder .
Page 25 text
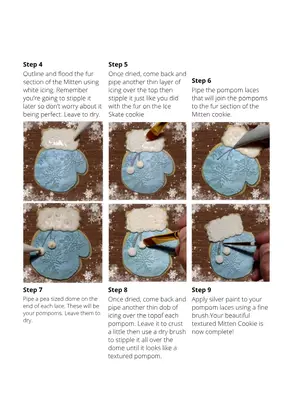
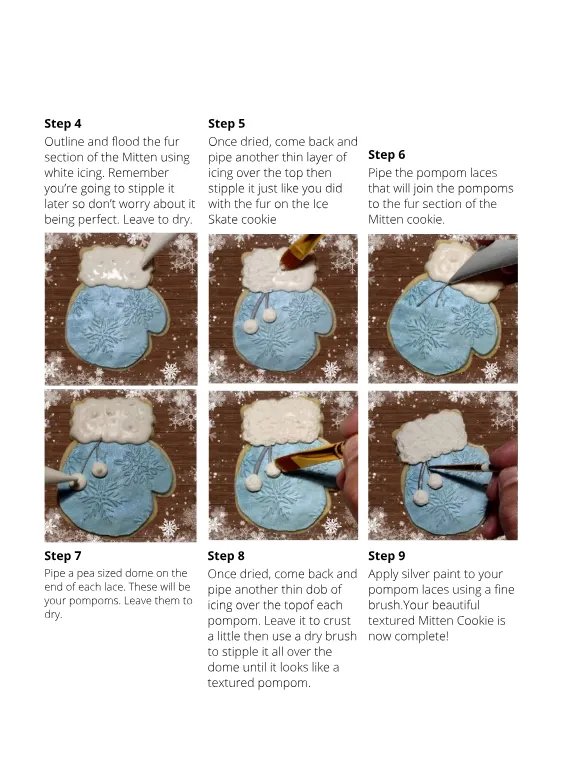
Step 4 Step 5 Outline and flood the fur section of the Mitten using white icing . Remember you ’ re going to stipple it later so don ’ t worry about it being perfect . Leave to dry . Once dried , come back and pipe another thin layer of icing over the top then stipple it just like you did with the fur on the Ice Skate cookie Step 6 Pipe the pompom laces that will join the pompoms to the fur section of the Mitten cookie . Step 7 Pipe a pea sized dome on the end of each lace . These will be your pompoms . Leave them to dry . Step 8 Step 9 Once dried , come back and pipe another thin dob of icing over the topof each pompom . Leave it to crust a little then use a dry brush to stipple it all over the dome until it looks like a textured pompom . Apply silver paint to your pompom laces using a fine brush . Your beautiful textured Mitten Cookie is now complete !




Page 29 text
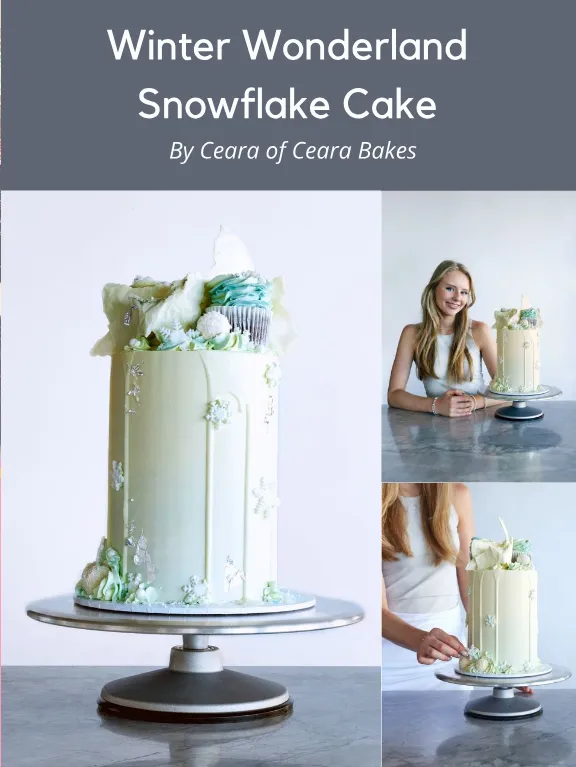
Winter Wonderland Snowflake Cake By Ceara of Ceara Bakes
Page 30 text
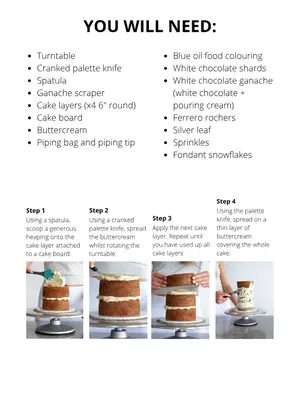
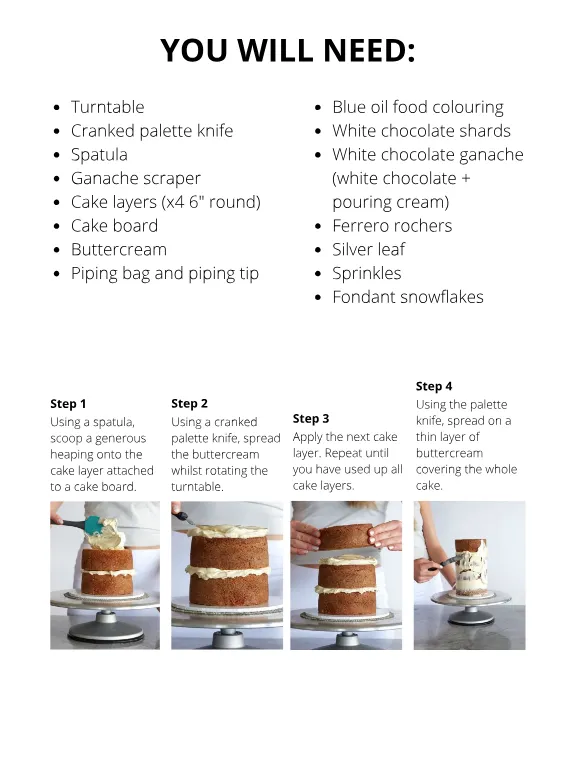
Turntable Cranked palette knife Spatula Ganache scraper Cake layers ( x4 6 " round ) Cake board Buttercream Piping bag and piping tip Blue oil food colouring White chocolate shards White chocolate ganache ( white chocolate + pouring cream ) Ferrero rochers Silver leaf Sprinkles Fondant snowflakes YOU WILL NEED : Turntable Cranked palette knife Spatula Ganache scraper Cake layers ( x4 6 " round ) Cake board Buttercream Piping bag and piping tip Blue oil food colouring White chocolate shards White chocolate ganache ( white chocolate + pouring cream ) Ferrero rochers Silver leaf Sprinkles Fondant snowflakes Step 1 Step 2 Using a spatula , scoop a generous heaping onto the cake layer attached to a cake board . Using a cranked palette knife , spread the buttercream whilst rotating the turntable . Step 3 Apply the next cake layer . Repeat until you have used up all cake layers . Step 4 Using the palette knife , spread on a thin layer of buttercream covering the whole cake .
Page 31 text
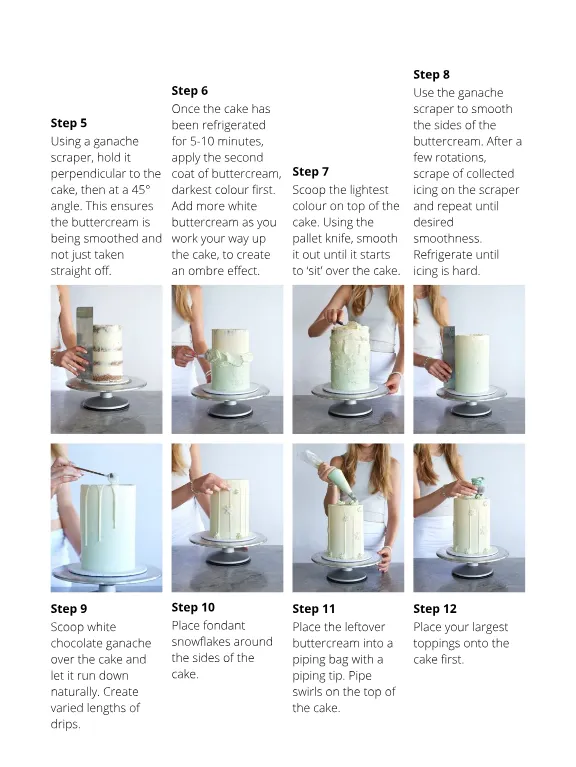
Step 5 Using a ganache scraper , hold it perpendicular to the cake , then at a 45 ° angle . This ensures the buttercream is being smoothed and not just taken straight off . Step 6 Once the cake has been refrigerated for 5-10 minutes , apply the second coat of buttercream , darkest colour first . Add more white buttercream as you work your way up the cake , to create an ombre effect . Step 7 Scoop the lightest colour on top of the cake . Using the pallet knife , smooth it out until it starts to ‘ sit ’ over the cake . Step 8 Use the ganache scraper to smooth the sides of the buttercream . After a few rotations , scrape of collected icing on the scraper and repeat until desired smoothness . Refrigerate until icing is hard . Step 9 Step 10 Step 11 Step 12 Place fondant snowflakes around the sides of the cake . Scoop white chocolate ganache over the cake and let it run down naturally . Create varied lengths of drips . Place the leftover buttercream into a piping bag with a piping tip . Pipe swirls on the top of the cake . Place your largest toppings onto the cake first .
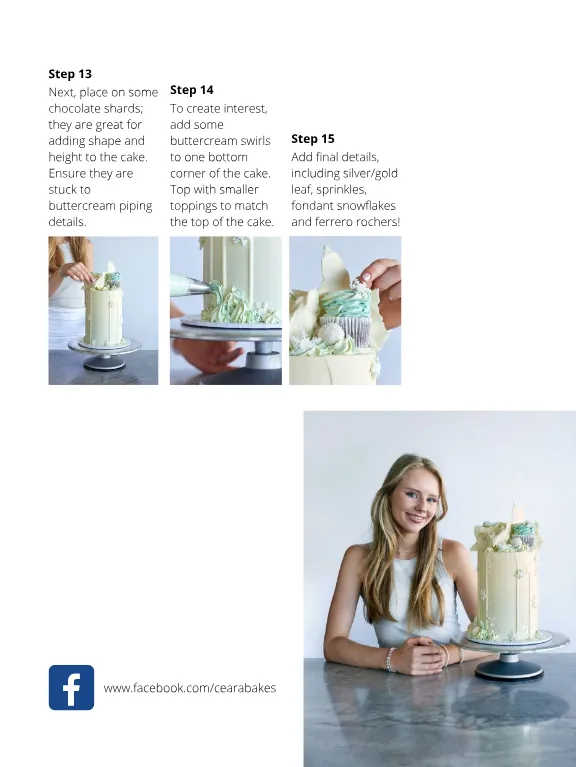
Page 32 text
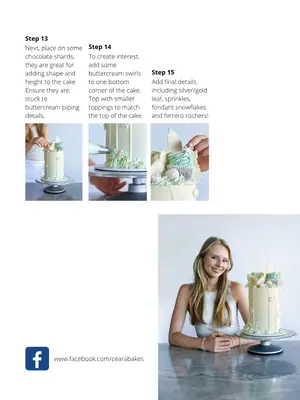
Step 13 Next , place on some chocolate shards ; they are great for adding shape and height to the cake . Ensure they are stuck to buttercream piping details . Step 14 To create interest , add some buttercream swirls to one bottom corner of the cake . Top with smaller toppings to match the top of the cake . Step 15 Add final details , including silver / gold leaf , sprinkles , fondant snowflakes and ferrero rochers ! www . facebook . com / cearabakes
Page 34 text
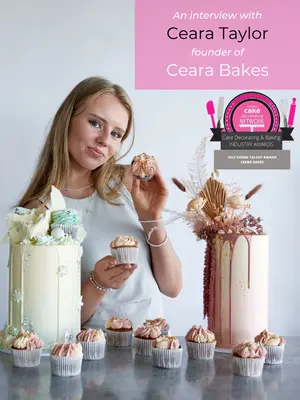
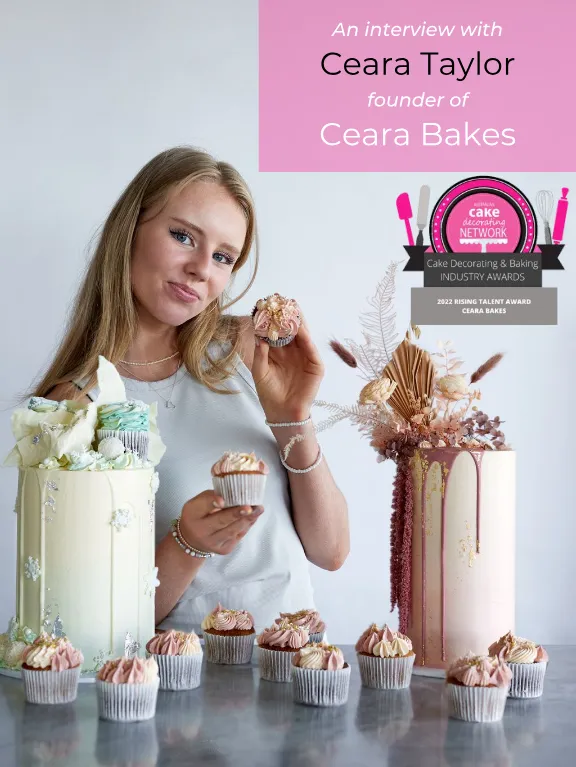
An interview with Ceara Taylor founder of Ceara Bakes
Page 35 text
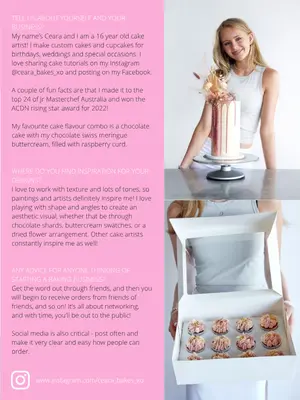
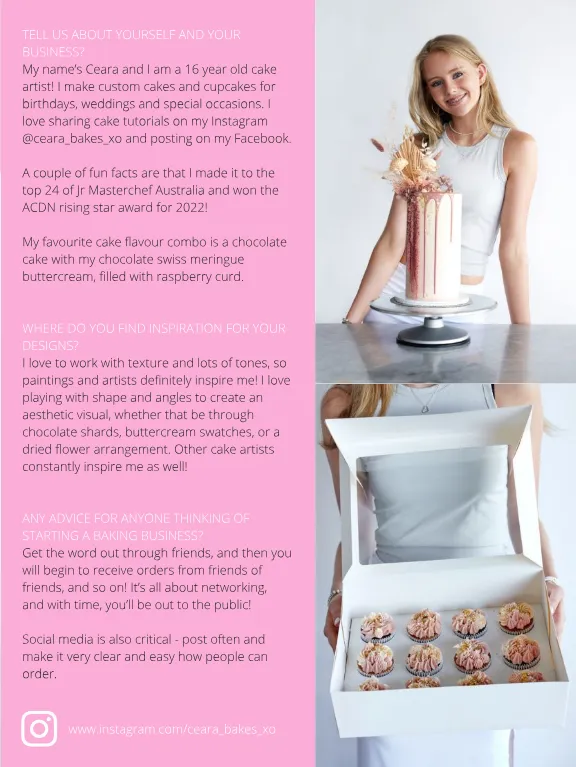
TELL US ABOUT YOURSELF AND YOUR BUSINESS ? My name ’ s Ceara and I am a 16 year old cake artist ! I make custom cakes and cupcakes for birthdays , weddings and special occasions . I love sharing cake tutorials on my Instagram @ ceara _ bakes _ xo and posting on my Facebook . A couple of fun facts are that I made it to the top 24 of Jr Masterchef Australia and won the ACDN rising star award for 2022 ! My favourite cake flavour combo is a chocolate cake with my chocolate swiss meringue buttercream , filled with raspberry curd . WHERE DO YOU FIND INSPIRATION FOR YOUR DESIGNS ? I love to work with texture and lots of tones , so paintings and artists definitely inspire me ! I love playing with shape and angles to create an aesthetic visual , whether that be through chocolate shards , buttercream swatches , or a dried flower arrangement . Other cake artists constantly inspire me as well ! ANY ADVICE FOR ANYONE THINKING OF STARTING A BAKING BUSINESS ? Get the word out through friends , and then you will begin to receive orders from friends of friends , and so on ! It ’ s all about networking , and with time , you ’ ll be out to the public ! Social media is also critical - post often and make it very clear and easy how people can order . www . instagram . com / ceara _ bakes _ xo
Page 37 text
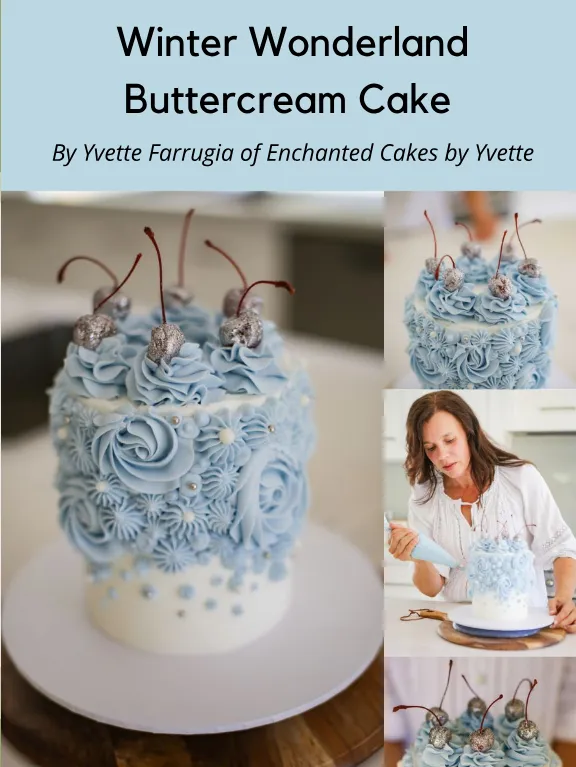
Winter Wonderland Buttercream Cake By Yvette Farrugia of Enchanted Cakes by Yvette
Page 38 text
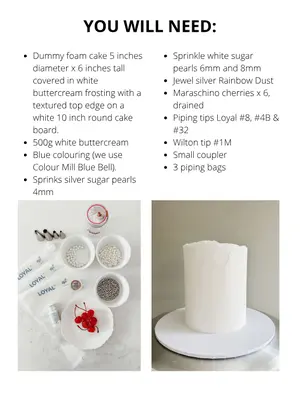
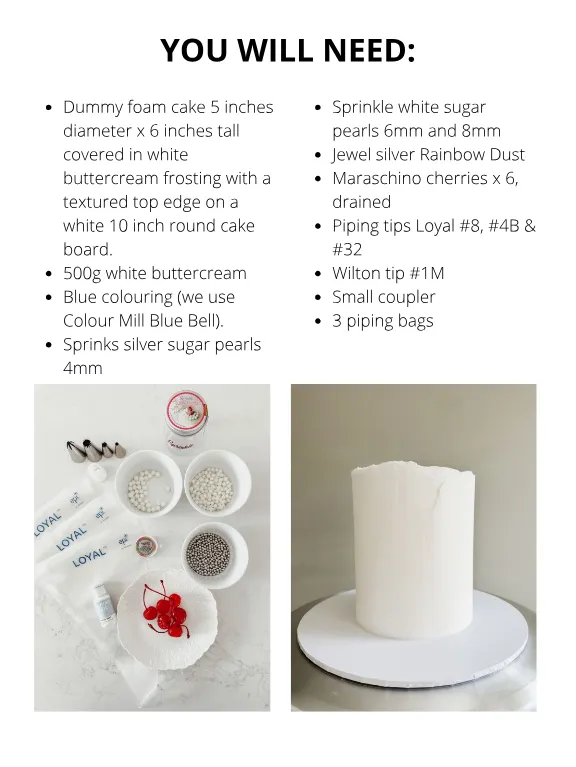
Dummy foam cake 5 inches diameter x 6 inches tall covered in white buttercream frosting with a textured top edge on a white 10 inch round cake board . 500g white buttercream Blue colouring ( we use Colour Mill Blue Bell ). Sprinks silver sugar pearls 4mm Sprinkle white sugar pearls 6mm and 8mm Jewel silver Rainbow Dust Maraschino cherries x 6 , drained Piping tips Loyal # 8 , # 4B & # 32 Wilton tip # 1M Small coupler 3 piping bags YOU WILL NEED : Dummy foam cake 5 inches diameter x 6 inches tall covered in white buttercream frosting with a textured top edge on a white 10 inch round cake board . 500g white buttercream Blue colouring ( we use Colour Mill Blue Bell ). Sprinks silver sugar pearls 4mm Sprinkle white sugar pearls 6mm and 8mm Jewel silver Rainbow Dust Maraschino cherries x 6 , drained Piping tips Loyal # 8 , # 4B & # 32 Wilton tip # 1M Small coupler 3 piping bags
Page 39 text
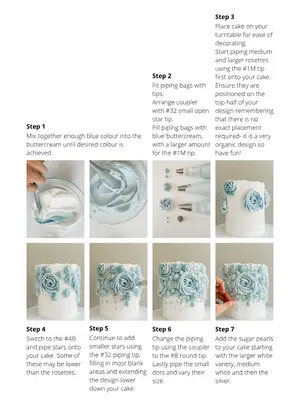
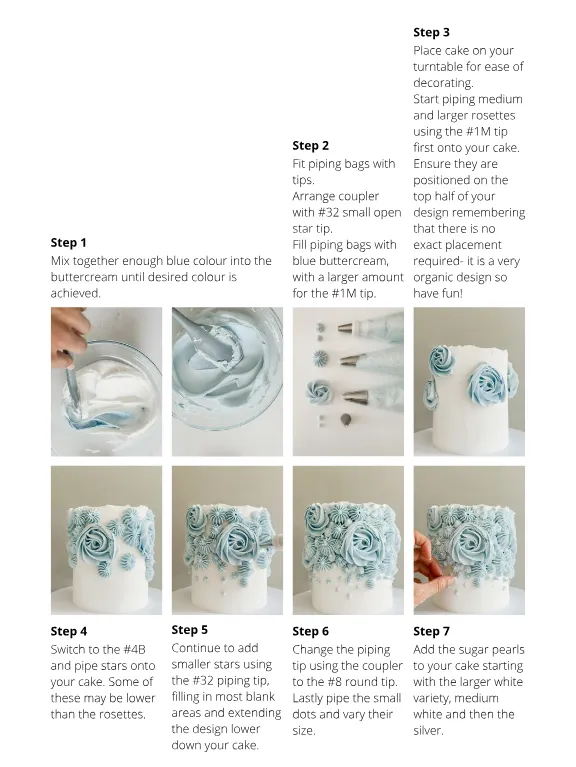
Step 1 Mix together enough blue colour into the buttercream until desired colour is achieved . Step 2 Fit piping bags with tips . Arrange coupler with # 32 small open star tip . Fill piping bags with blue buttercream , with a larger amount for the # 1M tip . Step 3 Place cake on your turntable for ease of decorating . Start piping medium and larger rosettes using the # 1M tip first onto your cake . Ensure they are positioned on the top half of your design remembering that there is no exact placement required- it is a very organic design so have fun ! Step 4 Step 5 Step 6 Step 7 Switch to the # 4B Continue to add Change the piping Add the sugar pearls and pipe stars onto smaller stars using tip using the coupler to your cake starting your cake . Some of the # 32 piping tip , to the # 8 round tip . with the larger white these may be lower filling in most blank Lastly pipe the small variety , medium than the rosettes . areas and extending dots and vary their white and then the the design lower size . silver . down your cake .
Page 40 text
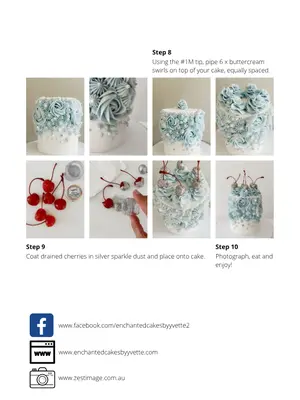
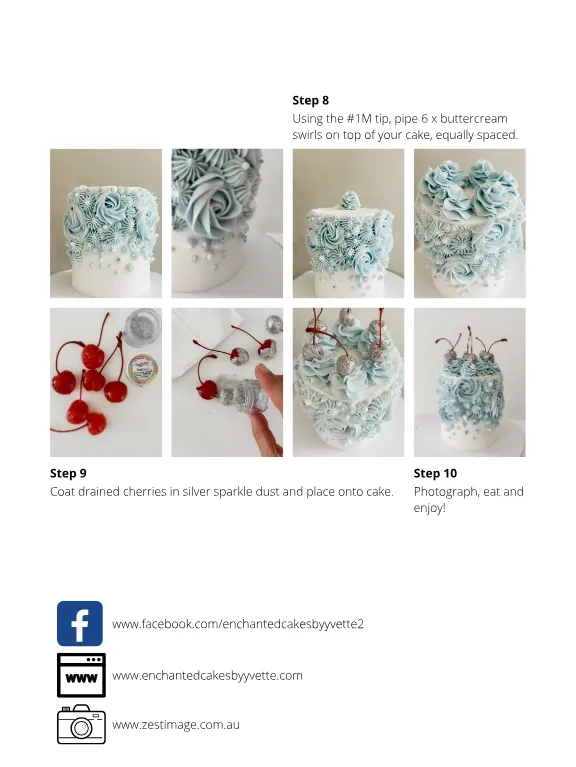
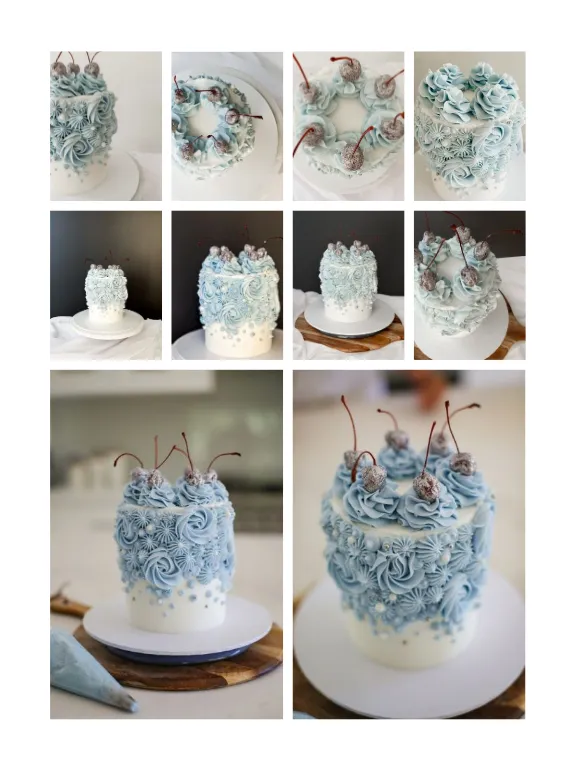
Step 8 Using the # 1M tip , pipe 6 x buttercream swirls on top of your cake , equally spaced . Step 9 Coat drained cherries in silver sparkle dust and place onto cake . Step 10 Photograph , eat and enjoy ! www . facebook . com / enchantedcakesbyyvette2 www . enchantedcakesbyyvette . com www . zestimage . com . au


Page 45 text
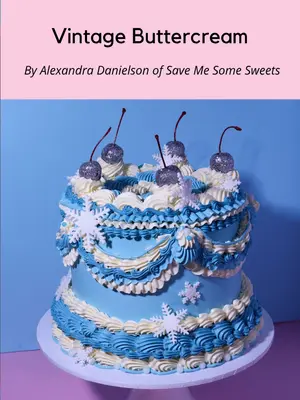
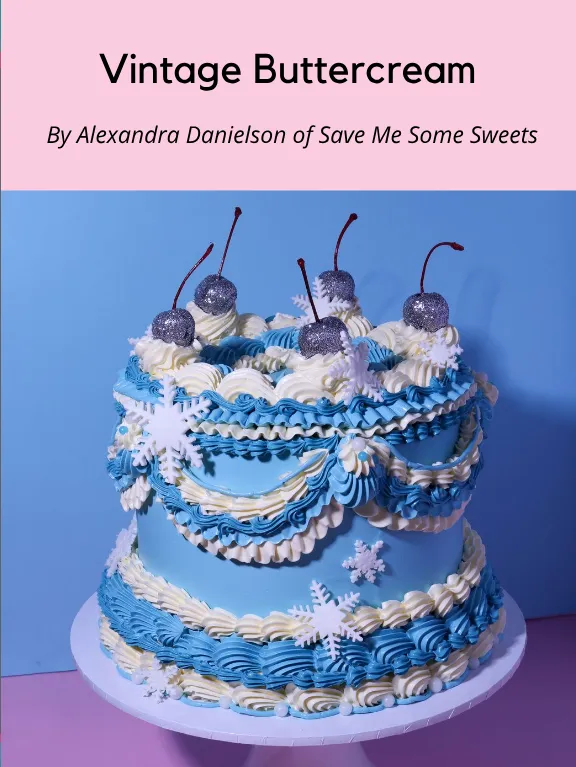
Vintage Buttercream By Alexandra Danielson of Save Me Some Sweets
Page 46 text
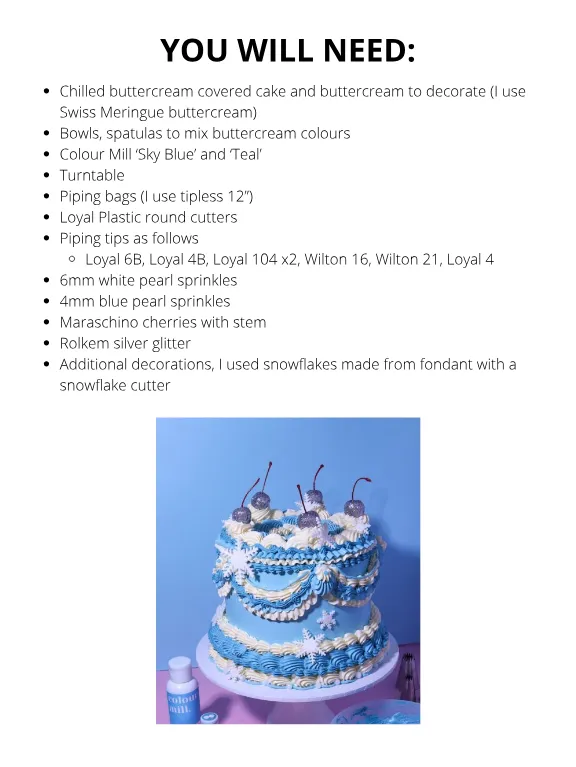
YOU WILL NEED : Chilled buttercream covered cake and buttercream to decorate ( I use Swiss Meringue buttercream ) Bowls , spatulas to mix buttercream colours Colour Mill ‘ Sky Blue ’ and ‘ Teal ’ Turntable Piping bags ( I use tipless 12 ”) Loyal Plastic round cutters Piping tips as follows Loyal 6B , Loyal 4B , Loyal 104 x2 , Wilton 16 , Wilton 21 , Loyal 4 6mm white pearl sprinkles 4mm blue pearl sprinkles Maraschino cherries with stem Rolkem silver glitter Additional decorations , I used snowflakes made from fondant with a snowflake cutter
Page 47 text
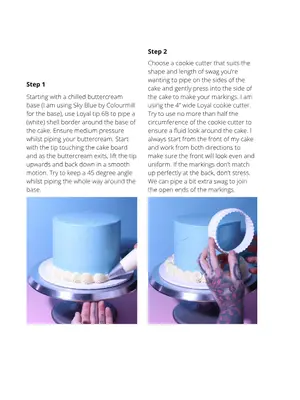
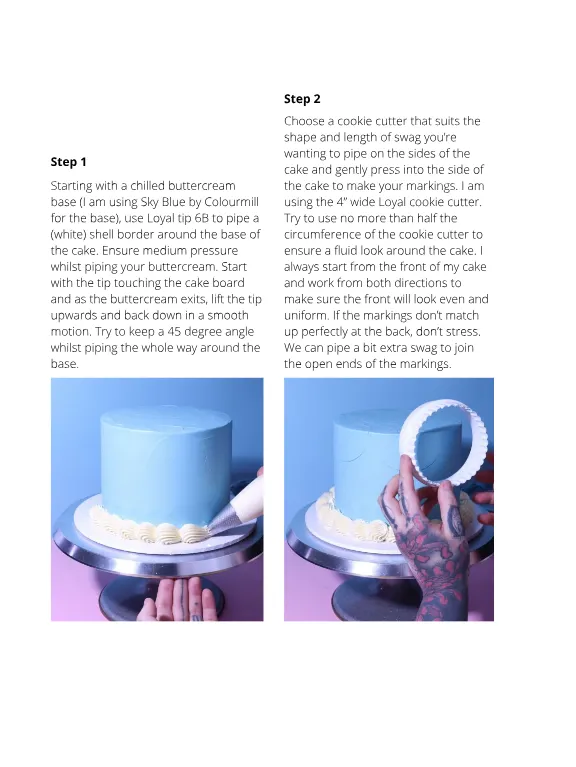
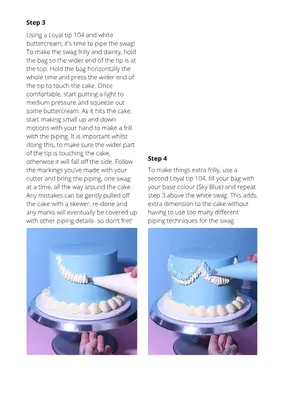
Step 2 Step 1 Starting with a chilled buttercream base ( I am using Sky Blue by Colourmill for the base ), use Loyal tip 6B to pipe a ( white ) shell border around the base of the cake . Ensure medium pressure whilst piping your buttercream . Start with the tip touching the cake board and as the buttercream exits , lift the tip upwards and back down in a smooth motion . Try to keep a 45 degree angle whilst piping the whole way around the base . Choose a cookie cutter that suits the shape and length of swag you ’ re wanting to pipe on the sides of the cake and gently press into the side of the cake to make your markings . I am using the 4 ” wide Loyal cookie cutter . Try to use no more than half the circumference of the cookie cutter to ensure a fluid look around the cake . I always start from the front of my cake and work from both directions to make sure the front will look even and uniform . If the markings don ’ t match up perfectly at the back , don ’ t stress . We can pipe a bit extra swag to join the open ends of the markings .
Page 48 text
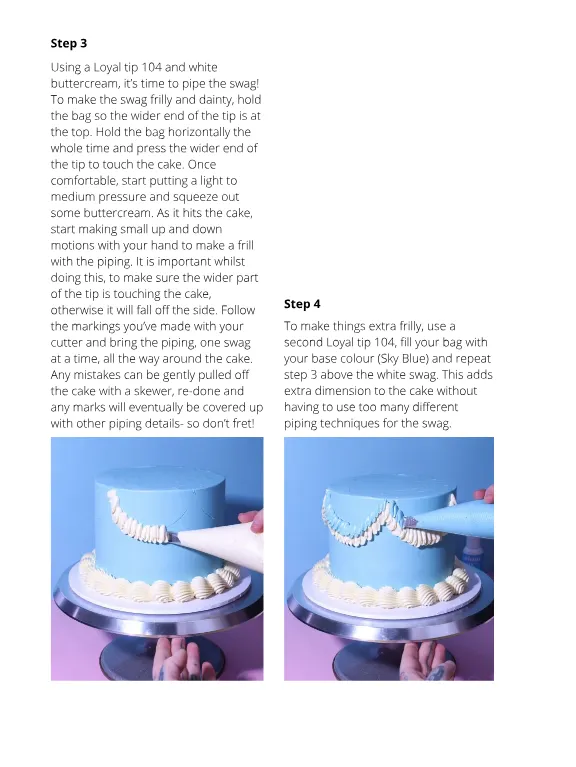
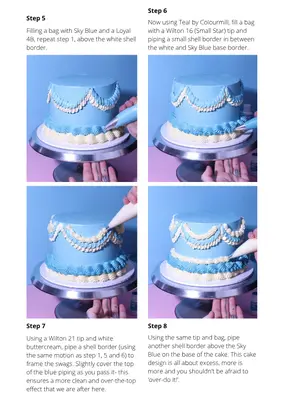
Step 3 Using a Loyal tip 104 and white buttercream , it ’ s time to pipe the swag ! To make the swag frilly and dainty , hold the bag so the wider end of the tip is at the top . Hold the bag horizontally the whole time and press the wider end of the tip to touch the cake . Once comfortable , start putting a light to medium pressure and squeeze out some buttercream . As it hits the cake , start making small up and down motions with your hand to make a frill with the piping . It is important whilst doing this , to make sure the wider part of the tip is touching the cake , otherwise it will fall off the side . Follow the markings you ’ ve made with your cutter and bring the piping , one swag at a time , all the way around the cake . Any mistakes can be gently pulled off the cake with a skewer , re-done and any marks will eventually be covered up with other piping details- so don ’ t fret ! Step 4 To make things extra frilly , use a second Loyal tip 104 , fill your bag with your base colour ( Sky Blue ) and repeat step 3 above the white swag . This adds extra dimension to the cake without having to use too many different piping techniques for the swag .
Page 49 text
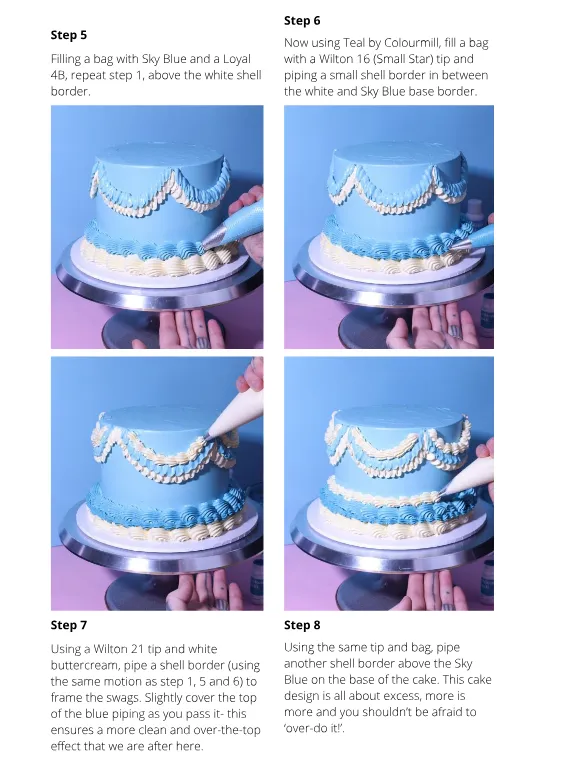
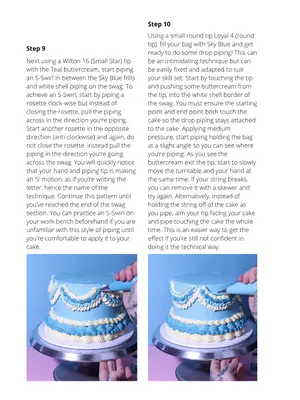
Step 5 Filling a bag with Sky Blue and a Loyal 4B , repeat step 1 , above the white shell border . Step 6 Now using Teal by Colourmill , fill a bag with a Wilton 16 ( Small Star ) tip and piping a small shell border in between the white and Sky Blue base border . Step 7 Step 8 Using a Wilton 21 tip and white buttercream , pipe a shell border ( using the same motion as step 1 , 5 and 6 ) to frame the swags . Slightly cover the top of the blue piping as you pass it- this ensures a more clean and over-the-top effect that we are after here . Using the same tip and bag , pipe another shell border above the Sky Blue on the base of the cake . This cake design is all about excess , more is more and you shouldn ’ t be afraid to ‘ over-do it !’.
Page 50 text
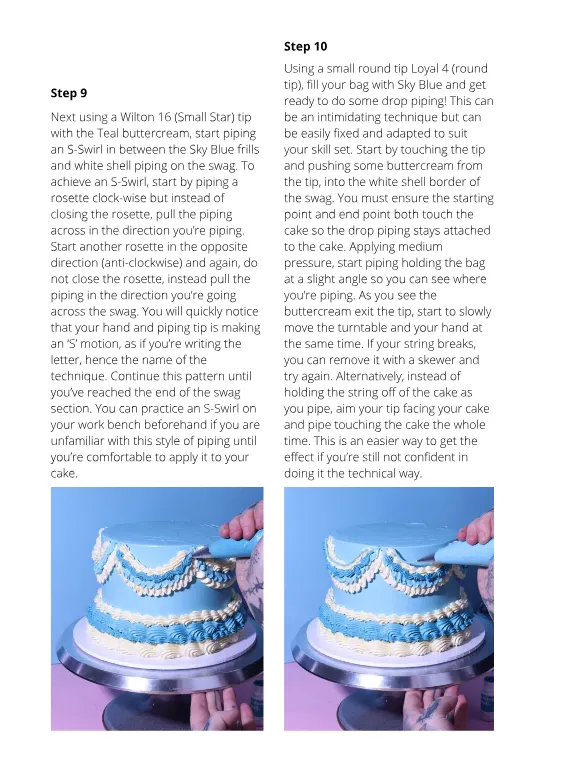
Step 10 Step 9 Next using a Wilton 16 ( Small Star ) tip with the Teal buttercream , start piping an S-Swirl in between the Sky Blue frills and white shell piping on the swag . To achieve an S-Swirl , start by piping a rosette clock-wise but instead of closing the rosette , pull the piping across in the direction you ’ re piping . Start another rosette in the opposite direction ( anti-clockwise ) and again , do not close the rosette , instead pull the piping in the direction you ’ re going across the swag . You will quickly notice that your hand and piping tip is making an ‘ S ’ motion , as if you ’ re writing the letter , hence the name of the technique . Continue this pattern until you ’ ve reached the end of the swag section . You can practice an S-Swirl on your work bench beforehand if you are unfamiliar with this style of piping until you ’ re comfortable to apply it to your cake . Using a small round tip Loyal 4 ( round tip ), fill your bag with Sky Blue and get ready to do some drop piping ! This can be an intimidating technique but can be easily fixed and adapted to suit your skill set . Start by touching the tip and pushing some buttercream from the tip , into the white shell border of the swag . You must ensure the starting point and end point both touch the cake so the drop piping stays attached to the cake . Applying medium pressure , start piping holding the bag at a slight angle so you can see where you ’ re piping . As you see the buttercream exit the tip , start to slowly move the turntable and your hand at the same time . If your string breaks , you can remove it with a skewer and try again . Alternatively , instead of holding the string off of the cake as you pipe , aim your tip facing your cake and pipe touching the cake the whole time . This is an easier way to get the effect if you ’ re still not confident in doing it the technical way .
Page 51 text
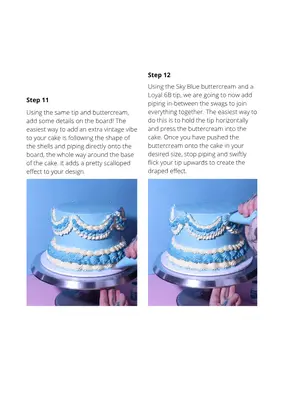
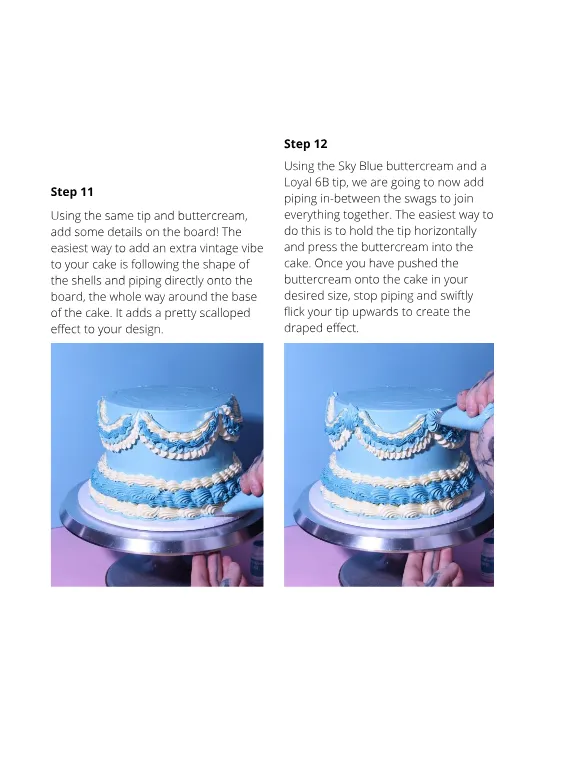
Step 12 Step 11 Using the same tip and buttercream , add some details on the board ! The easiest way to add an extra vintage vibe to your cake is following the shape of the shells and piping directly onto the board , the whole way around the base of the cake . It adds a pretty scalloped effect to your design . Using the Sky Blue buttercream and a Loyal 6B tip , we are going to now add piping in-between the swags to join everything together . The easiest way to do this is to hold the tip horizontally and press the buttercream into the cake . Once you have pushed the buttercream onto the cake in your desired size , stop piping and swiftly flick your tip upwards to create the draped effect .
Page 52 text
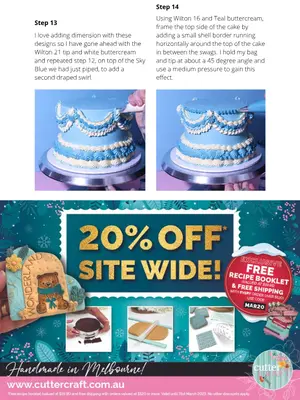
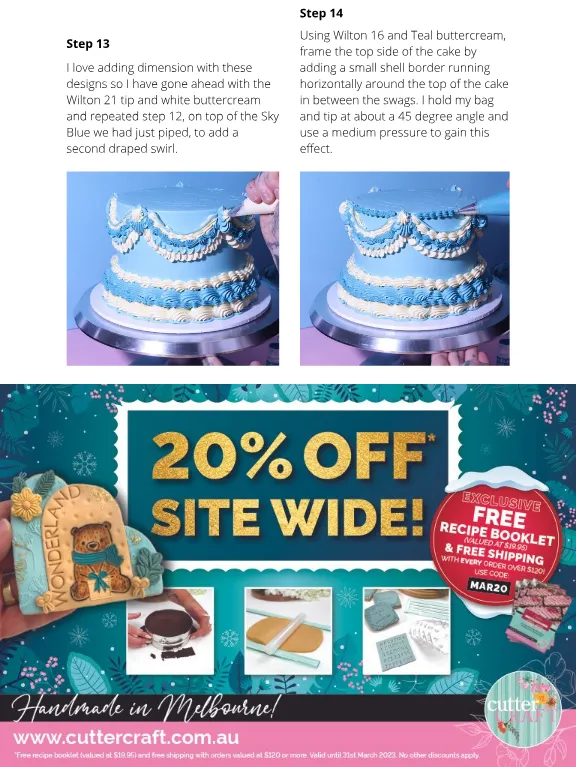
Step 14 Step 13 I love adding dimension with these designs so I have gone ahead with the Wilton 21 tip and white buttercream and repeated step 12 , on top of the Sky Blue we had just piped , to add a second draped swirl . Using Wilton 16 and Teal buttercream , frame the top side of the cake by adding a small shell border running horizontally around the top of the cake in between the swags . I hold my bag and tip at about a 45 degree angle and use a medium pressure to gain this effect .
Page 53 text
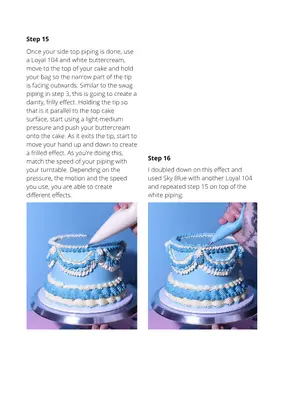
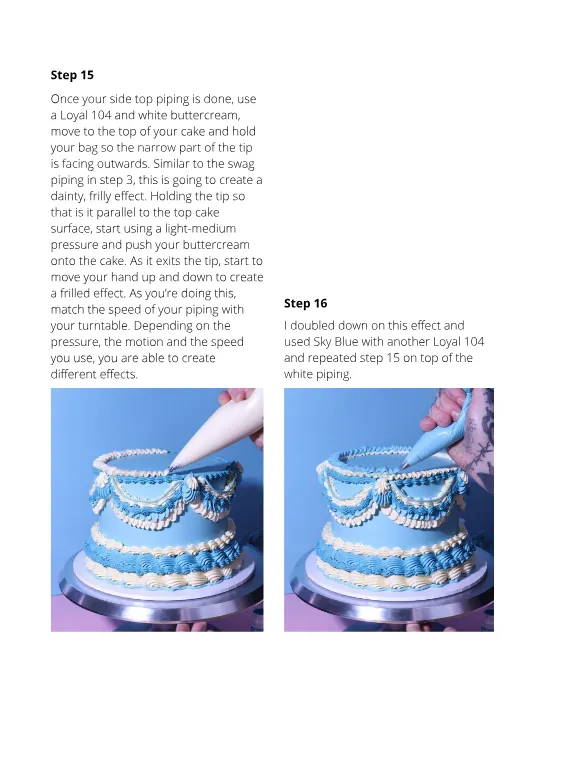
Step 15 Once your side top piping is done , use a Loyal 104 and white buttercream , move to the top of your cake and hold your bag so the narrow part of the tip is facing outwards . Similar to the swag piping in step 3 , this is going to create a dainty , frilly effect . Holding the tip so that is it parallel to the top cake surface , start using a light-medium pressure and push your buttercream onto the cake . As it exits the tip , start to move your hand up and down to create a frilled effect . As you ’ re doing this , match the speed of your piping with your turntable . Depending on the pressure , the motion and the speed you use , you are able to create different effects . Step 16 I doubled down on this effect and used Sky Blue with another Loyal 104 and repeated step 15 on top of the white piping .
Page 54 text
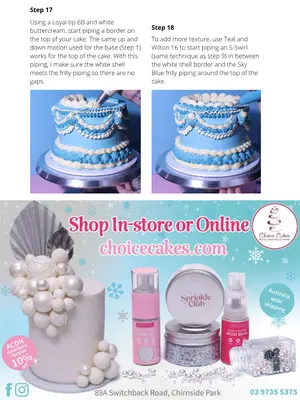
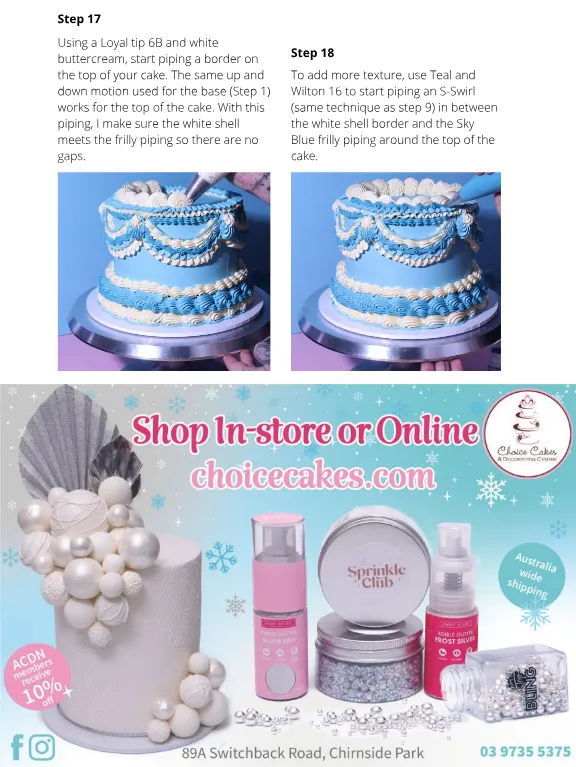
Step 17 Using a Loyal tip 6B and white buttercream , start piping a border on the top of your cake . The same up and down motion used for the base ( Step 1 ) works for the top of the cake . With this piping , I make sure the white shell meets the frilly piping so there are no gaps . Step 18 To add more texture , use Teal and Wilton 16 to start piping an S-Swirl ( same technique as step 9 ) in between the white shell border and the Sky Blue frilly piping around the top of the cake .
Page 55 text
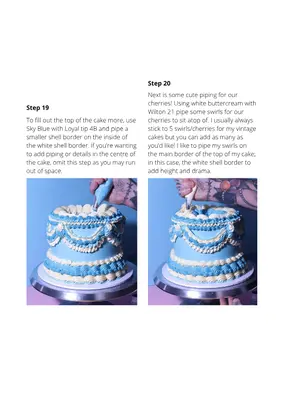
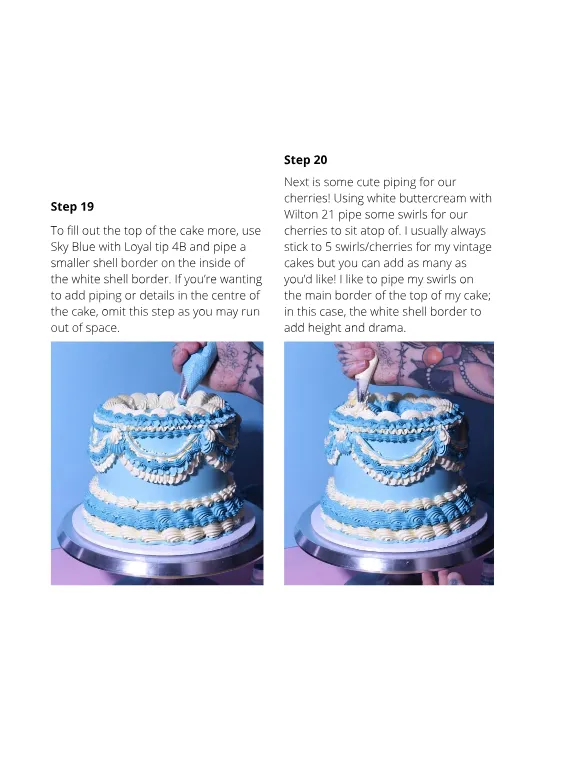
Step 20 Step 19 To fill out the top of the cake more , use Sky Blue with Loyal tip 4B and pipe a smaller shell border on the inside of the white shell border . If you ’ re wanting to add piping or details in the centre of the cake , omit this step as you may run out of space . Next is some cute piping for our cherries ! Using white buttercream with Wilton 21 pipe some swirls for our cherries to sit atop of . I usually always stick to 5 swirls / cherries for my vintage cakes but you can add as many as you ’ d like ! I like to pipe my swirls on the main border of the top of my cake ; in this case , the white shell border to add height and drama .
Page 56 text
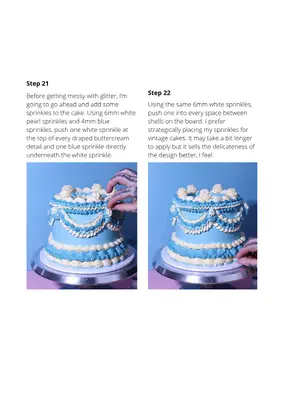
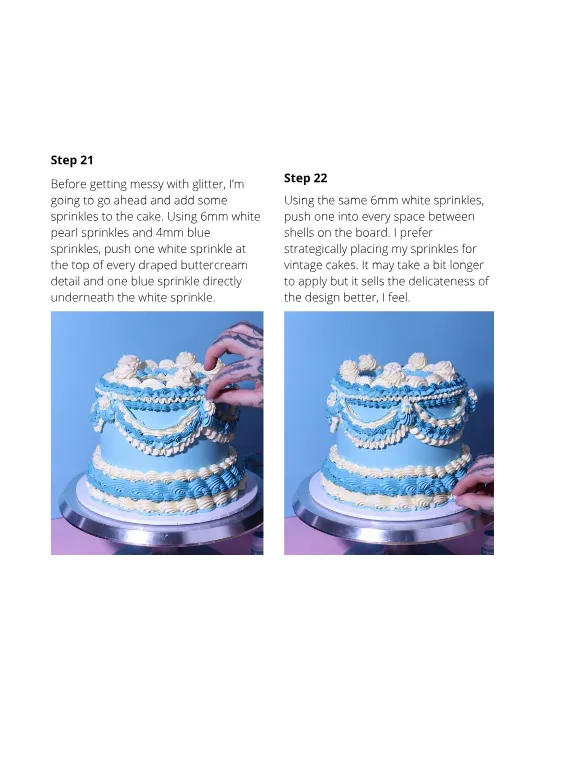
Step 21 Before getting messy with glitter , I ’ m going to go ahead and add some sprinkles to the cake . Using 6mm white pearl sprinkles and 4mm blue sprinkles , push one white sprinkle at the top of every draped buttercream detail and one blue sprinkle directly underneath the white sprinkle . Step 22 Using the same 6mm white sprinkles , push one into every space between shells on the board . I prefer strategically placing my sprinkles for vintage cakes . It may take a bit longer to apply but it sells the delicateness of the design better , I feel .
Page 57 text
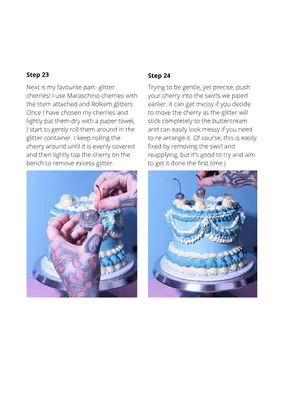
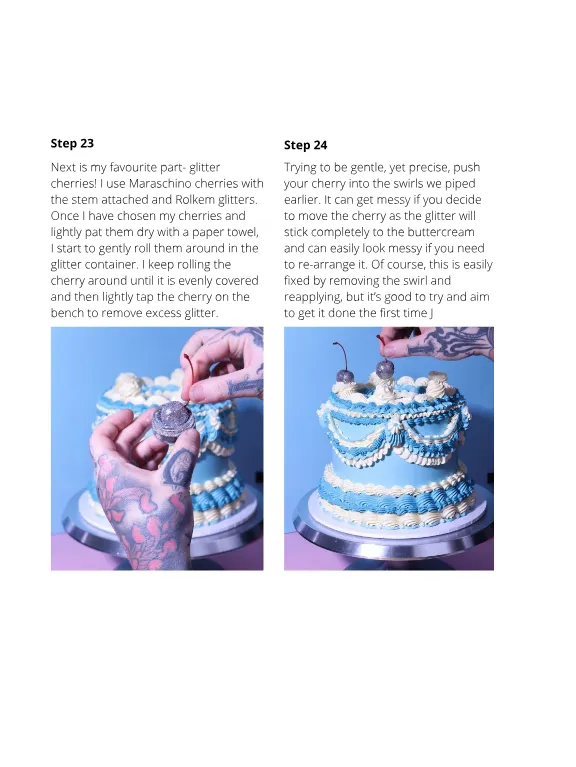
Step 23 Step 24 Next is my favourite part- glitter cherries ! I use Maraschino cherries with the stem attached and Rolkem glitters . Once I have chosen my cherries and lightly pat them dry with a paper towel , I start to gently roll them around in the glitter container . I keep rolling the cherry around until it is evenly covered and then lightly tap the cherry on the bench to remove excess glitter . Trying to be gentle , yet precise , push your cherry into the swirls we piped earlier . It can get messy if you decide to move the cherry as the glitter will stick completely to the buttercream and can easily look messy if you need to re-arrange it . Of course , this is easily fixed by removing the swirl and reapplying , but it ’ s good to try and aim to get it done the first time J
Page 58 text
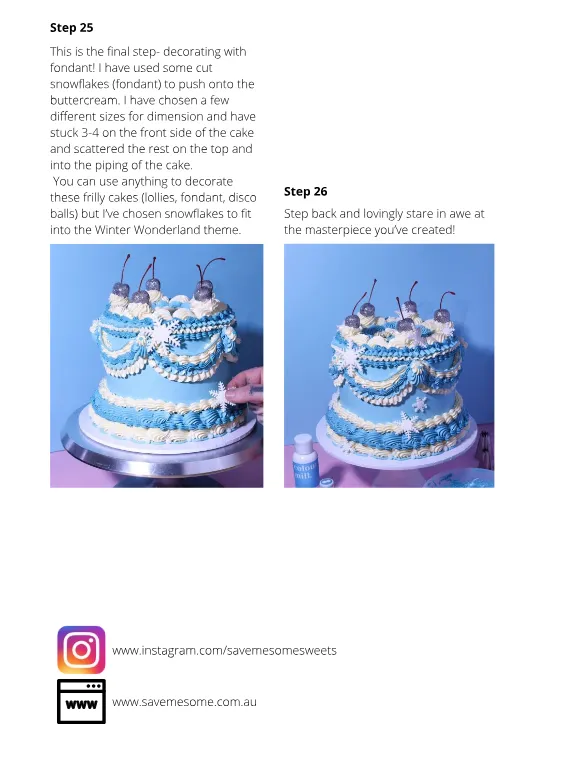
Step 25 This is the final step- decorating with fondant ! I have used some cut snowflakes ( fondant ) to push onto the buttercream . I have chosen a few different sizes for dimension and have stuck 3-4 on the front side of the cake and scattered the rest on the top and into the piping of the cake . You can use anything to decorate these frilly cakes ( lollies , fondant , disco balls ) but I ’ ve chosen snowflakes to fit into the Winter Wonderland theme . Step 26 Step back and lovingly stare in awe at the masterpiece you ’ ve created ! www . instagram . com / save me some sweets www . savemesome . com . au




Page 62 text
Cake Chat Cake Chat with Amber Comadira-Smith from Cake with Amber Amber shares her cake expertise so you can sweeten-up your cake skills and create amazing cakes with confidence ! 5 INSTA FOLLOWS THAT WILL SPARK YOUR CAKE CREATIVITY ! Don ’ t you hate those moments where you just feel stumped for a cake idea ? I ’ ve personally had a few major creative blocks that left me down-to-the-wire with my cake making , which I never want to repeat . The one that stands out to me the most was a couple of years ago when I was asked by a company to submit a Christmas themed cake tutorial for their blog . It was a steep two week turnaround time to brainstorm , submit my ideas for approval and create the tutorial from start to finish , including photos and a write up of every step . And can you guess what happened ? Yep . My good old friend ‘ creative block ’ decided to pay me a visit . I was STUMPED ... I ’ d spend hours just thinking and brainstorming , but I just wasn ’ t enthused and I hated most of my ideas . throughout the cake-making process . In the end , I managed to get that creative spark I needed and I created a great looking cupcake tutorial that I was very proud of . But I had taken up SO much time trying to push through my creative block , that in the end , I only had two days to finish the whole tutorial from start to finish . I literally submitted that tutorial with minutes to spare . It was really awful and stressful . After that incident , I decided to find better ways of boosting my creativity so I could utilise it when I needed it the most . Part of this solution was to find artists from other creative industries that inspired me . You might be thinking , ‘ Why not look at other cake decorators for inspiration ?’. Over the years of dealing with creative blocks , I find that looking at other people ’ s cake work actually stunts my own creativity . Instead of sparking inspiration , it actually kills my spark . Instead , following people from other industries inspires me to experiment and help me grow and flourish my ideas . Admiring different mediums really gets me out of my cake box and thinking differently ! In the hopes of helping you if you ever face these terrible creative block situations , I thought I ’ d share my top 5 non-cake related Instagram pages for some creative cake design inspiration .
Page 63 text
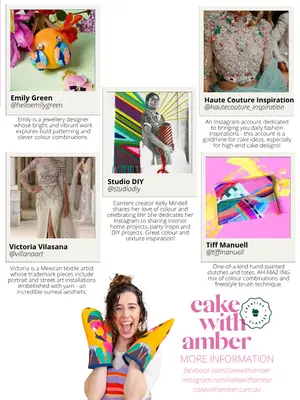
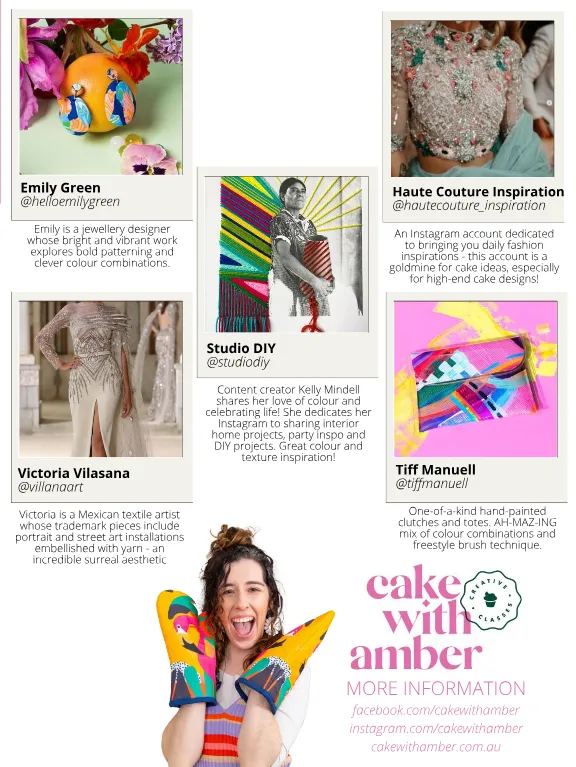
Emily Green @ helloemilygreen Emily is a jewellery designer whose bright and vibrant work explores bold patterning and clever colour combinations . Haute Couture Inspiration @ hautecouture _ inspiration An Instagram account dedicated to bringing you daily fashion inspirations - this account is a goldmine for cake ideas , especially for high-end cake designs ! Victoria Vilasana @ villanaart Victoria is a Mexican textile artist whose trademark pieces include portrait and street art installations embellished with yarn - an incredible surreal aesthetic Studio DIY @ studiodiy Content creator Kelly Mindell shares her love of colour and celebrating life ! She dedicates her Instagram to sharing interior home projects , party inspo and DIY projects . Great colour and texture inspiration ! Tiff Manuell @ tiffmanuell One-of-a-kind hand-painted clutches and totes . AH-MAZ-ING mix of colour combinations and freestyle brush technique . MORE INFORMATION facebook . com / cakewithamber instagram . com / cakewithamber cakewithamber . com . au


Page 65 text
Now live ! Cake ! TV PREMIUM TUTORIALS FROM DECORATORS AROUND THE WORLD caketv . online






Page 70 text
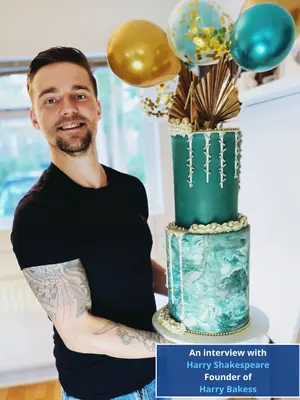
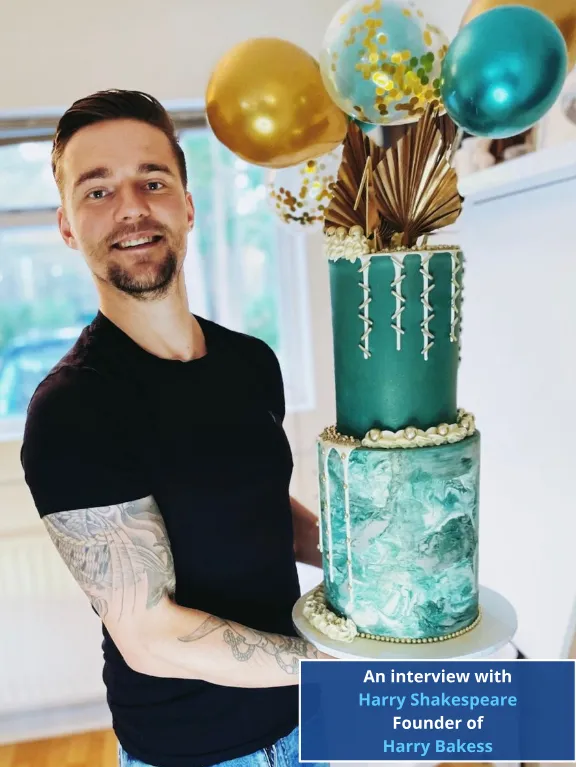
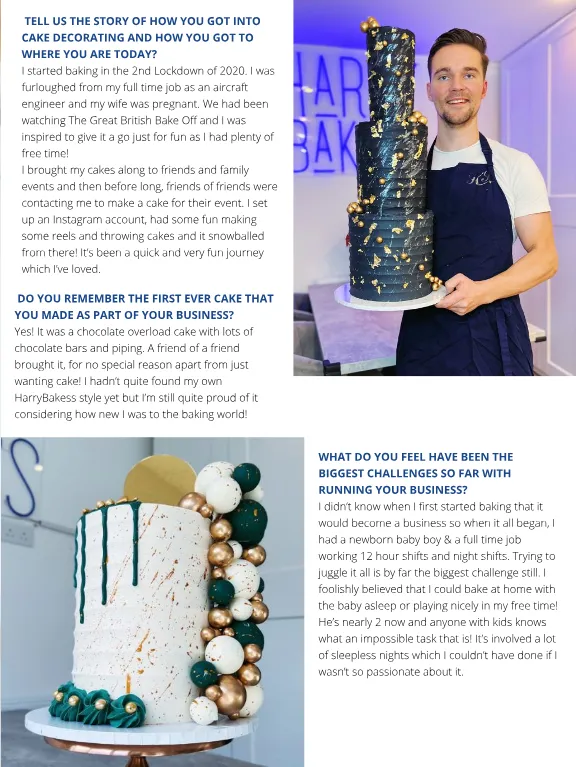
An interview with Harry Shakespeare Founder of Harry Bakess
Page 71 text
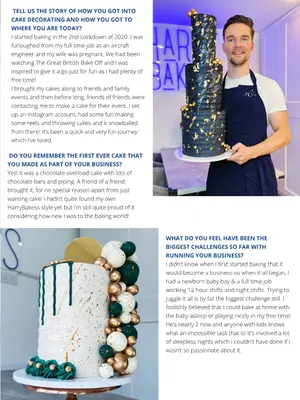
TELL US THE STORY OF HOW YOU GOT INTO CAKE DECORATING AND HOW YOU GOT TO WHERE YOU ARE TODAY ? I started baking in the 2nd Lockdown of 2020 . I was furloughed from my full time job as an aircraft engineer and my wife was pregnant . We had been watching The Great British Bake Off and I was inspired to give it a go just for fun as I had plenty of free time ! I brought my cakes along to friends and family events and then before long , friends of friends were contacting me to make a cake for their event . I set up an Instagram account , had some fun making some reels and throwing cakes and it snowballed from there ! It ’ s been a quick and very fun journey which I ’ ve loved . DO YOU REMEMBER THE FIRST EVER CAKE THAT YOU MADE AS PART OF YOUR BUSINESS ? Yes ! It was a chocolate overload cake with lots of chocolate bars and piping . A friend of a friend brought it , for no special reason apart from just wanting cake ! I hadn ’ t quite found my own HarryBakess style yet but I ’ m still quite proud of it considering how new I was to the baking world ! WHAT DO YOU FEEL HAVE BEEN THE BIGGEST CHALLENGES SO FAR WITH RUNNING YOUR BUSINESS ? I didn ’ t know when I first started baking that it would become a business so when it all began , I had a newborn baby boy & a full time job working 12 hour shifts and night shifts . Trying to juggle it all is by far the biggest challenge still . I foolishly believed that I could bake at home with the baby asleep or playing nicely in my free time ! He ’ s nearly 2 now and anyone with kids knows what an impossible task that is ! It ’ s involved a lot of sleepless nights which I couldn ’ t have done if I wasn ’ t so passionate about it .
Page 72 text
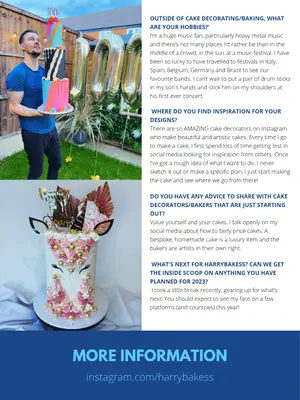
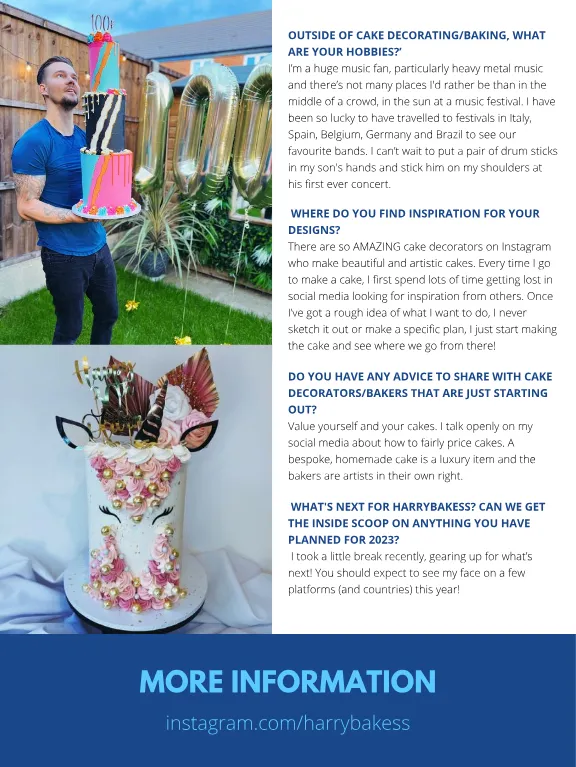
OUTSIDE OF CAKE DECORATING / BAKING , WHAT ARE YOUR HOBBIES ?’ I ’ m a huge music fan , particularly heavy metal music and there ’ s not many places I ' d rather be than in the middle of a crowd , in the sun at a music festival . I have been so lucky to have travelled to festivals in Italy , Spain , Belgium , Germany and Brazil to see our favourite bands . I can ’ t wait to put a pair of drum sticks in my son ' s hands and stick him on my shoulders at his first ever concert . WHERE DO YOU FIND INSPIRATION FOR YOUR DESIGNS ? There are so AMAZING cake decorators on Instagram who make beautiful and artistic cakes . Every time I go to make a cake , I first spend lots of time getting lost in social media looking for inspiration from others . Once I ’ ve got a rough idea of what I want to do , I never sketch it out or make a specific plan , I just start making the cake and see where we go from there ! DO YOU HAVE ANY ADVICE TO SHARE WITH CAKE DECORATORS / BAKERS THAT ARE JUST STARTING OUT ? Value yourself and your cakes . I talk openly on my social media about how to fairly price cakes . A bespoke , homemade cake is a luxury item and the bakers are artists in their own right . WHAT ' S NEXT FOR HARRYBAKESS ? CAN WE GET THE INSIDE SCOOP ON ANYTHING YOU HAVE PLANNED FOR 2023 ? I took a little break recently , gearing up for what ’ s next ! You should expect to see my face on a few platforms ( and countries ) this year ! MORE INFORMATION instagram . com / harrybakess