Page 58 of 85
Page 1 text
Cake! MAGAZINE
Page 2 text
letter from the editor Hello and welcome to our third Cake! Magazine issue for 2024! Christmas is going to be here before we know it, especially with the jam-packed lineup we have coming!
Page 3 text
letter from the editor This edition of Cake! Magazine is Magazine issue for 2024! Christmas is dedicated to all things Painted, going to be here before we know it, featuring beautiful cake tutorials especially with the jam-packed lineup along with a collection of inspiring images in our Member Gallery.
Page 4 text
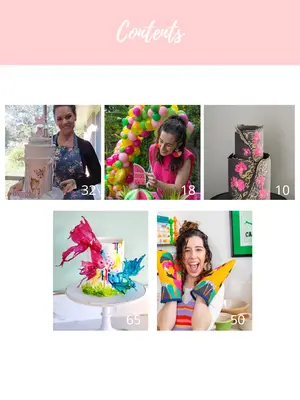
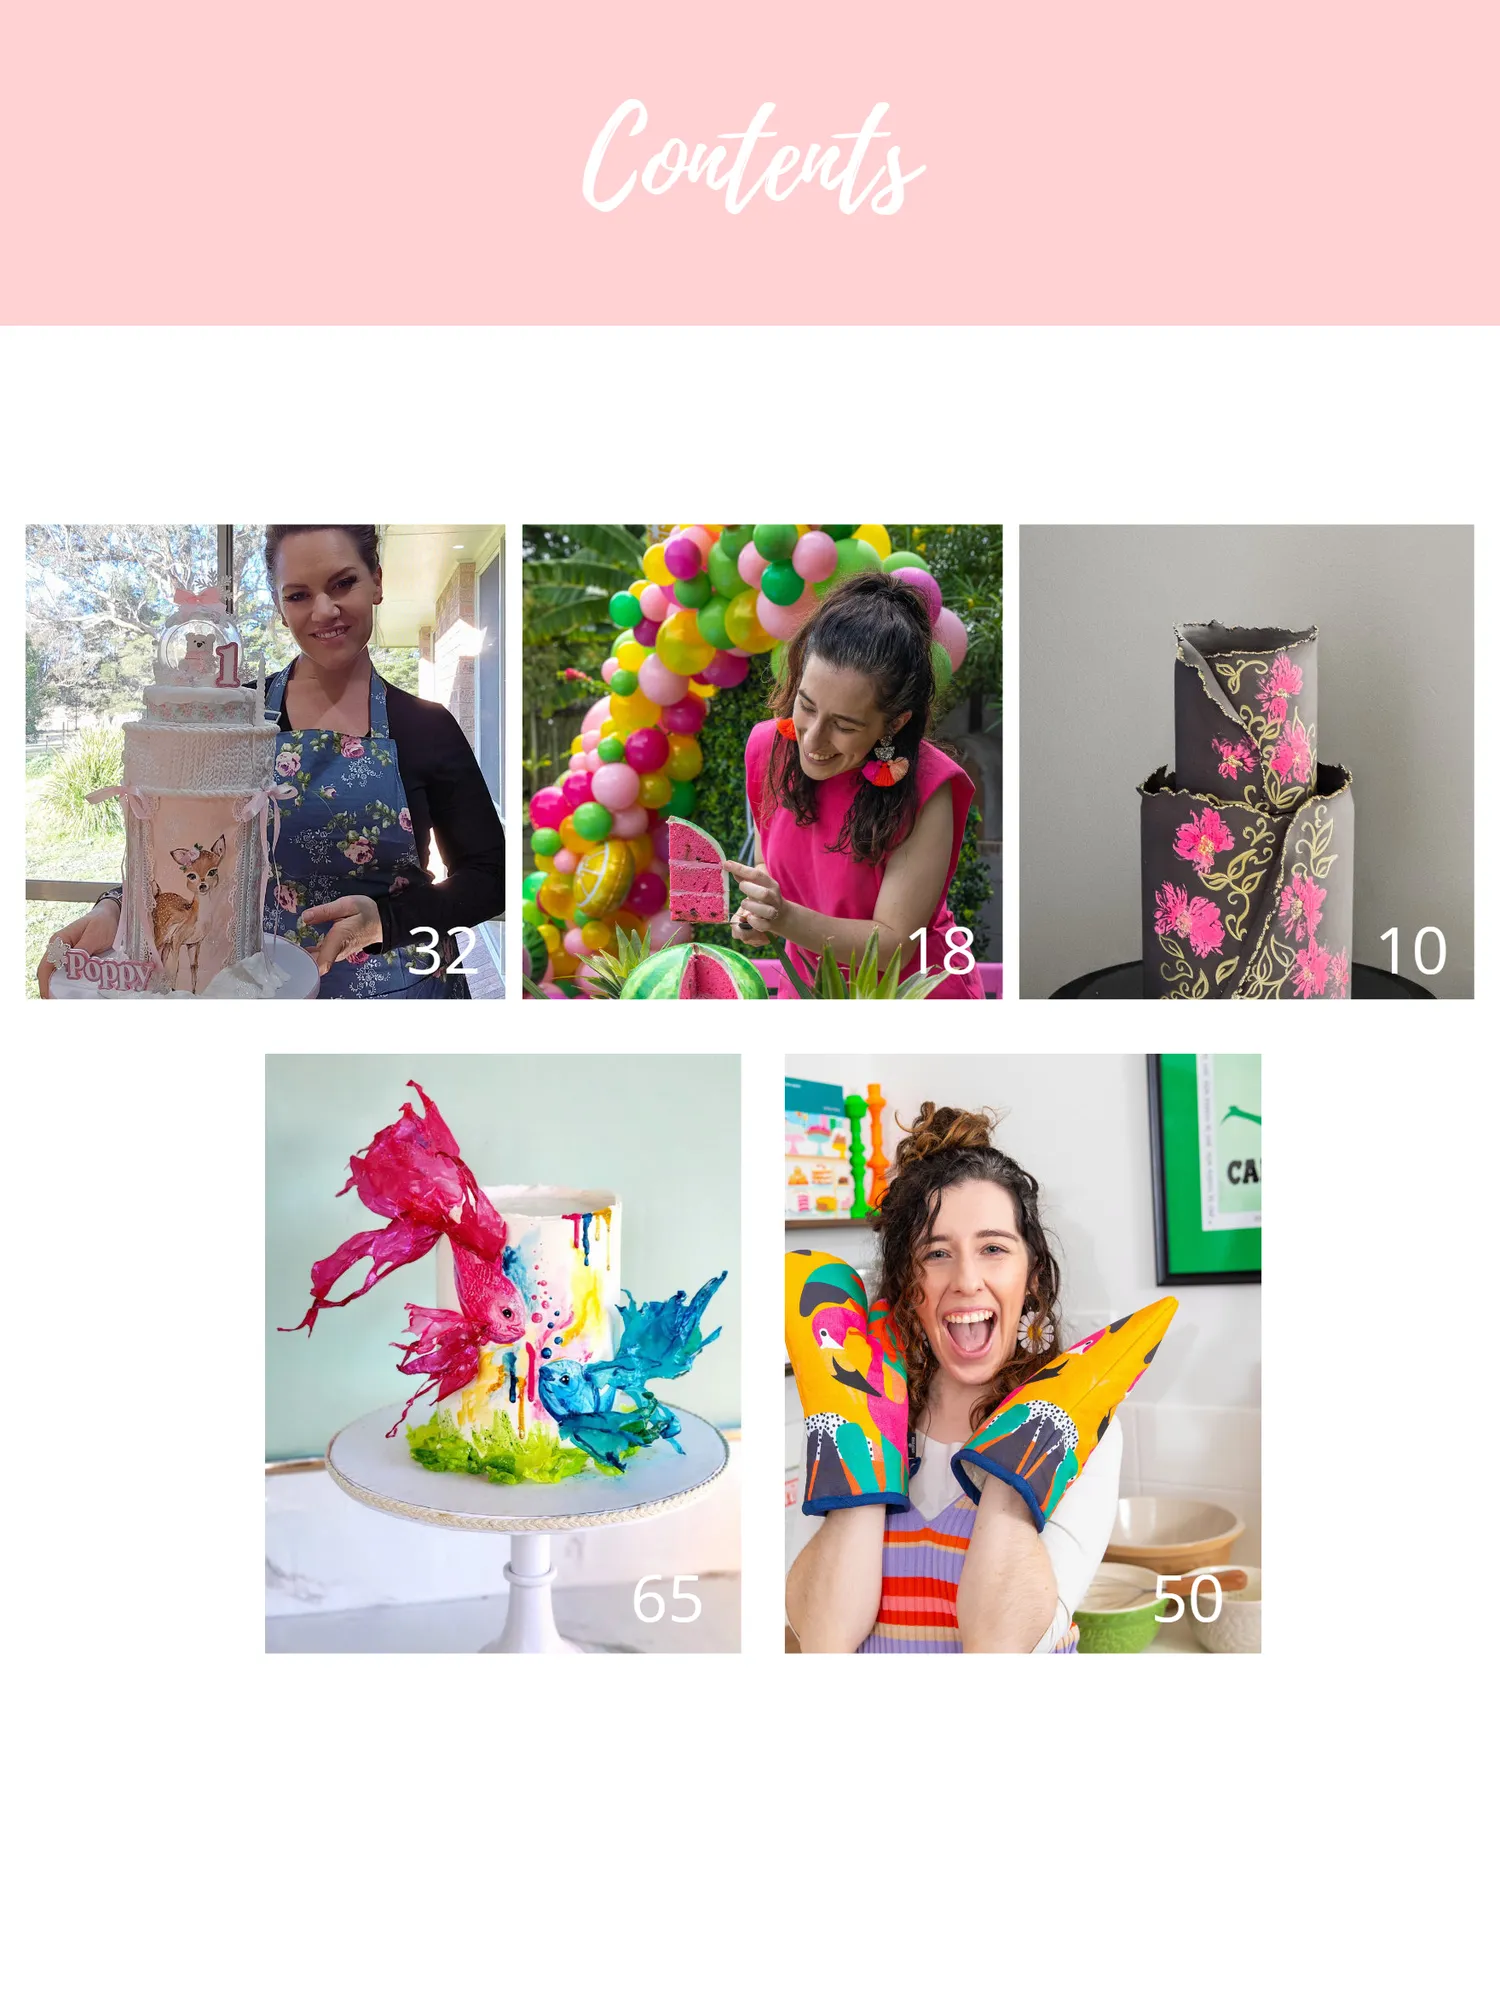
Contents 32 18 10 65 50
Page 5 text
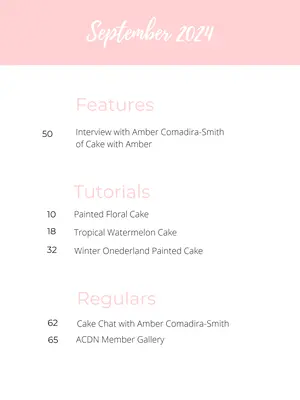
September 2024 Features 50 Interview with Amber Comadira-Smith of Cake with Amber Tutorials 10 Painted Floral Cake 18 Tropical Watermelon Cake 32 Winter Onederland Painted Cake Regulars 62 Cake Chat with Amber Comadira-Smith 65 ACDN Member Gallery


Page 7 text
PAINTED Cake Tutorials

Page 8 text
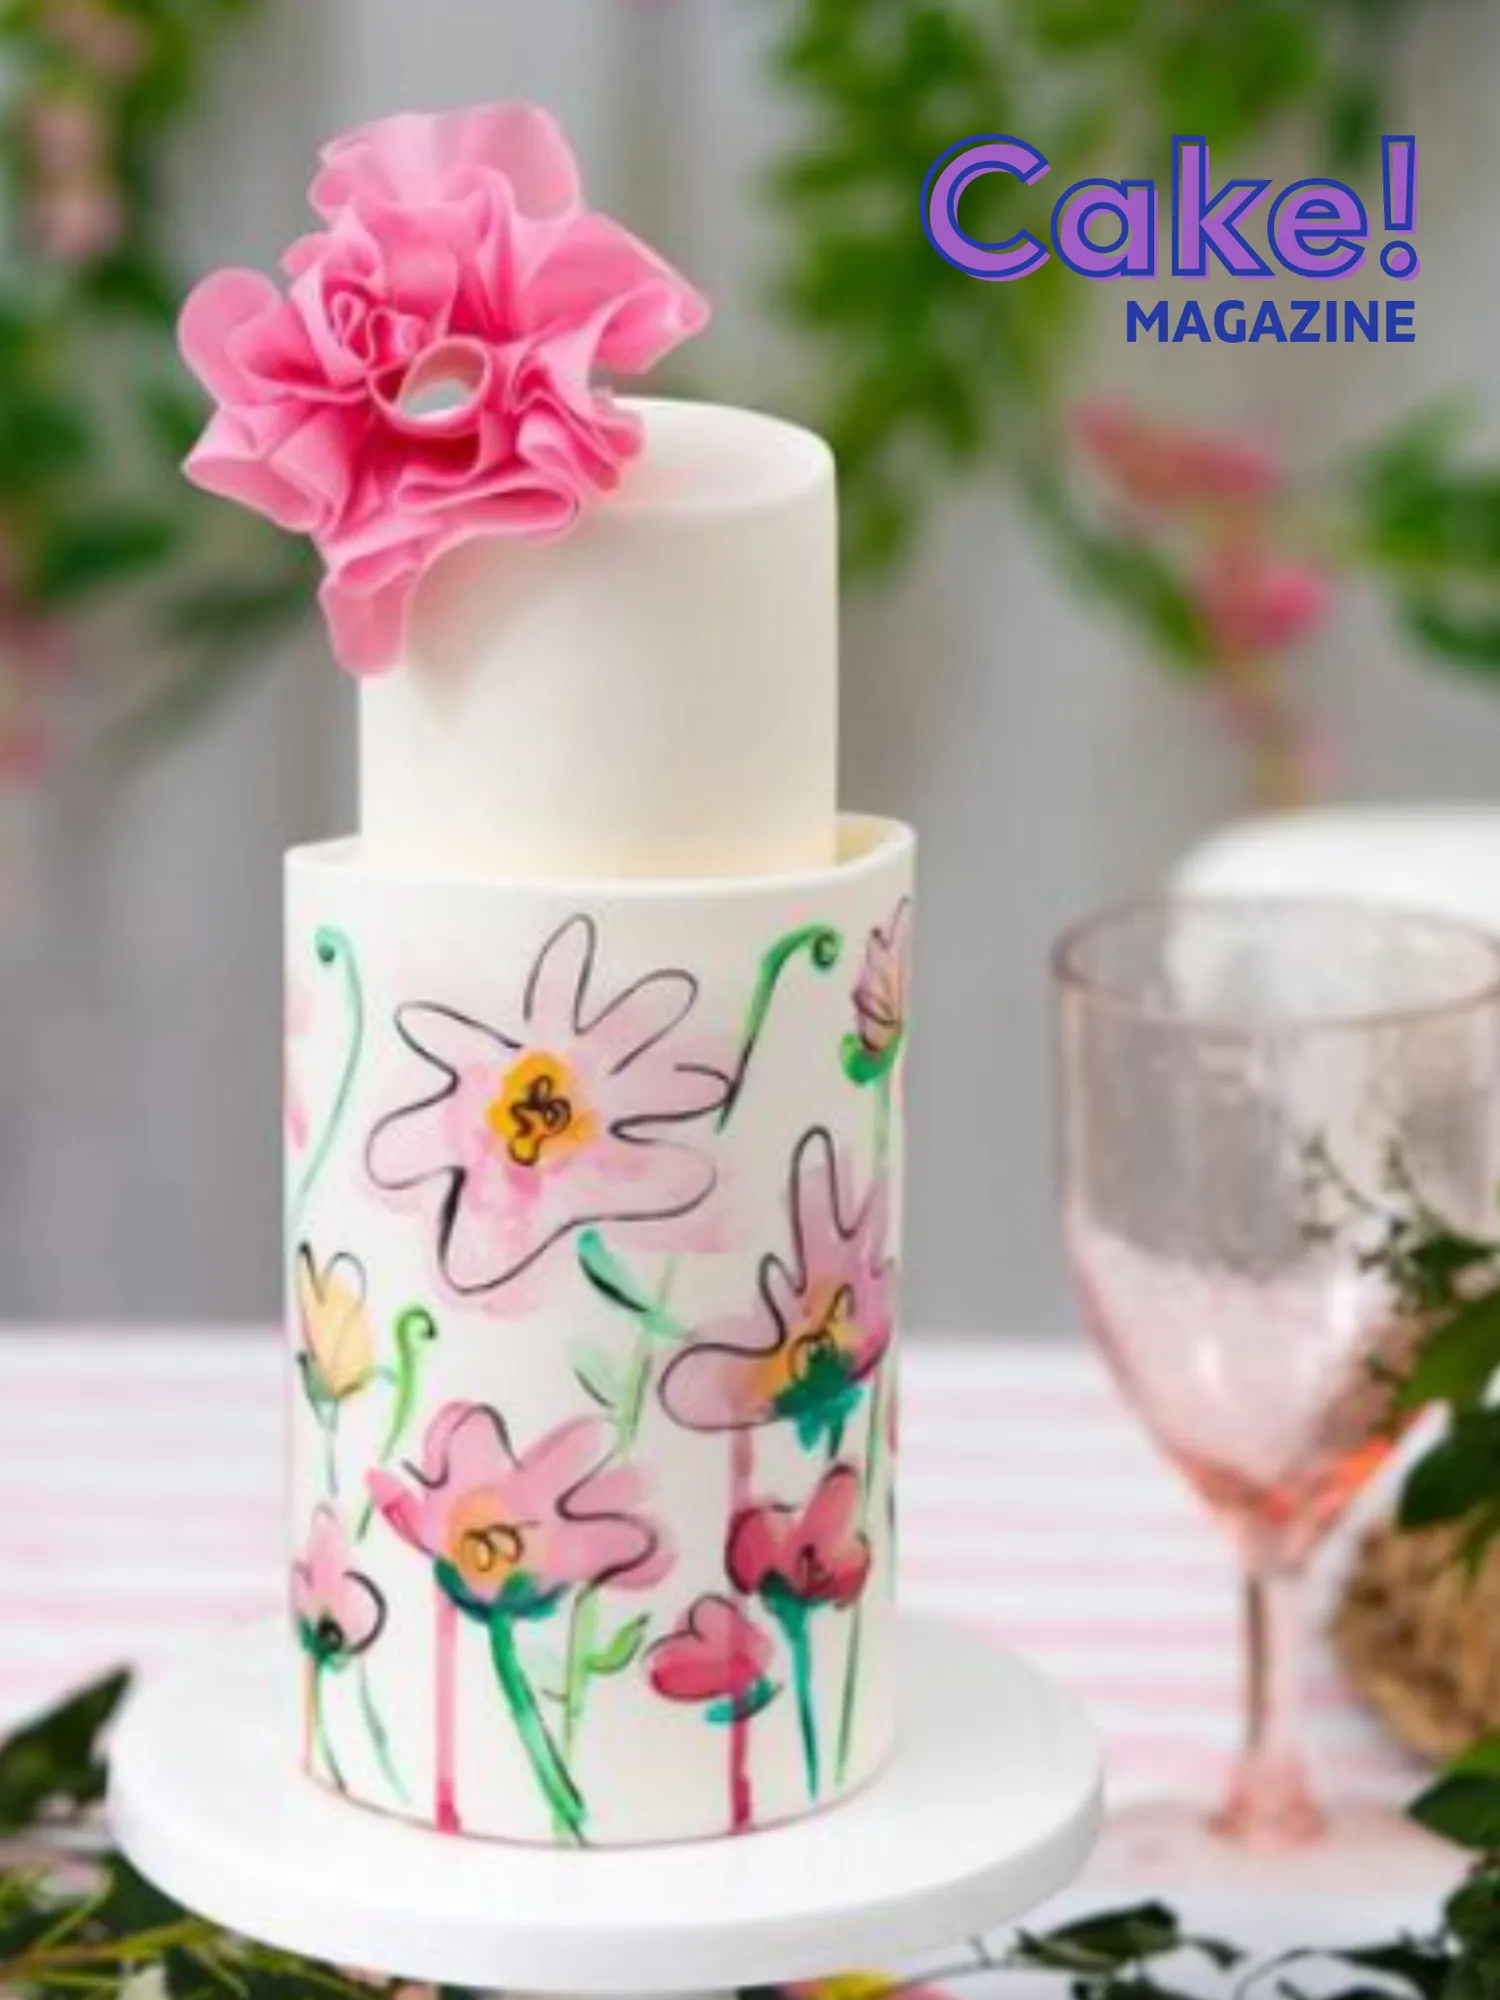
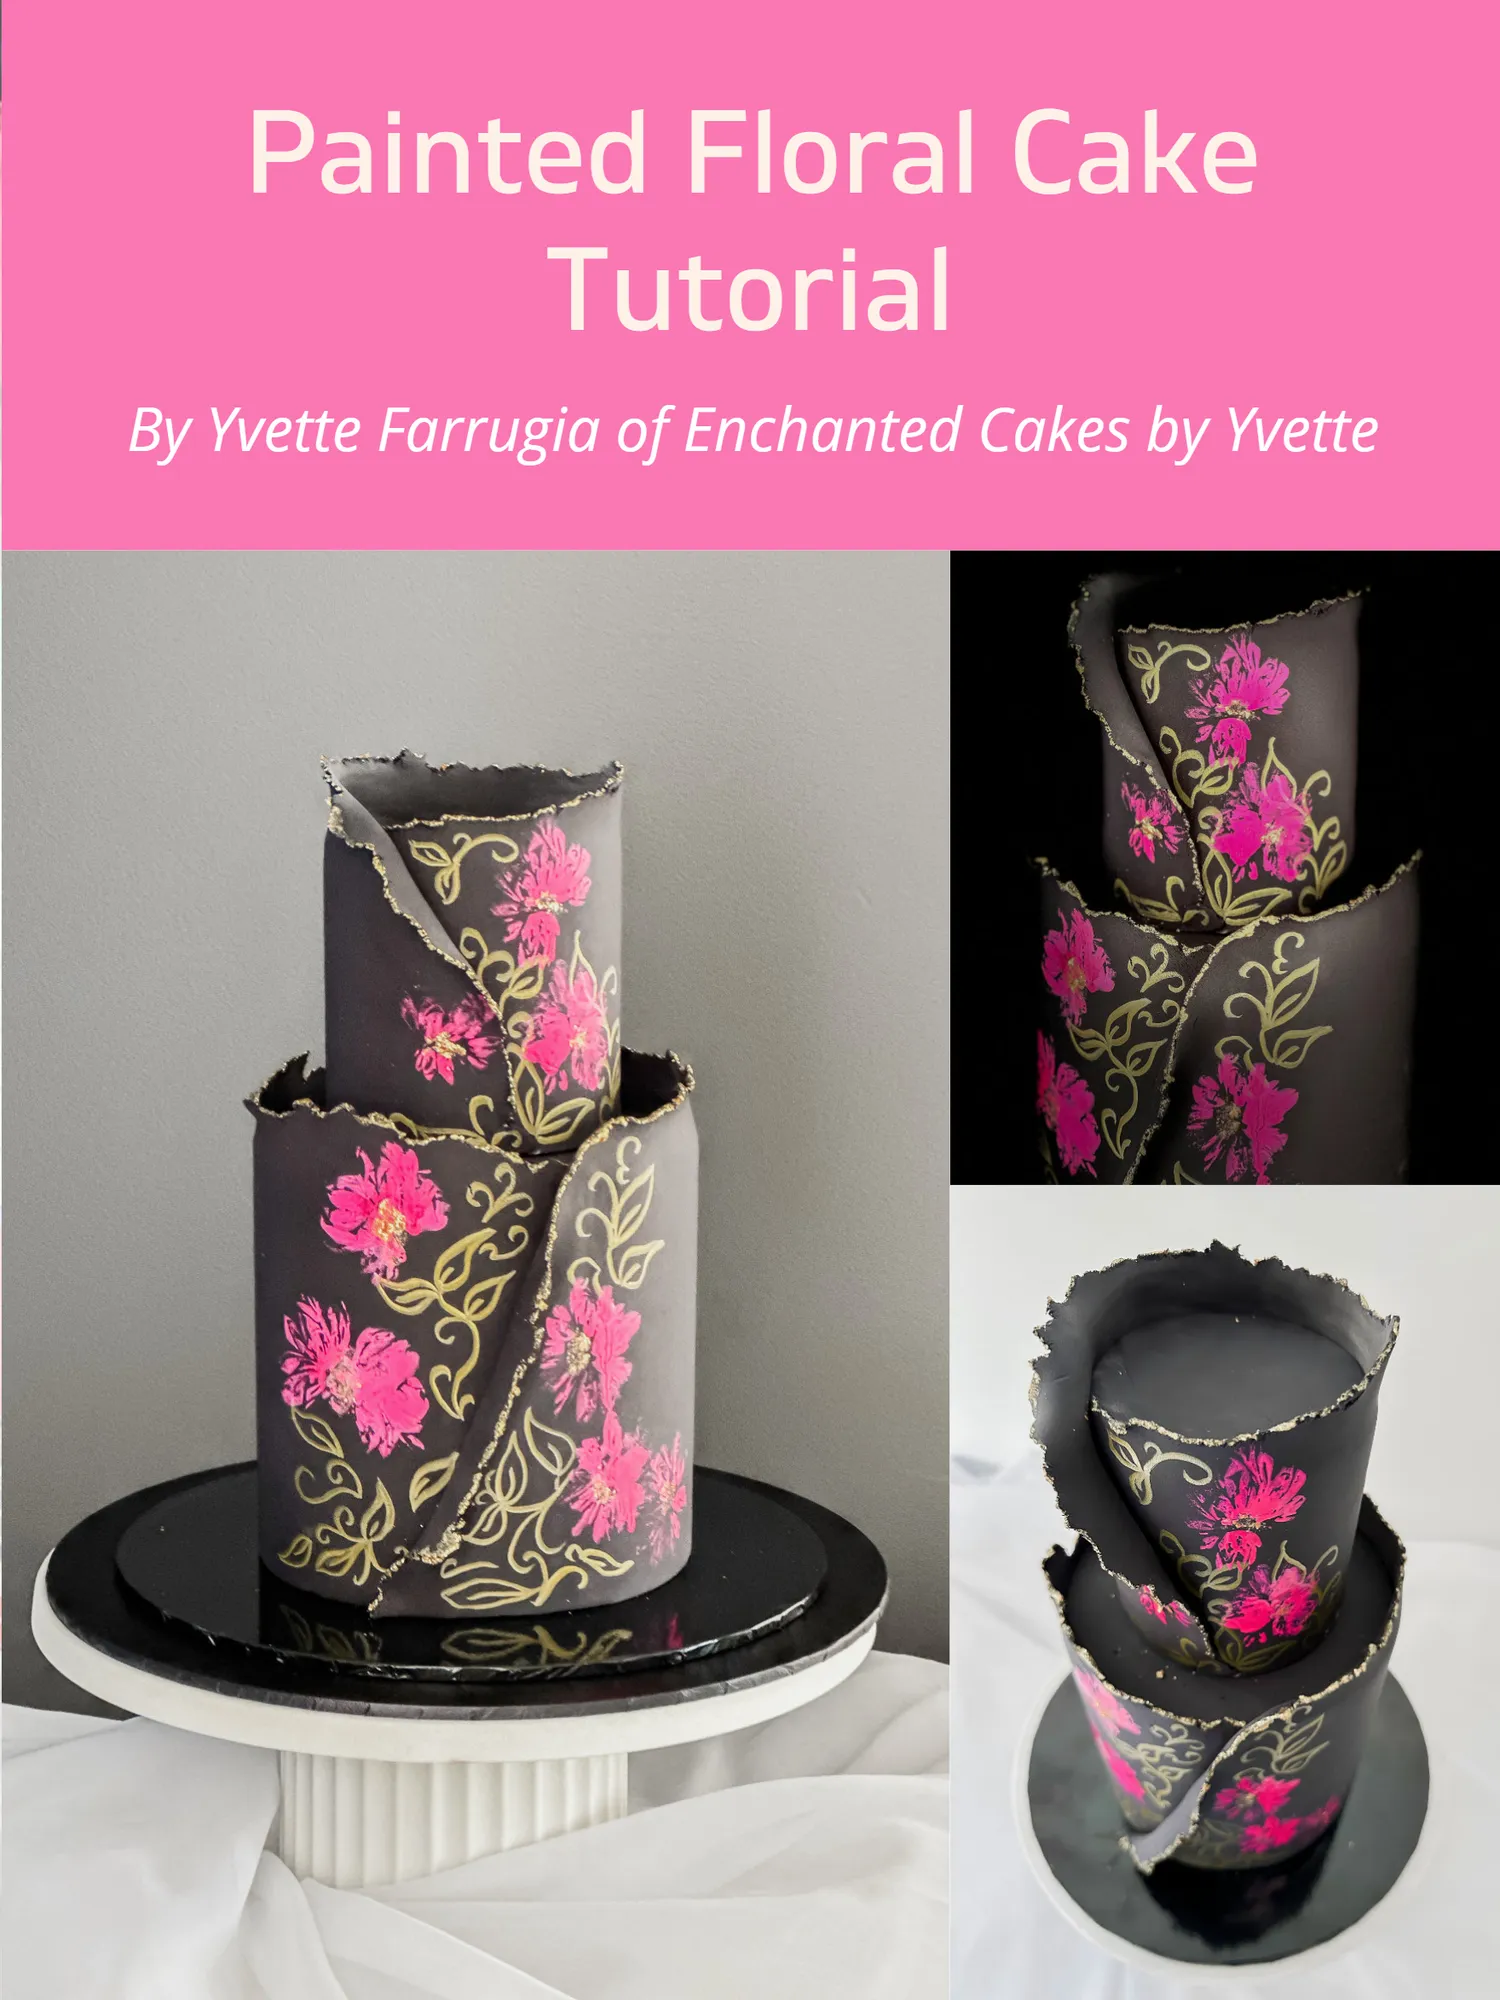
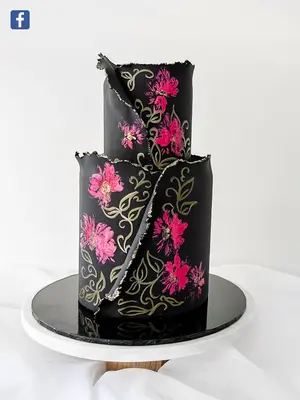
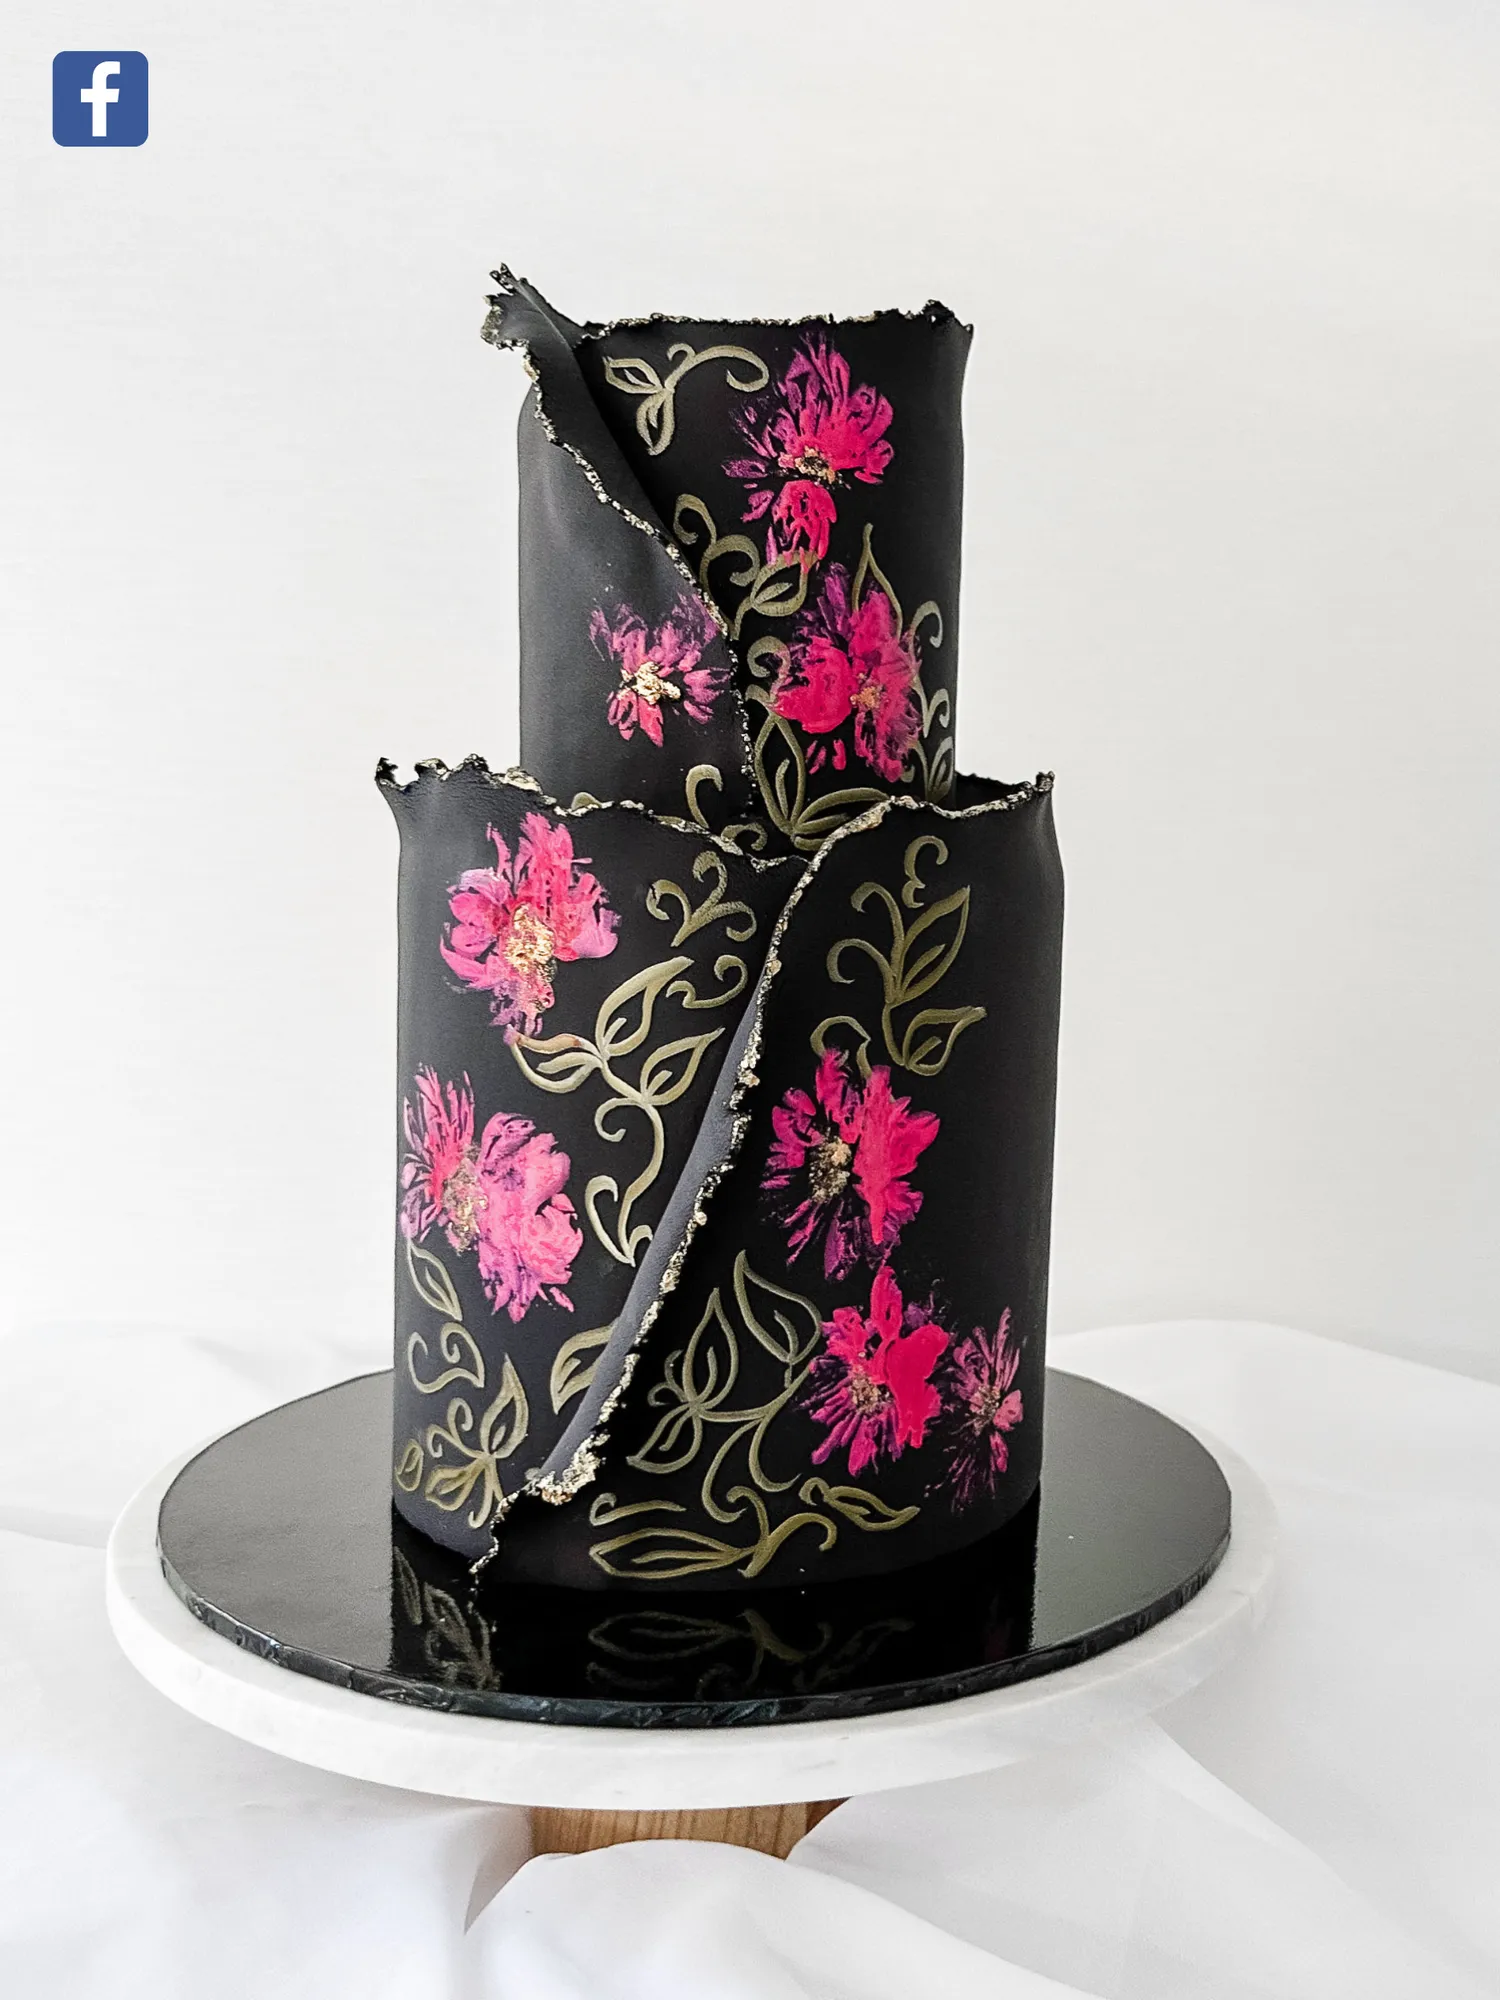
Painted Floral Cake By Yvette Farrugia of Enchanted Cakes by Yvette
Page 9 text
Painted Floral Cake Tutorial By Yvette Farrugia of Enchanted Cakes by Yvette


Page 10 text
Dummy foam cake 4 inches diameter x 4 inches tall Dummy foam cake 6 inches diameter x 6 inches tall Both dummies are covered with black fondant on a black 10 inch round cake board. Use the wrap method for covering your cake with an
Page 11 text
YOU WILL NEED: Dummy foam cake 4 inches diameter x 4 inches tall Dummy foam cake 6 inches diameter x 6 inches tall Both dummies are covered with black fondant on a black 1 10 inch round cake board. Use the wrap method for covering your cake with an
Page 12 text
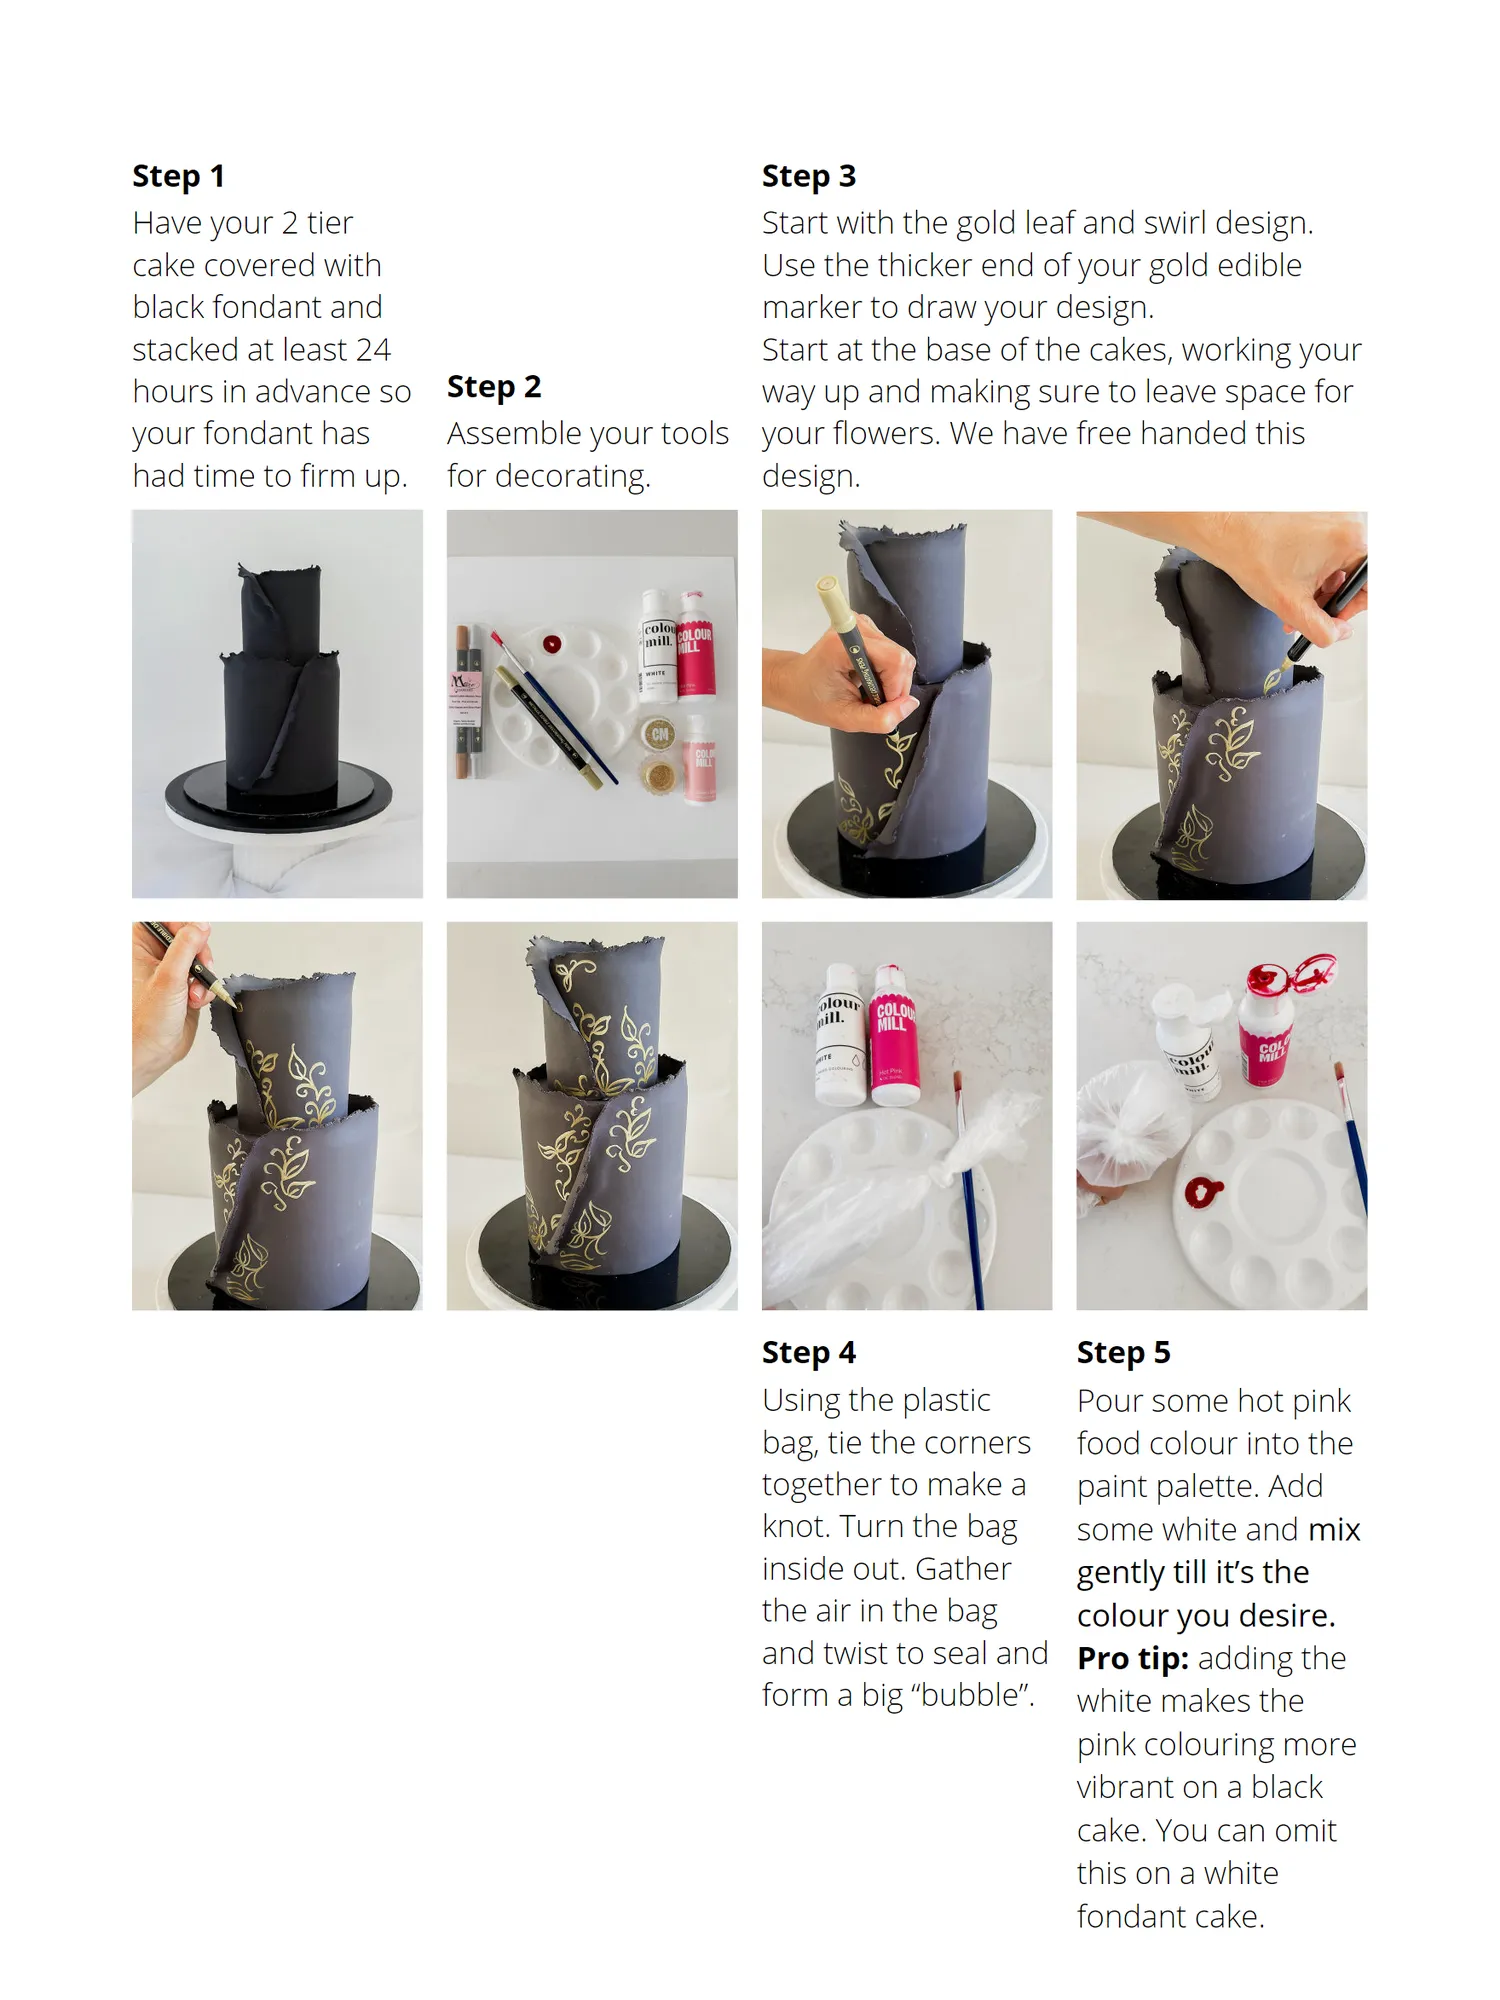
Step 1 Step 3 Have your 2 tier Start with the gold leaf and swirl design. cake covered with Use the thicker end of your gold edible black fondant and marker to draw your design. stacked at least 24 Start at the base of the cakes, working your hours in advance so Step 2 way up and making sure to leave space for your fondant has Assemble your tools your flowers. We have free handed this had time to firm up. for decorating. design. Step 4 Step 5 Using the plastic Pour some hot pink bag, tie the corners food colour into the together to make a paint palette. Add knot. Turn the bag some white and mix inside out. Gather gently till it’s the the air in the bag colour you desire. and twist to seal and Pro tip: adding the form a big “bubble”. white makes the pink colouring more vibrant on a black cake. You can omit this on a white fondant cake.
Page 13 text
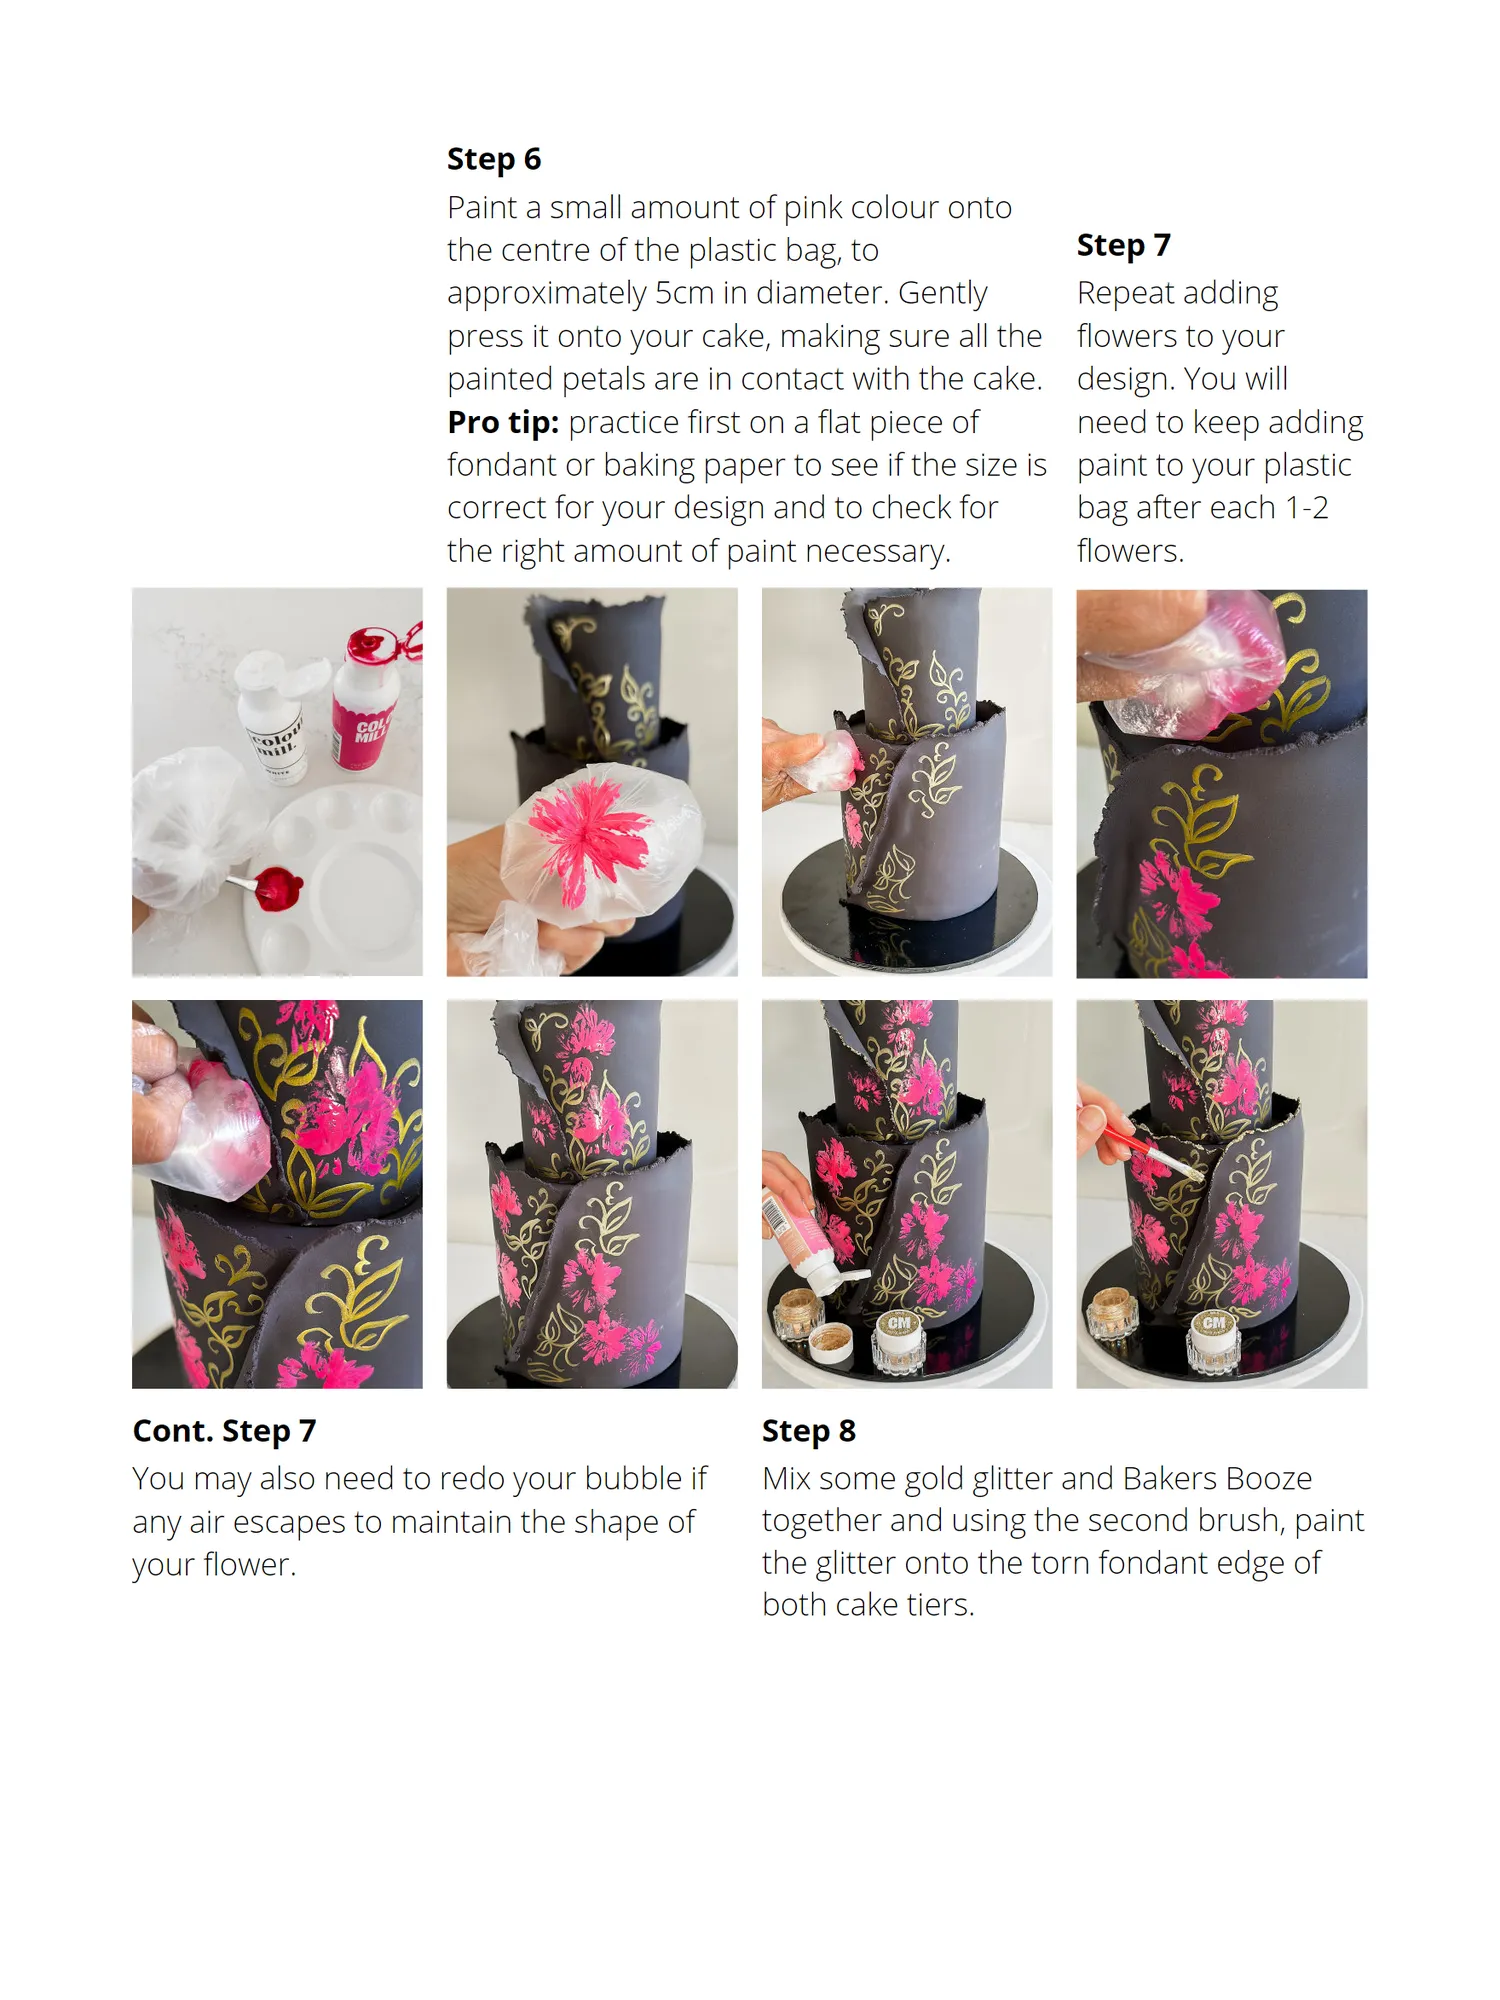
Step 6 Paint a small amount of pink colour onto the centre of the plastic bag, to Step 7 approximately 5cm in diameter. Gently Repeat adding press it onto your cake, making sure all the flowers to your painted petals are in contact with the cake. design. You will Pro tip: practice first on a flat piece of need to keep adding fondant or baking paper to see if the size is paint to your plastic correct for your design and to check for bag after each 1-2 the right amount of paint necessary. flowers. Cont. Step 7 Step 8 You may also need to redo your bubble if Mix some gold glitter and Bakers Booze any air escapes to maintain the shape of together and using the second brush, paint your flower. the glitter onto the torn fondant edge of both cake tiers.
Page 14 text
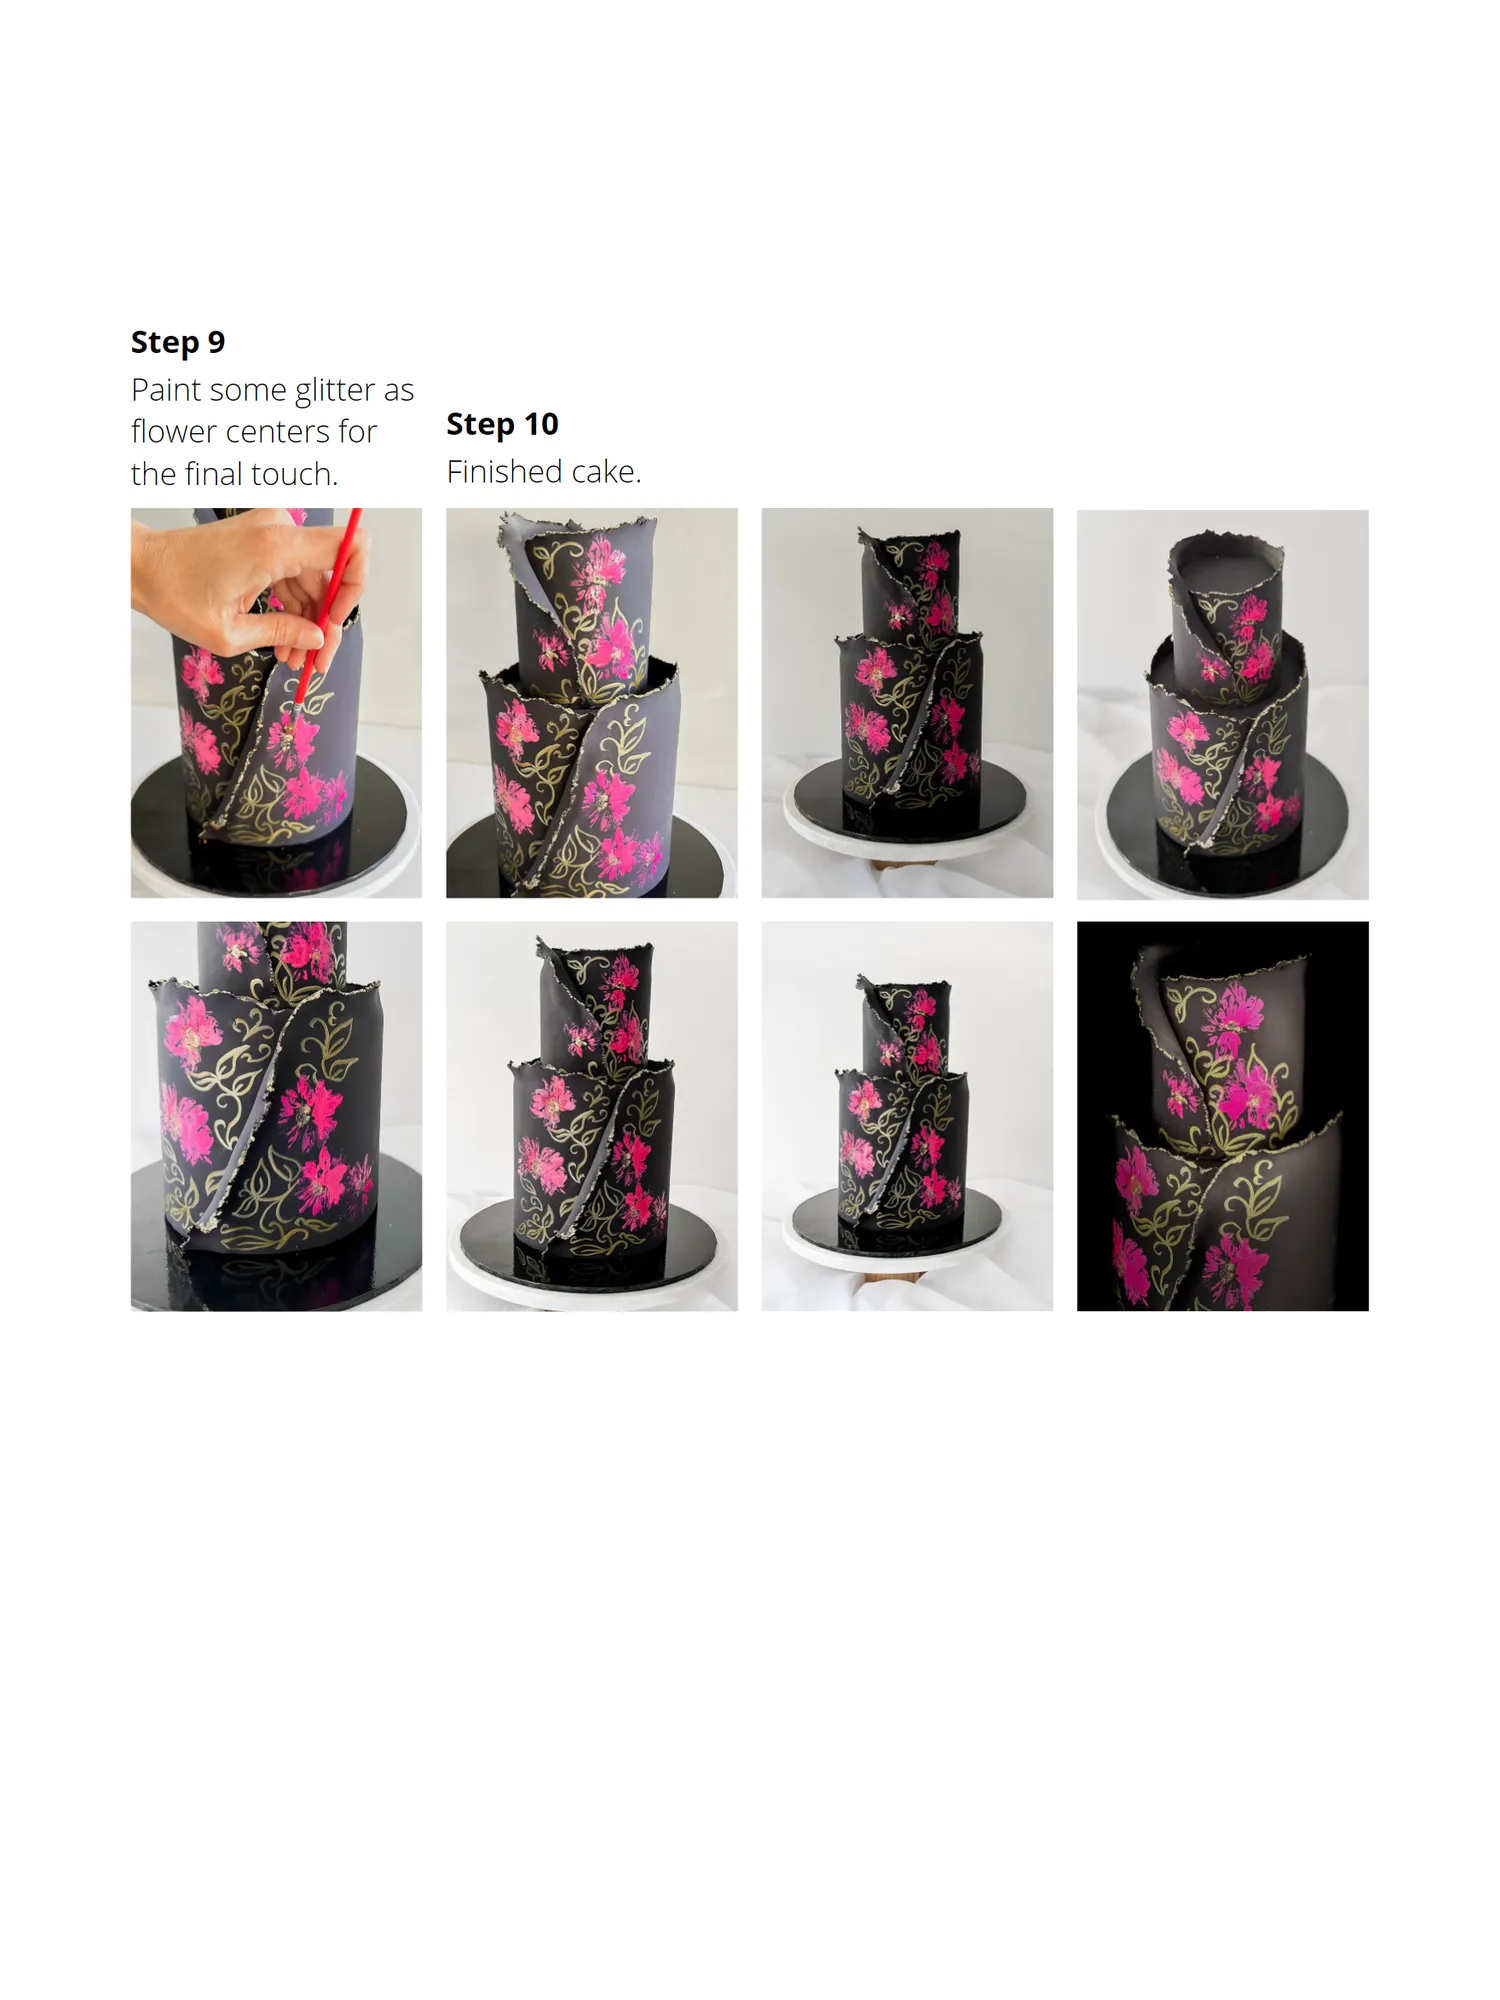
Step 9 Paint some glitter as Step 10 flower centers for the final touch. Finished cake.
Page 15 text
Step 10 Finished cake.


Page 16 text
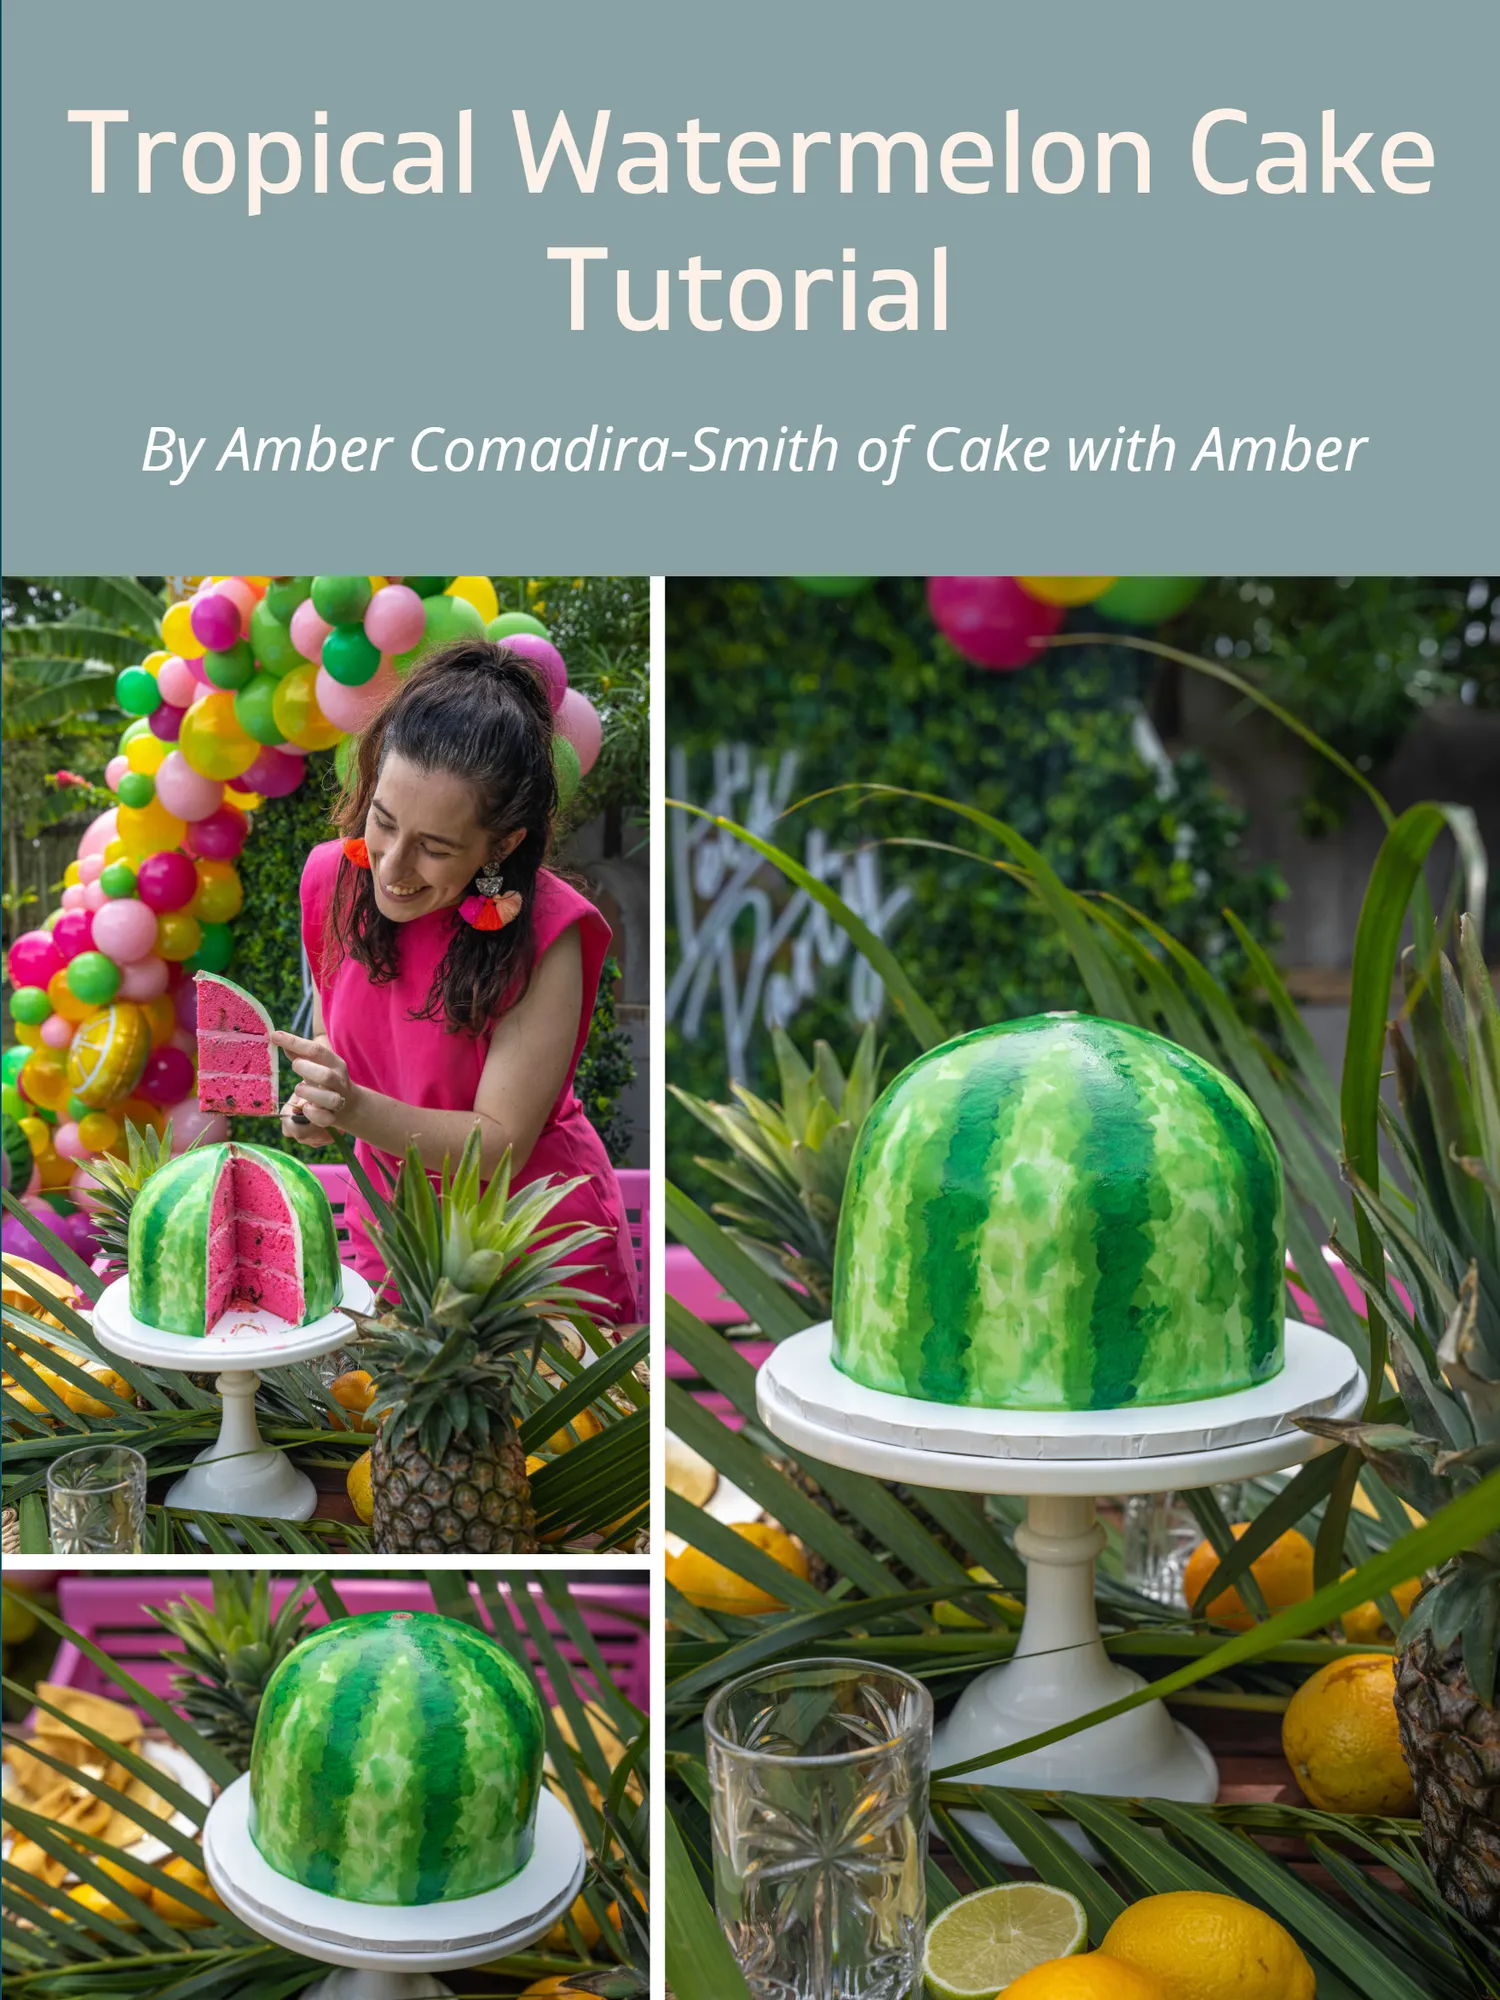
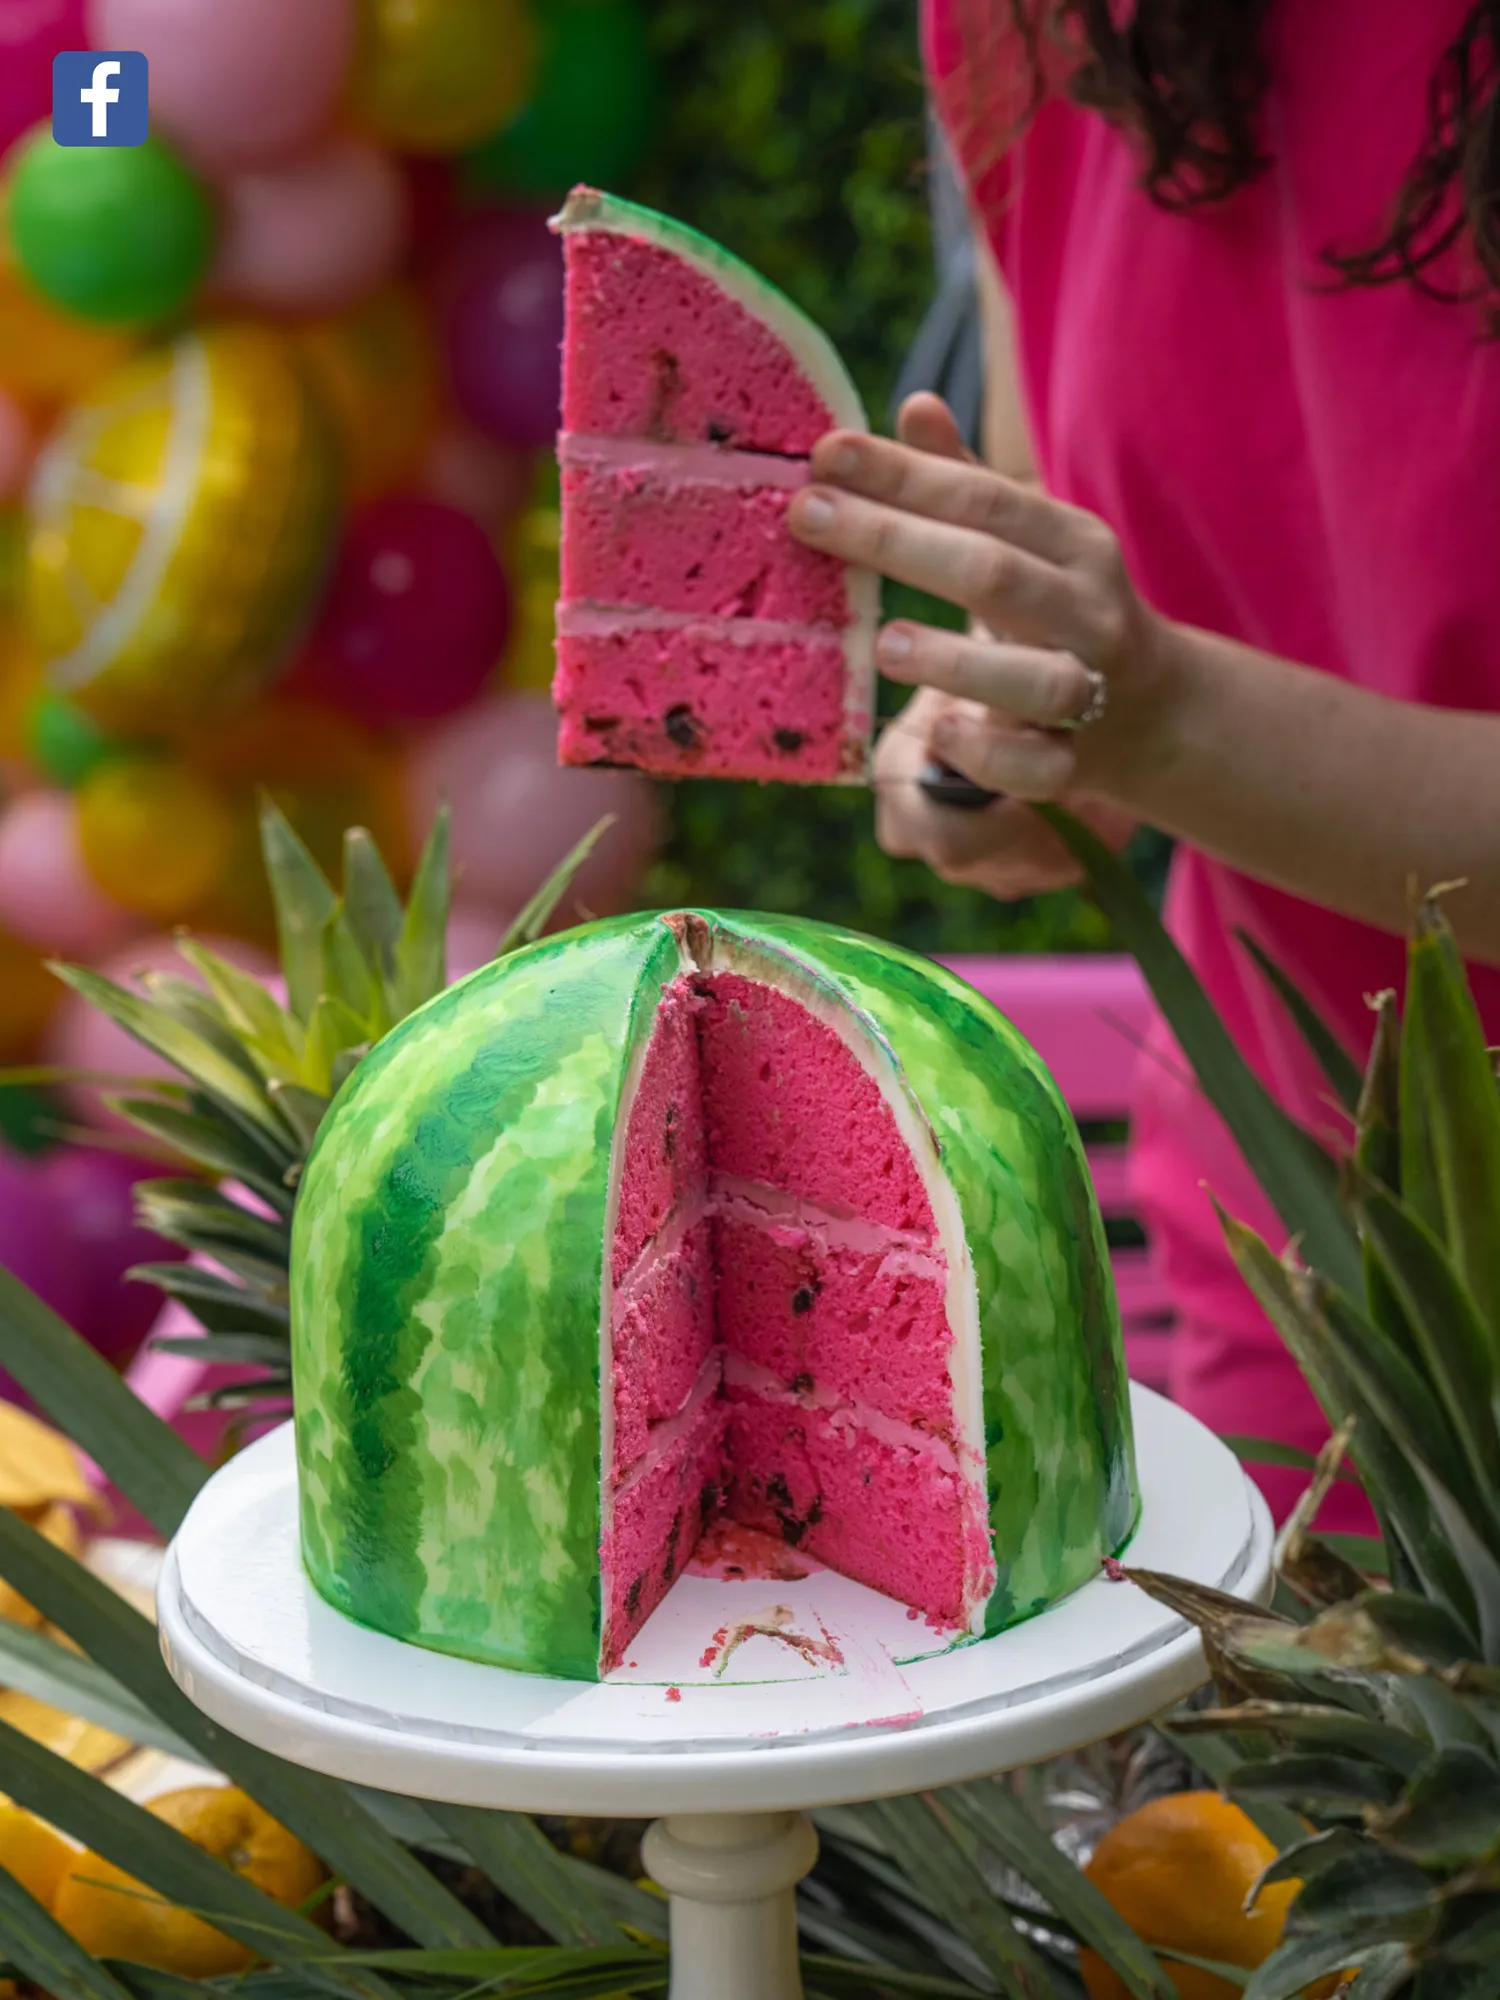
Tropical Watermelon Cake By Amber Comadira-Smith of Cake with Amber
Page 17 text
Tropical Watermelon Cake Tutorial By Amber Comadira-Smith of Cake with Amber
Page 18 text
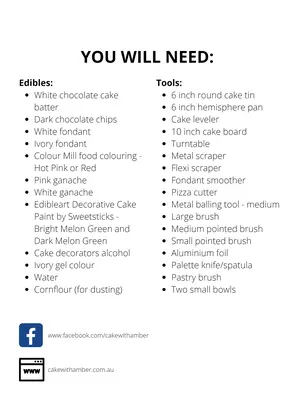
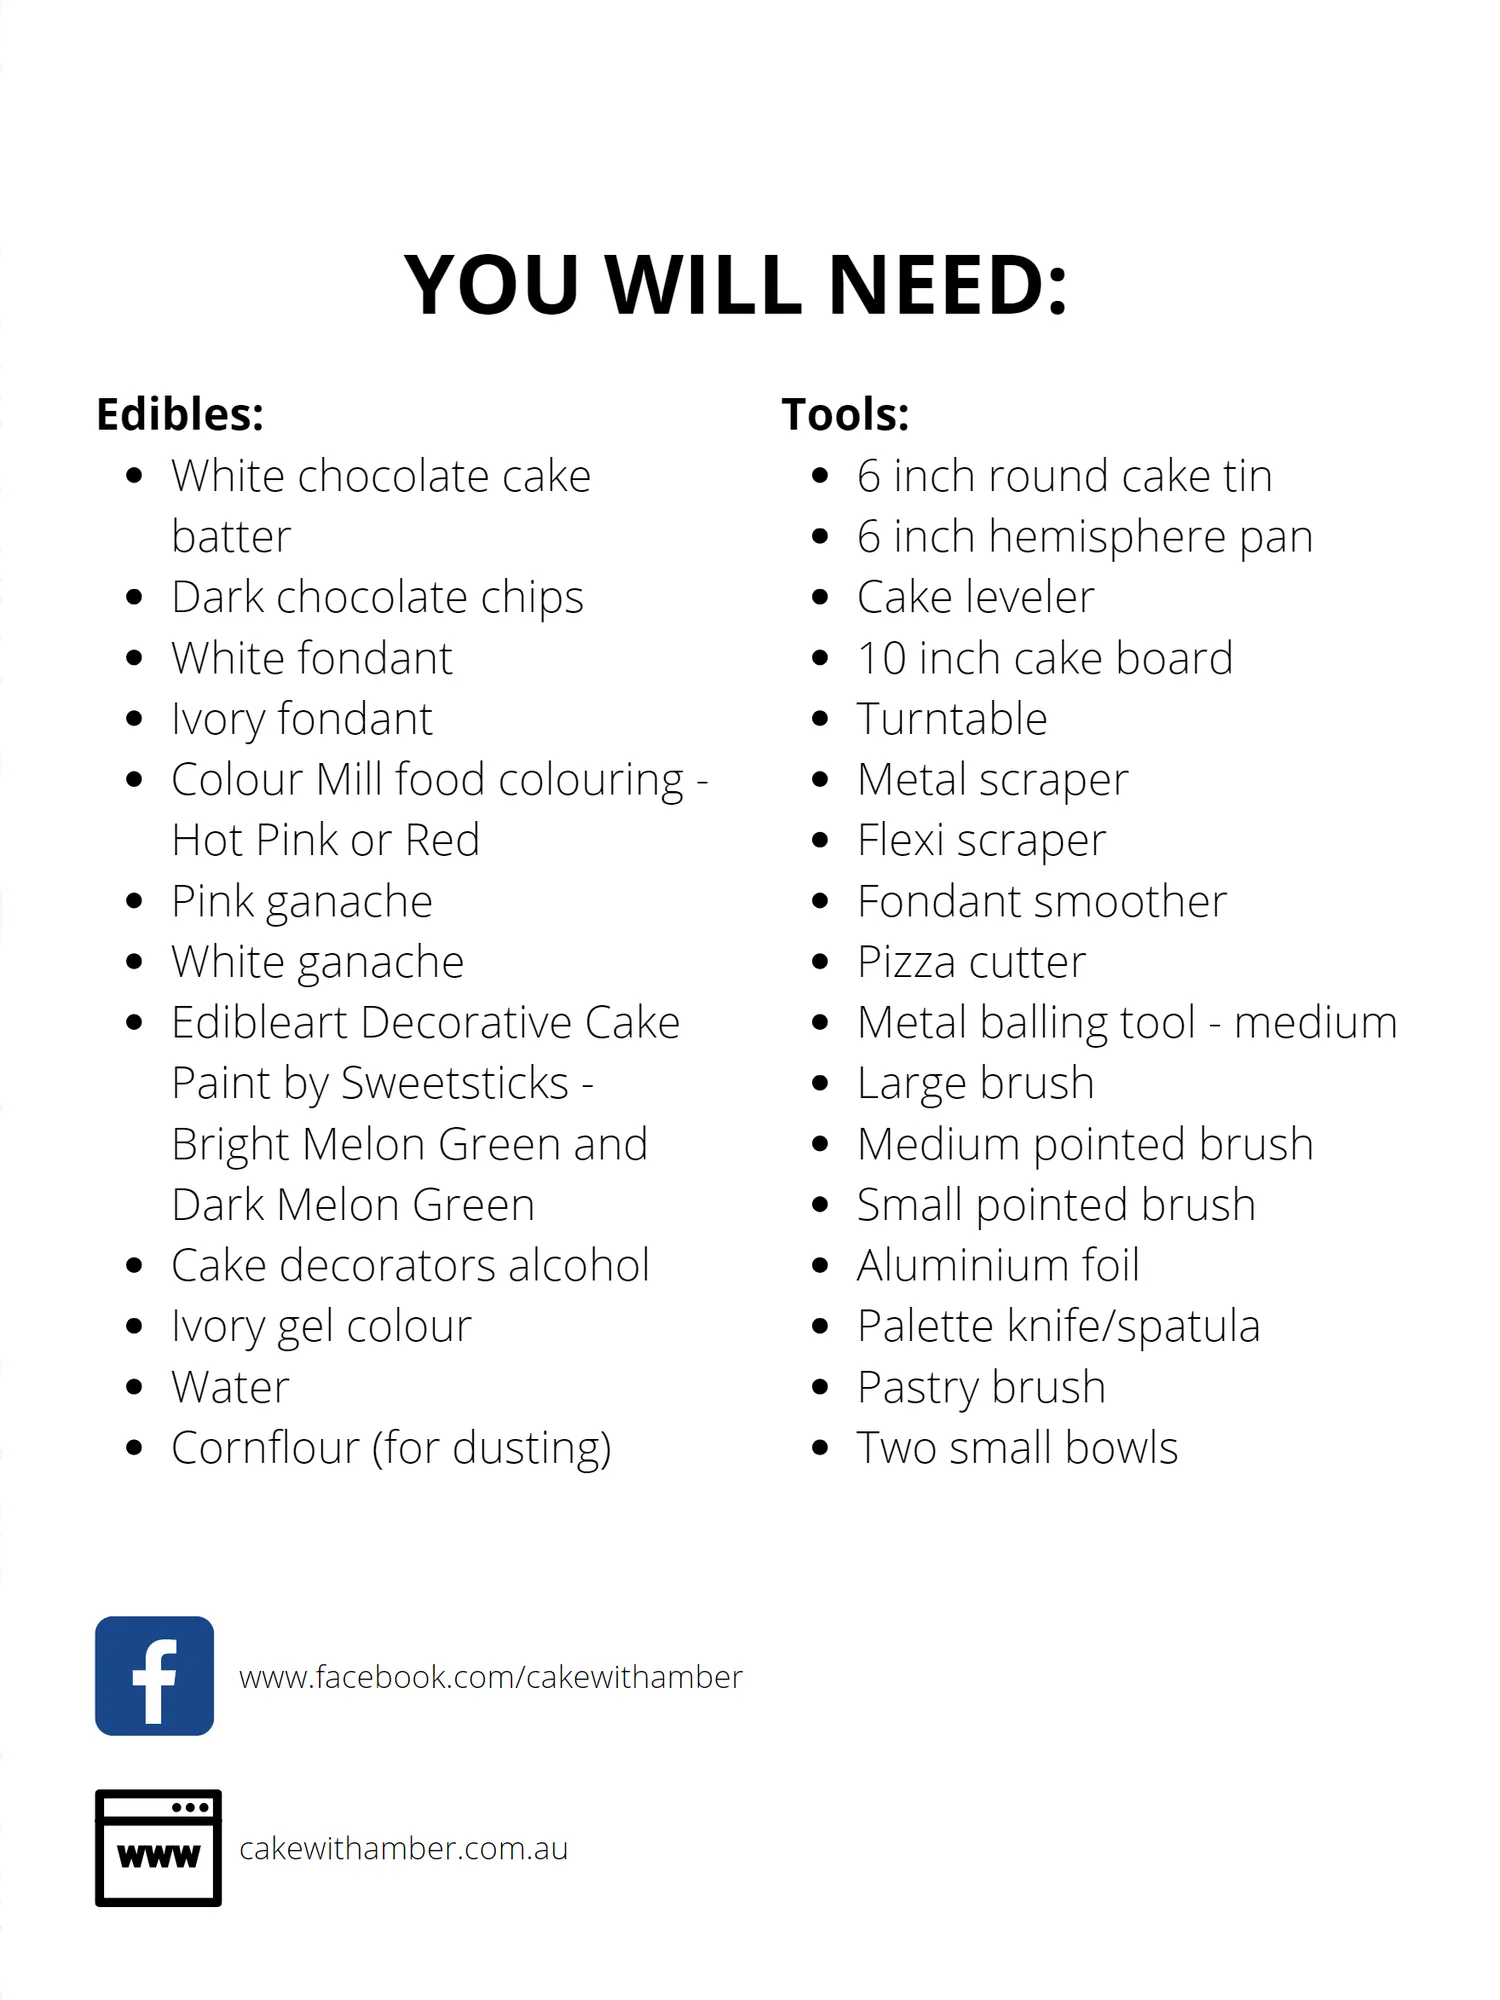
Edibles: White chocolate cake batter Dark chocolate chips
Page 19 text
YOU WILL NEED: Tools: White chocolate cake 6 inch round cake tin 6 inch hemisphere pan Dark chocolate chips Cake leveler
Page 20 text
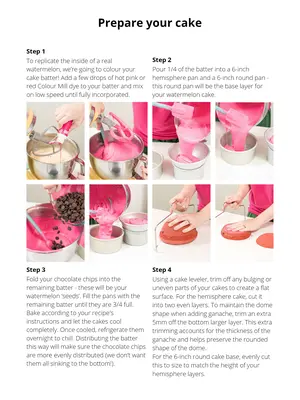
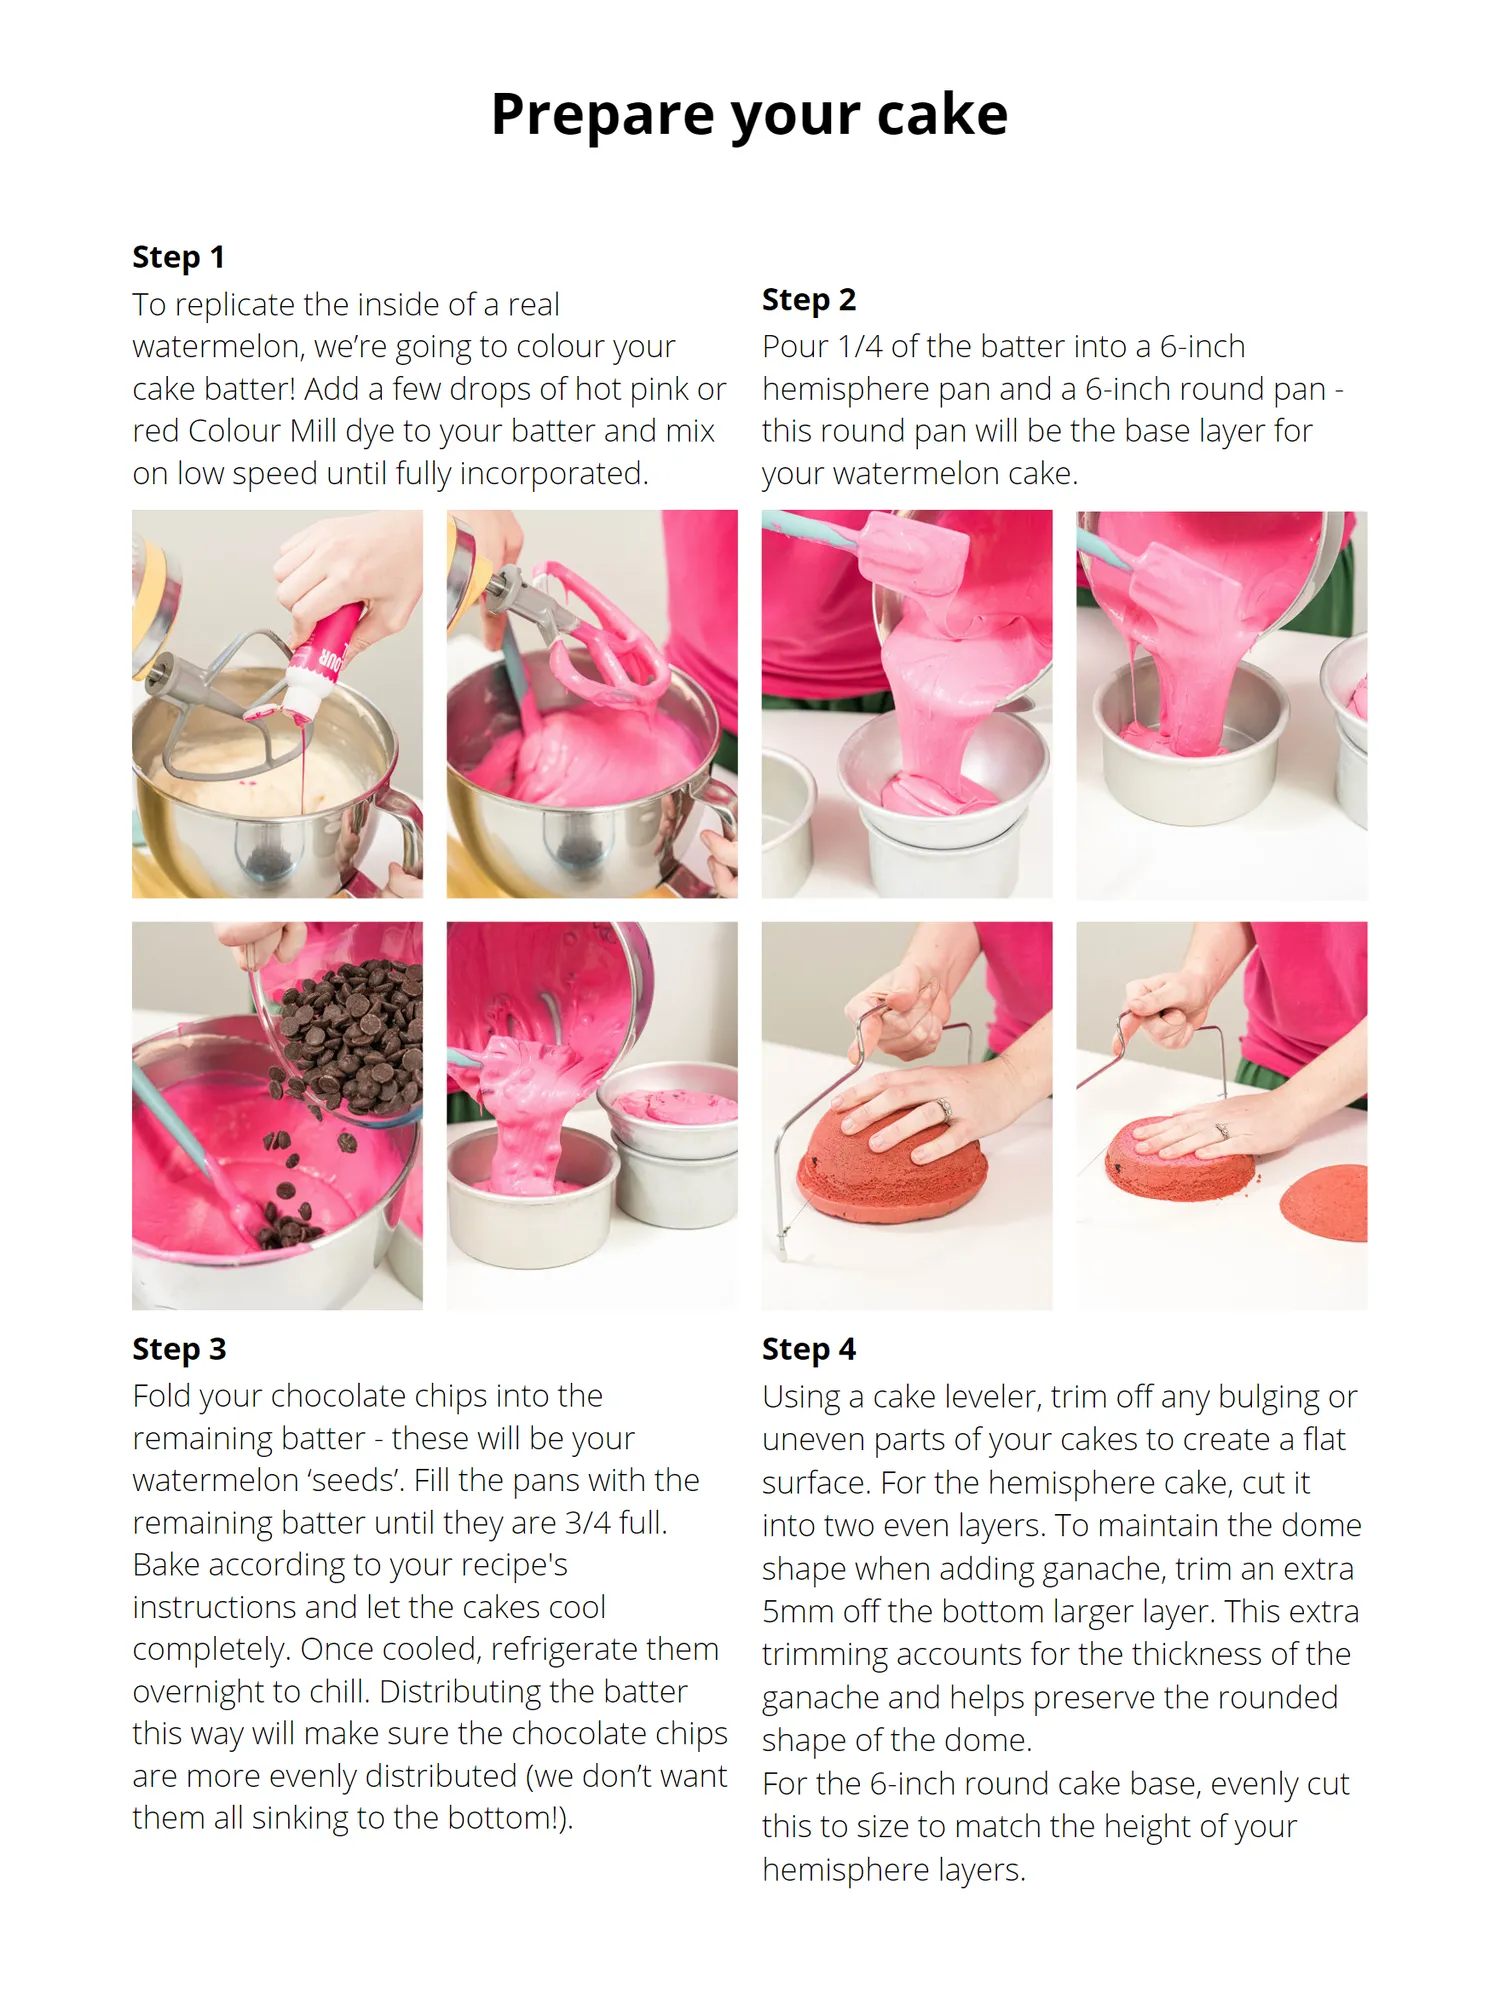
Prepare your cake Step 1 To replicate the inside of a real Step 2 watermelon, we’re going to colour your Pour 1/4 of the batter into a 6-inch cake batter! Add a few drops of hot pink or hemisphere pan and a 6-inch round pan - red Colour Mill dye to your batter and mix this round pan will be the base layer for on low speed until fully incorporated. your watermelon cake. Step 3 Step 4 Fold your chocolate chips into the Using a cake leveler, trim off any bulging or remaining batter - these will be your uneven parts of your cakes to create a flat watermelon ‘seeds’. Fill the pans with the surface. For the hemisphere cake, cut it remaining batter until they are 3/4 full. into two even layers. To maintain the dome Bake according to your recipe's shape when adding ganache, trim an extra instructions and let the cakes cool 5mm off the bottom larger layer. This extra completely. Once cooled, refrigerate them trimming accounts for the thickness of the overnight to chill. Distributing the batter ganache and helps preserve the rounded this way will make sure the chocolate chips shape of the dome. are more evenly distributed (we don’t want For the 6-inch round cake base, evenly cut them all sinking to the bottom!). this to size to match the height of your hemisphere layers.
Page 21 text
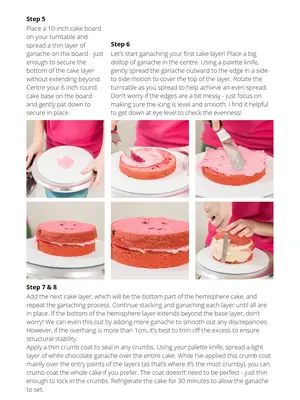
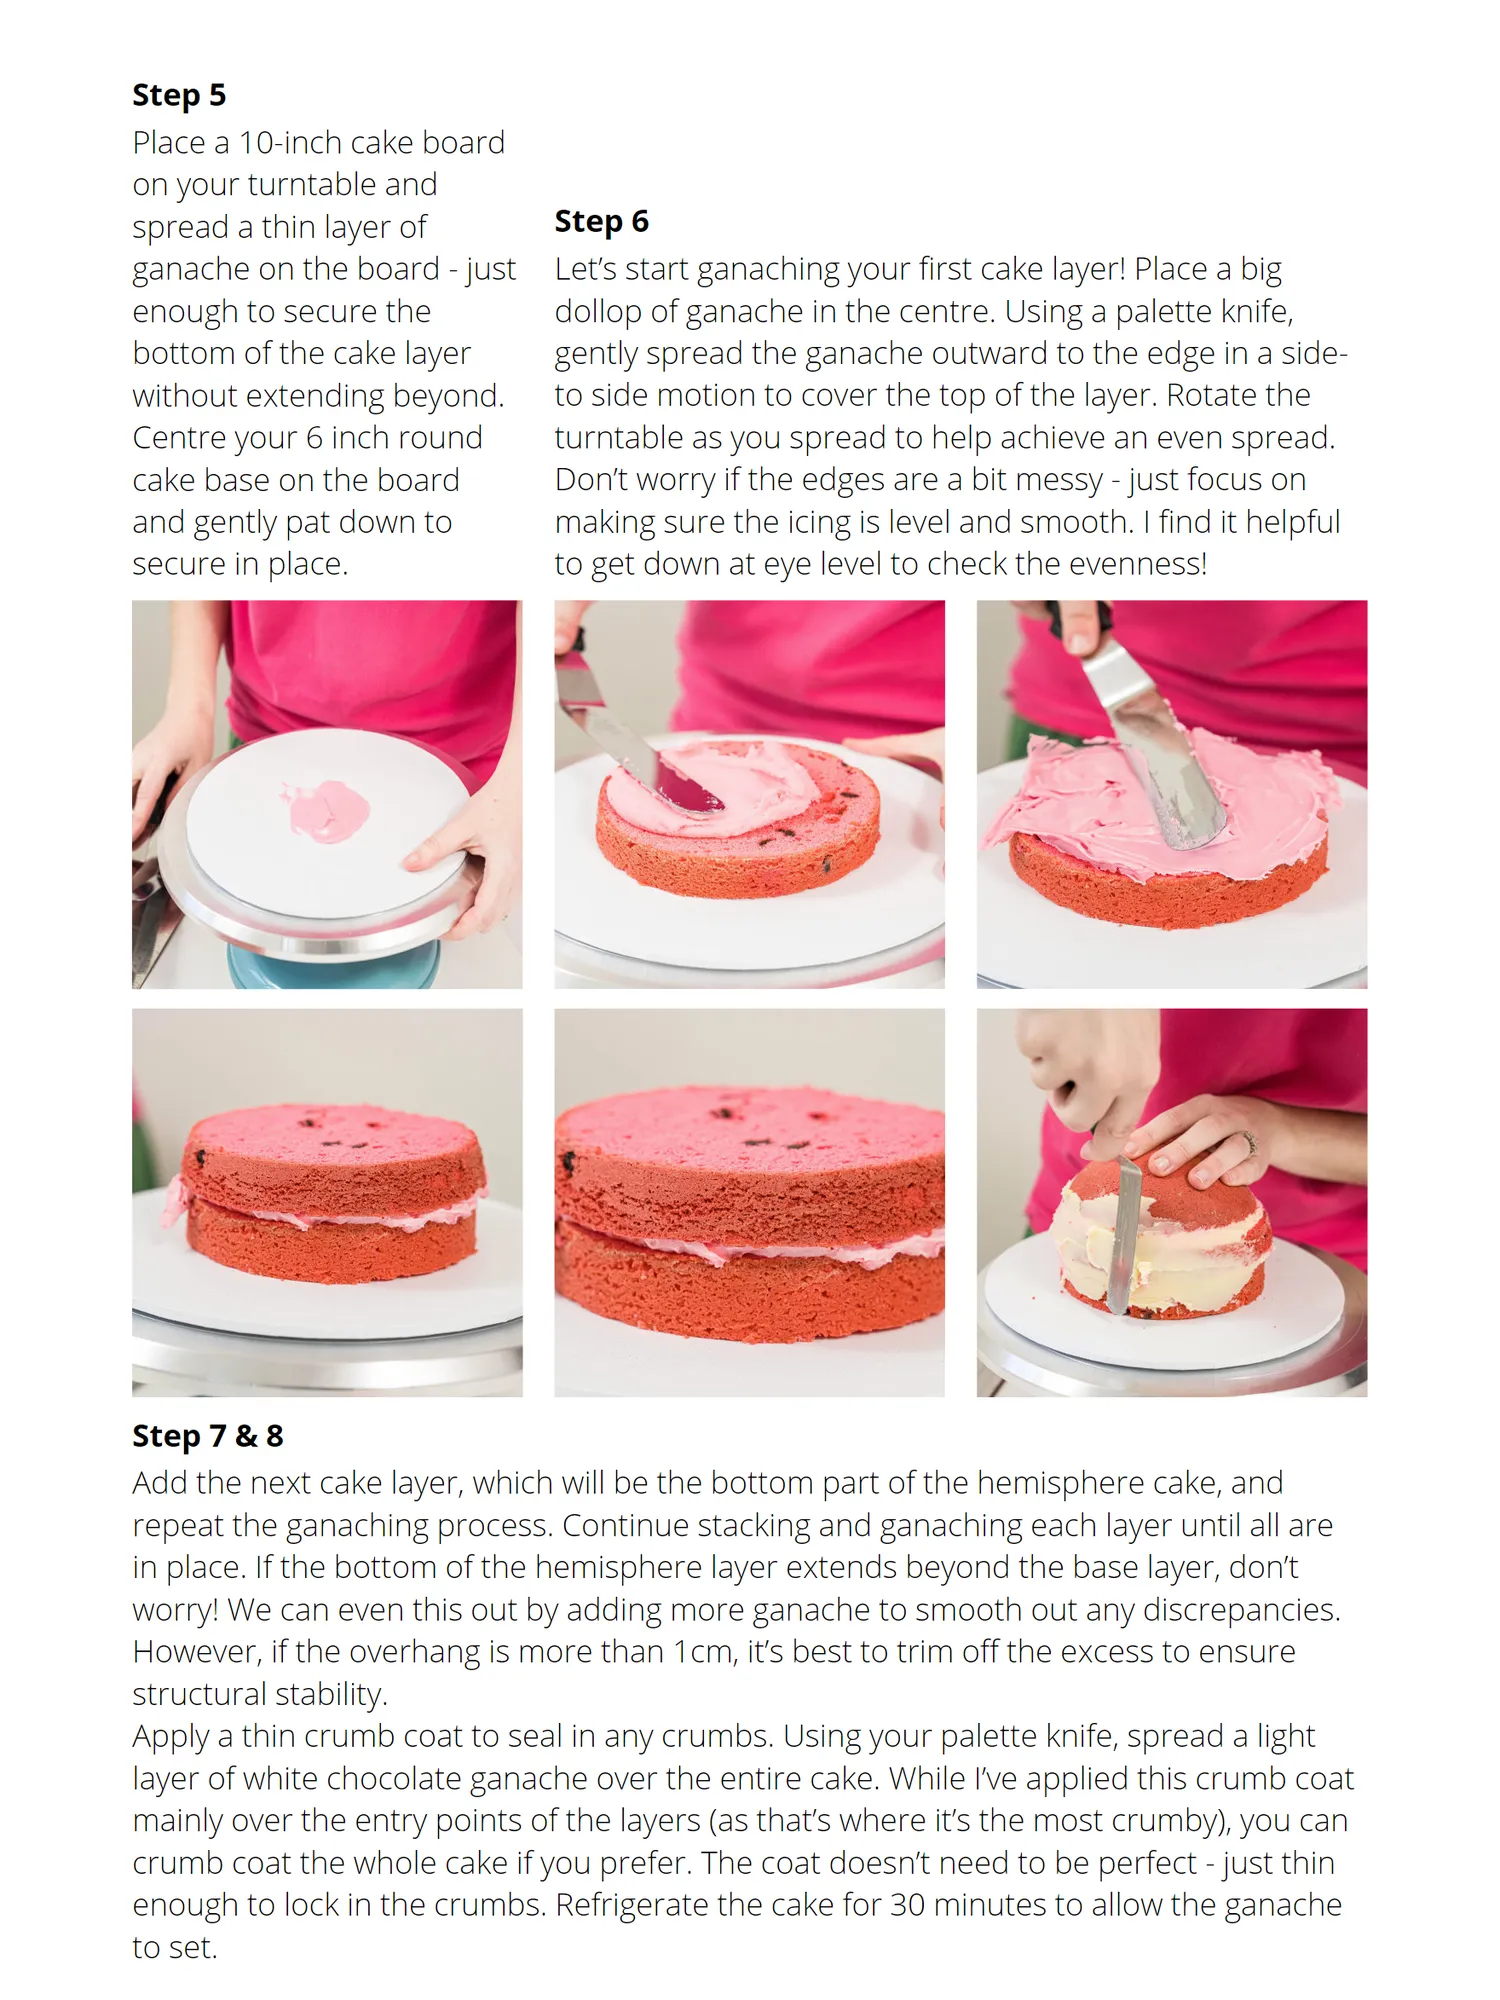
Step 5 Place a 10-inch cake board on your turntable and spread a thin layer of Step 6 ganache on the board - just Let’s start ganaching your first cake layer! Place a big enough to secure the dollop of ganache in the centre. Using a palette knife, bottom of the cake layer gently spread the ganache outward to the edge in a side- without extending beyond. to side motion to cover the top of the layer. Rotate the Centre your 6 inch round turntable as you spread to help achieve an even spread. cake base on the board Don’t worry if the edges are a bit messy - just focus on and gently pat down to making sure the icing is level and smooth. I find it helpful secure in place. to get down at eye level to check the evenness! Step 7 & 8 Add the next cake layer, which will be the bottom part of the hemisphere cake, and repeat the ganaching process. Continue stacking and ganaching each layer until all are in place. If the bottom of the hemisphere layer extends beyond the base layer, don’t worry! We can even this out by adding more ganache to smooth out any discrepancies. However, if the overhang is more than 1cm, it’s best to trim off the excess to ensure structural stability. Apply a thin crumb coat to seal in any crumbs. Using your palette knife, spread a light layer of white chocolate ganache over the entire cake. While I’ve applied this crumb coat mainly over the entry points of the layers (as that’s where it’s the most crumby), you can crumb coat the whole cake if you prefer. The coat doesn’t need to be perfect - just thin enough to lock in the crumbs. Refrigerate the cake for 30 minutes to allow the ganache to set.
Page 22 text
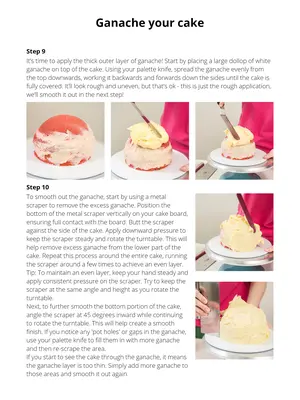
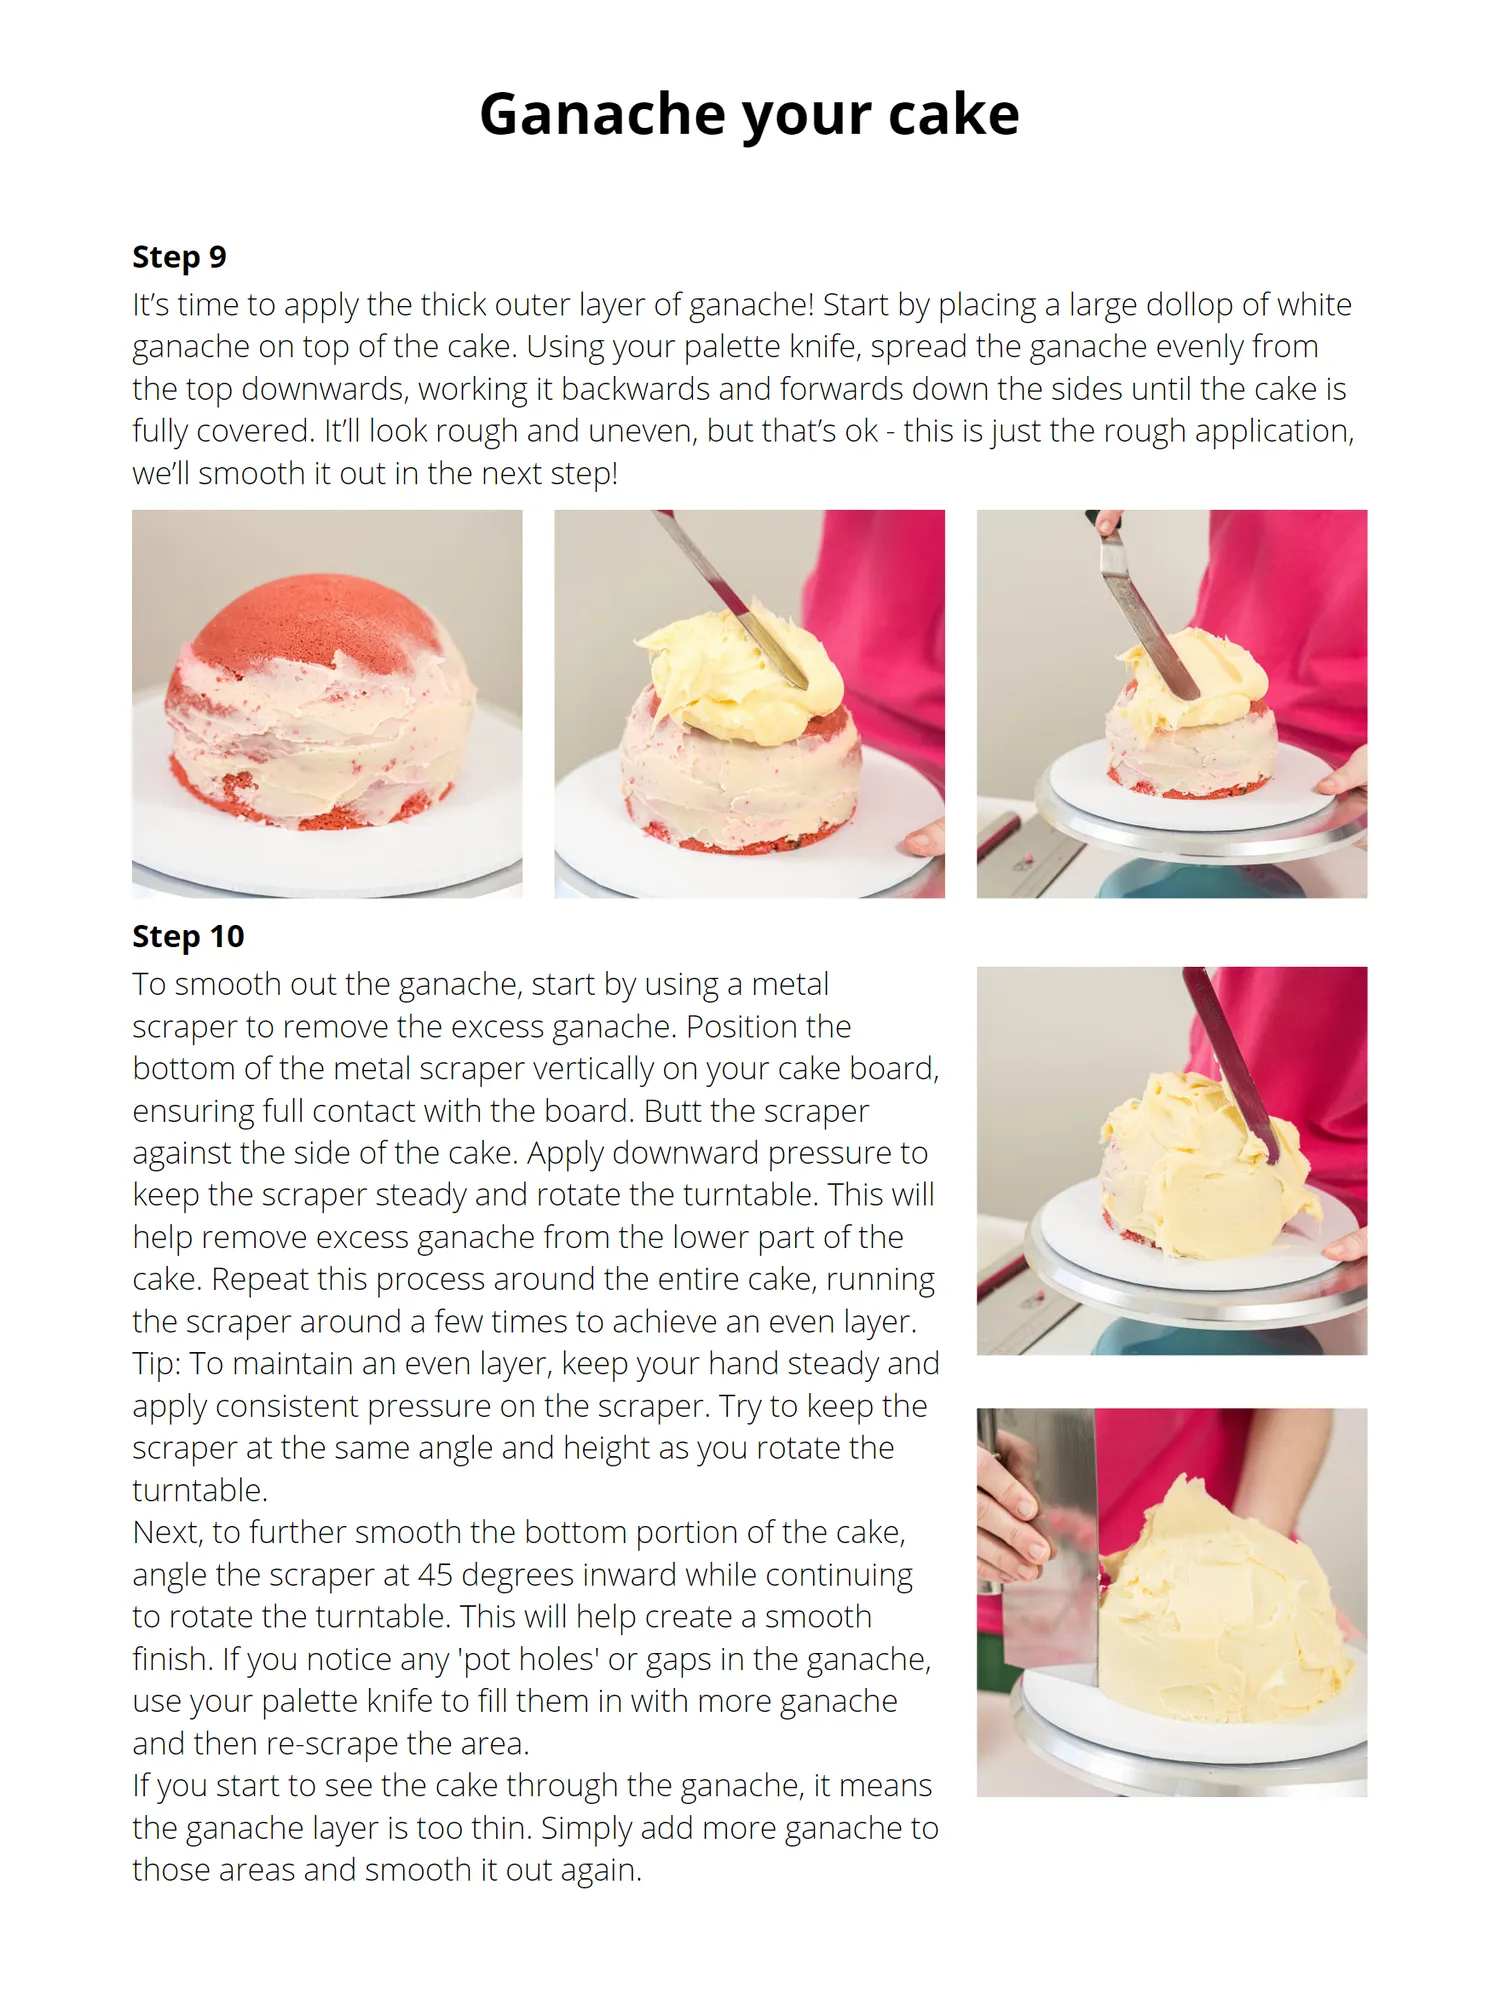
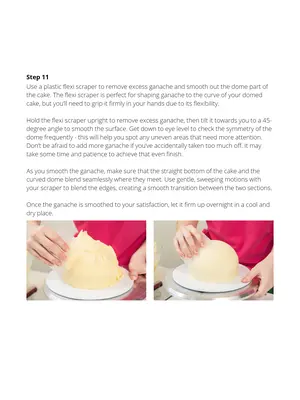
Ganache your cake Step 9 It’s time to apply the thick outer layer of ganache! Start by placing a large dollop of white ganache on top of the cake. Using your palette knife, spread the ganache evenly from the top downwards, working it backwards and forwards down the sides until the cake is fully covered. It’ll look rough and uneven, but that’s ok - this is just the rough application, we’ll smooth it out in the next step! Step 10 To smooth out the ganache, start by using a metal scraper to remove the excess ganache. Position the bottom of the metal scraper vertically on your cake board, ensuring full contact with the board. Butt the scraper against the side of the cake. Apply downward pressure to keep the scraper steady and rotate the turntable. This will help remove excess ganache from the lower part of the cake. Repeat this process around the entire cake, running the scraper around a few times to achieve an even layer. Tip: To maintain an even layer, keep your hand steady and apply consistent pressure on the scraper. Try to keep the scraper at the same angle and height as you rotate the turntable. Next, to further smooth the bottom portion of the cake, angle the scraper at 45 degrees inward while continuing to rotate the turntable. This will help create a smooth finish. If you notice any 'pot holes' or gaps in the ganache, use your palette knife to fill them in with more ganache and then re-scrape the area. If you start to see the cake through the ganache, it means the ganache layer is too thin. Simply add more ganache to those areas and smooth it out again.
Page 23 text
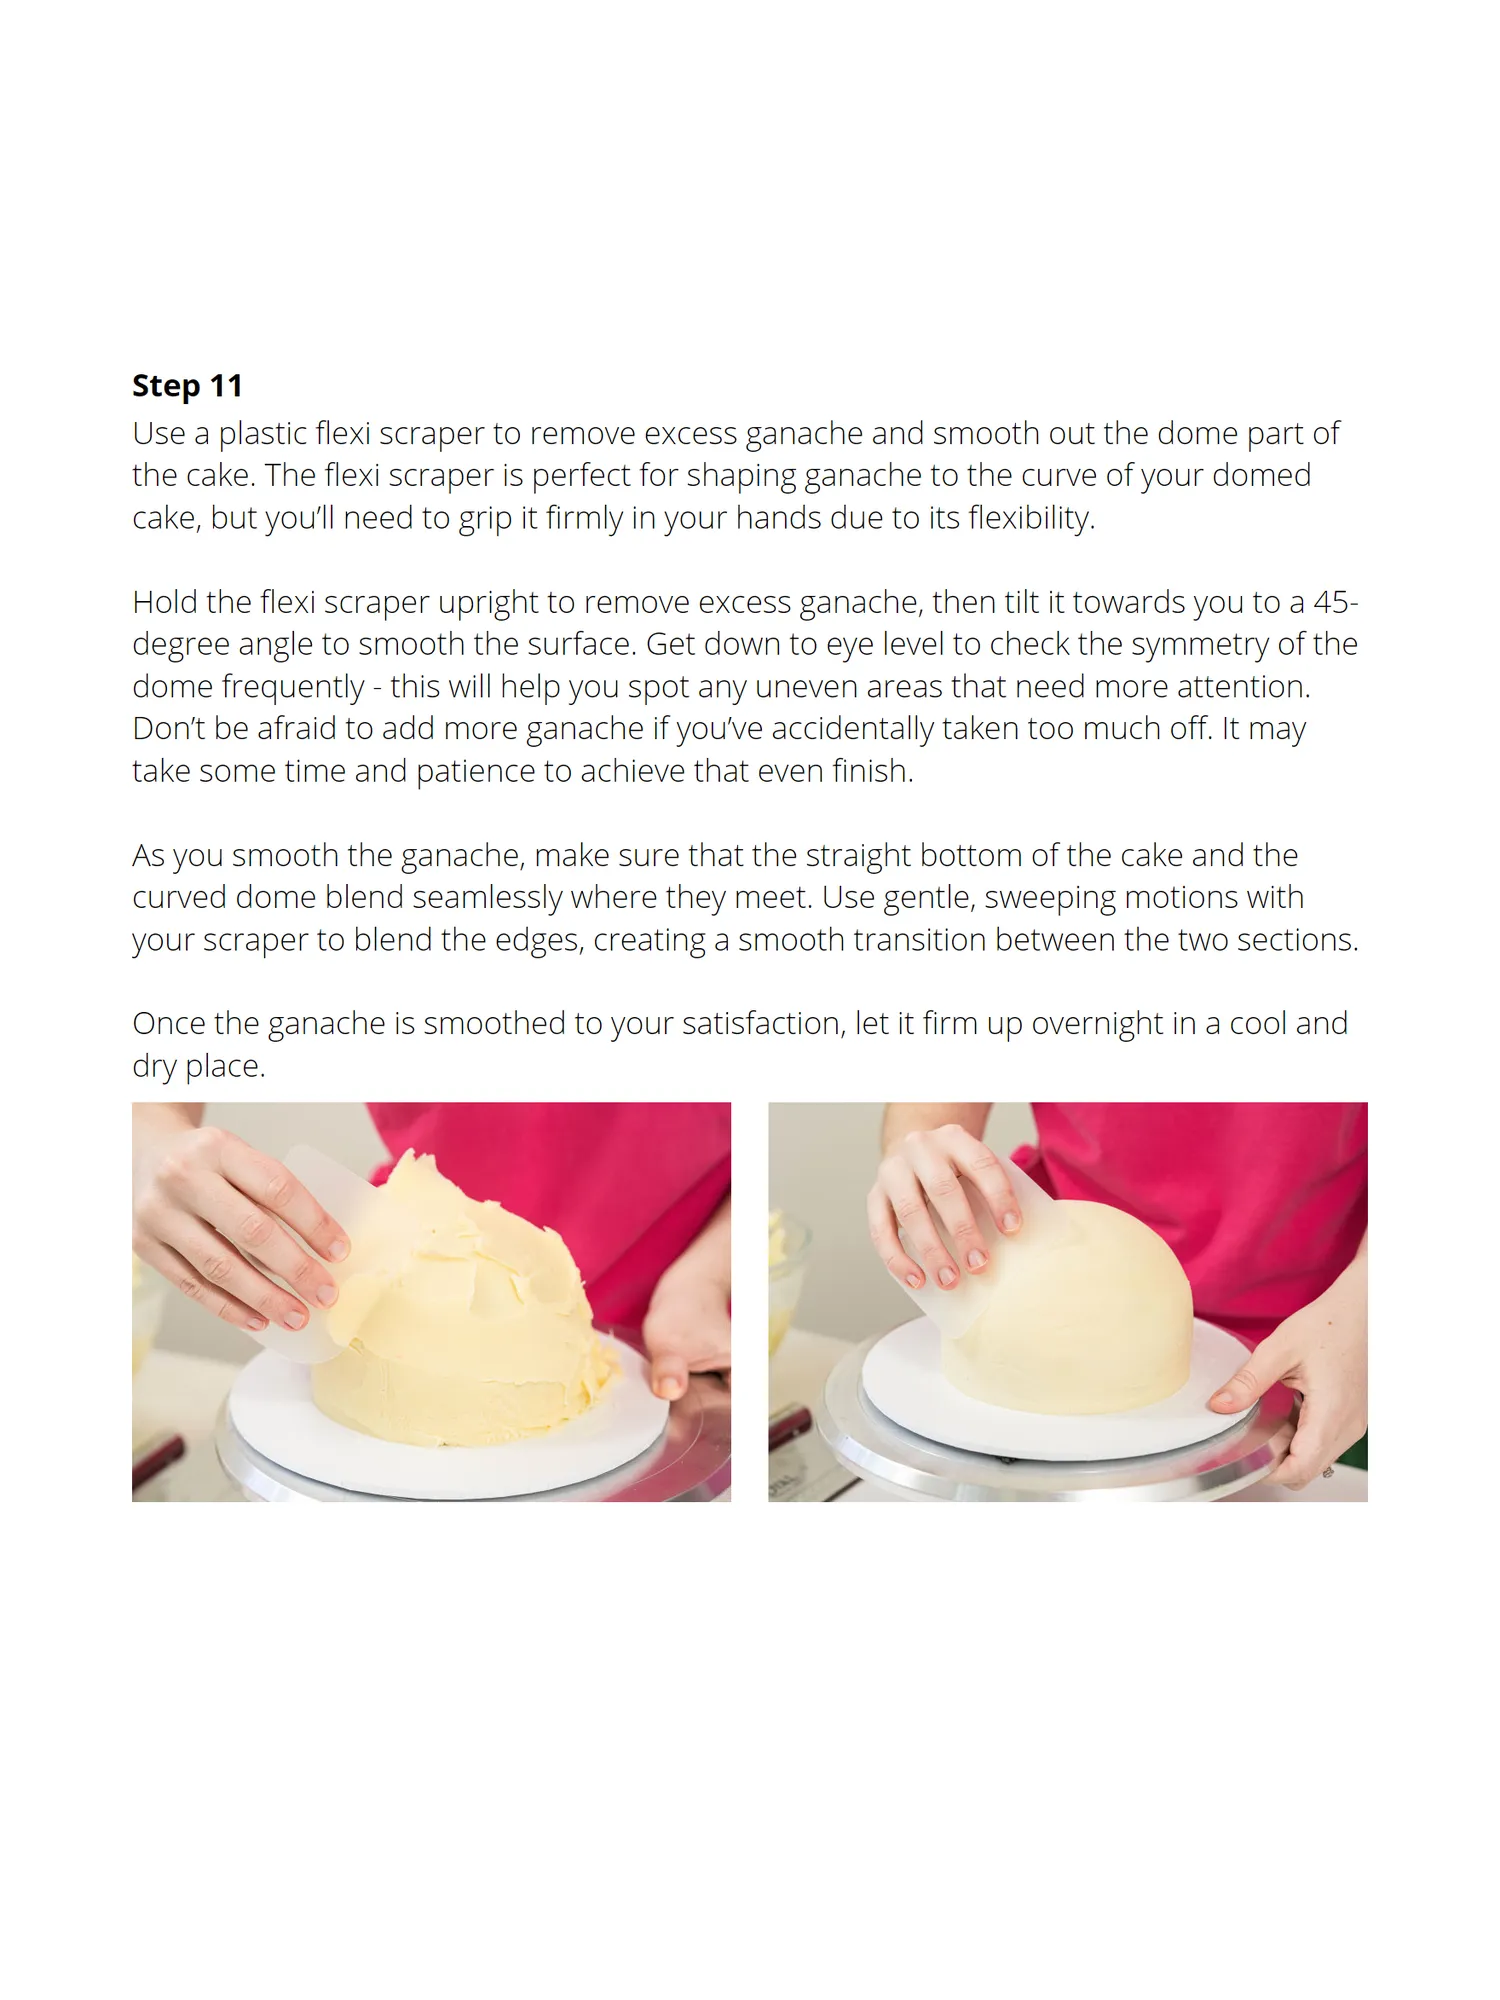
Step 11 Use a plastic flexi scraper to remove excess ganache and smooth out the dome part of the cake. The flexi scraper is perfect for shaping ganache to the curve of your domed cake, but you’ll need to grip it firmly in your hands due to its flexibility. Hold the flexi scraper upright to remove excess ganache, then tilt it towards you to a 45- degree angle to smooth the surface. Get down to eye level to check the symmetry of the dome frequently - this will help you spot any uneven areas that need more attention. Don’t be afraid to add more ganache if you’ve accidentally taken too much off. It may take some time and patience to achieve that even finish. As you smooth the ganache, make sure that the straight bottom of the cake and the curved dome blend seamlessly where they meet. Use gentle, sweeping motions with your scraper to blend the edges, creating a smooth transition between the two sections. Once the ganache is smoothed to your satisfaction, let it firm up overnight in a cool and dry place.
Page 24 text
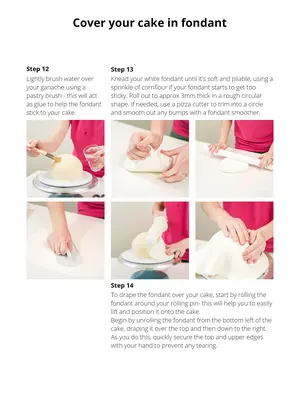
Cover your cake in fondant Step 12 Step 13 Lightly brush water over Knead your white fondant until it’s soft and pliable, using a your ganache using a sprinkle of cornflour if your fondant starts to get too pastry brush - this will act sticky. Roll out to approx 3mm thick in a rough circular as glue to help the fondant shape. If needed, use a pizza cutter to trim into a circle stick to your cake. and smooth out any bumps with a fondant smoother. Step 14 To drape the fondant over your cake, start by rolling the fondant around your rolling pin- this will help you to easily lift and position it onto the cake. Begin by unrolling the fondant from the bottom left of the cake, draping it over the top and then down to the right. As you do this, quickly secure the top and upper edges with your hand to prevent any tearing.
Page 25 text
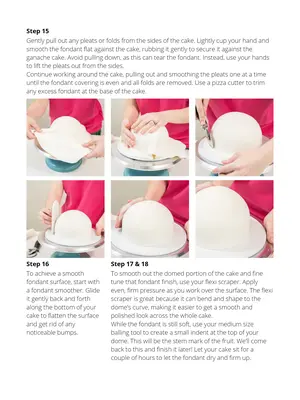
Step 15 Gently pull out any pleats or folds from the sides of the cake. Lightly cup your hand and smooth the fondant flat against the cake, rubbing it gently to secure it against the ganache cake. Avoid pulling down, as this can tear the fondant. Instead, use your hands to lift the pleats out from the sides. Continue working around the cake, pulling out and smoothing the pleats one at a time until the fondant covering is even and all folds are removed. Use a pizza cutter to trim any excess fondant at the base of the cake. Step 16 Step 17 & 18 To achieve a smooth To smooth out the domed portion of the cake and fine fondant surface, start with tune that fondant finish, use your flexi scraper. Apply a fondant smoother. Glide even, firm pressure as you work over the surface. The flexi it gently back and forth scraper is great because it can bend and shape to the along the bottom of your dome’s curve, making it easier to get a smooth and cake to flatten the surface polished look across the whole cake. and get rid of any While the fondant is still soft, use your medium size noticeable bumps. balling tool to create a small indent at the top of your dome. This will be the stem mark of the fruit. We’ll come back to this and finish it later! Let your cake sit for a couple of hours to let the fondant dry and firm up.
Page 26 text
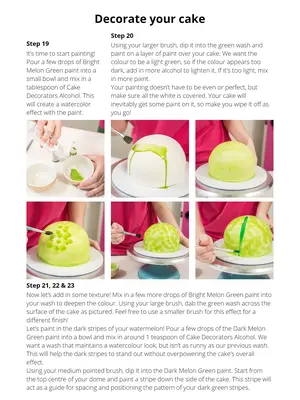
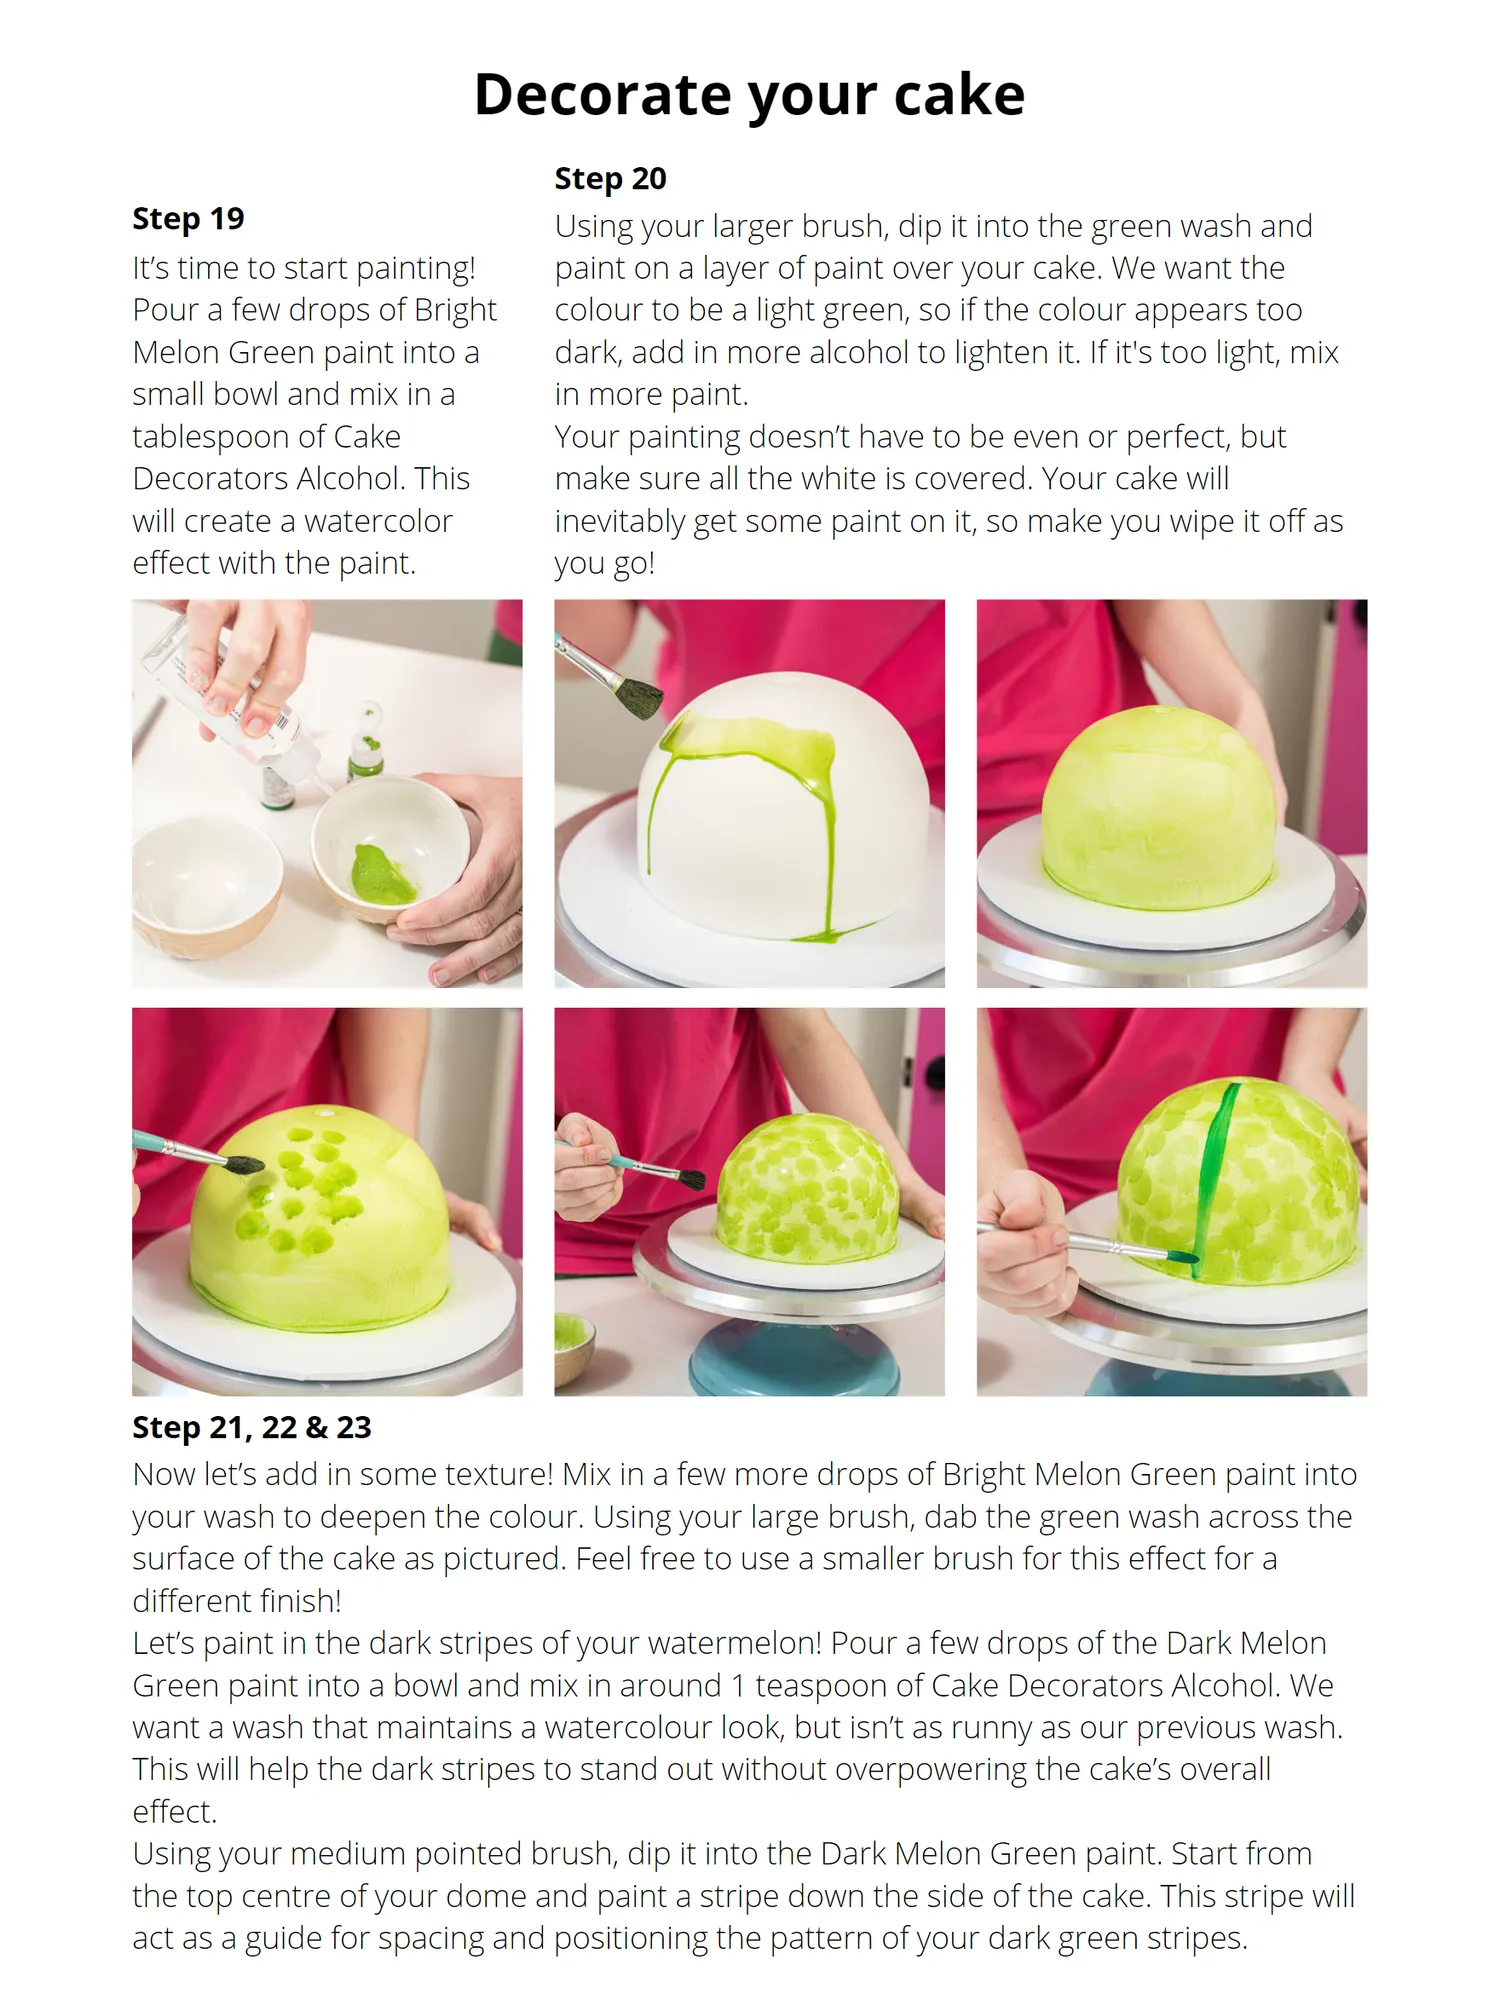
Decorate your cake Step 20 Step 19 Using your larger brush, dip it into the green wash and It’s time to start painting! paint on a layer of paint over your cake. We want the Pour a few drops of Bright colour to be a light green, so if the colour appears too Melon Green paint into a dark, add in more alcohol to lighten it. If it's too light, mix small bowl and mix in a in more paint. tablespoon of Cake Your painting doesn’t have to be even or perfect, but Decorators Alcohol. This make sure all the white is covered. Your cake will will create a watercolor inevitably get some paint on it, so make you wipe it off as effect with the paint. you go! Step 21, 22 & 23 Now let’s add in some texture! Mix in a few more drops of Bright Melon Green paint into your wash to deepen the colour. Using your large brush, dab the green wash across the surface of the cake as pictured. Feel free to use a smaller brush for this effect for a different finish! Let’s paint in the dark stripes of your watermelon! Pour a few drops of the Dark Melon Green paint into a bowl and mix in around 1 teaspoon of Cake Decorators Alcohol. We want a wash that maintains a watercolour look, but isn’t as runny as our previous wash. This will help the dark stripes to stand out without overpowering the cake’s overall effect. Using your medium pointed brush, dip it into the Dark Melon Green paint. Start from the top centre of your dome and paint a stripe down the side of the cake. This stripe will act as a guide for spacing and positioning the pattern of your dark green stripes.
Page 27 text
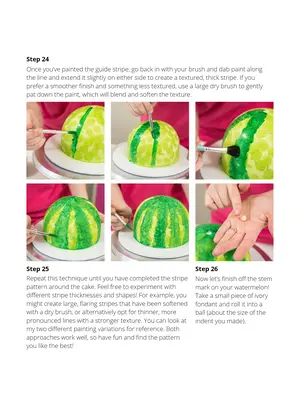
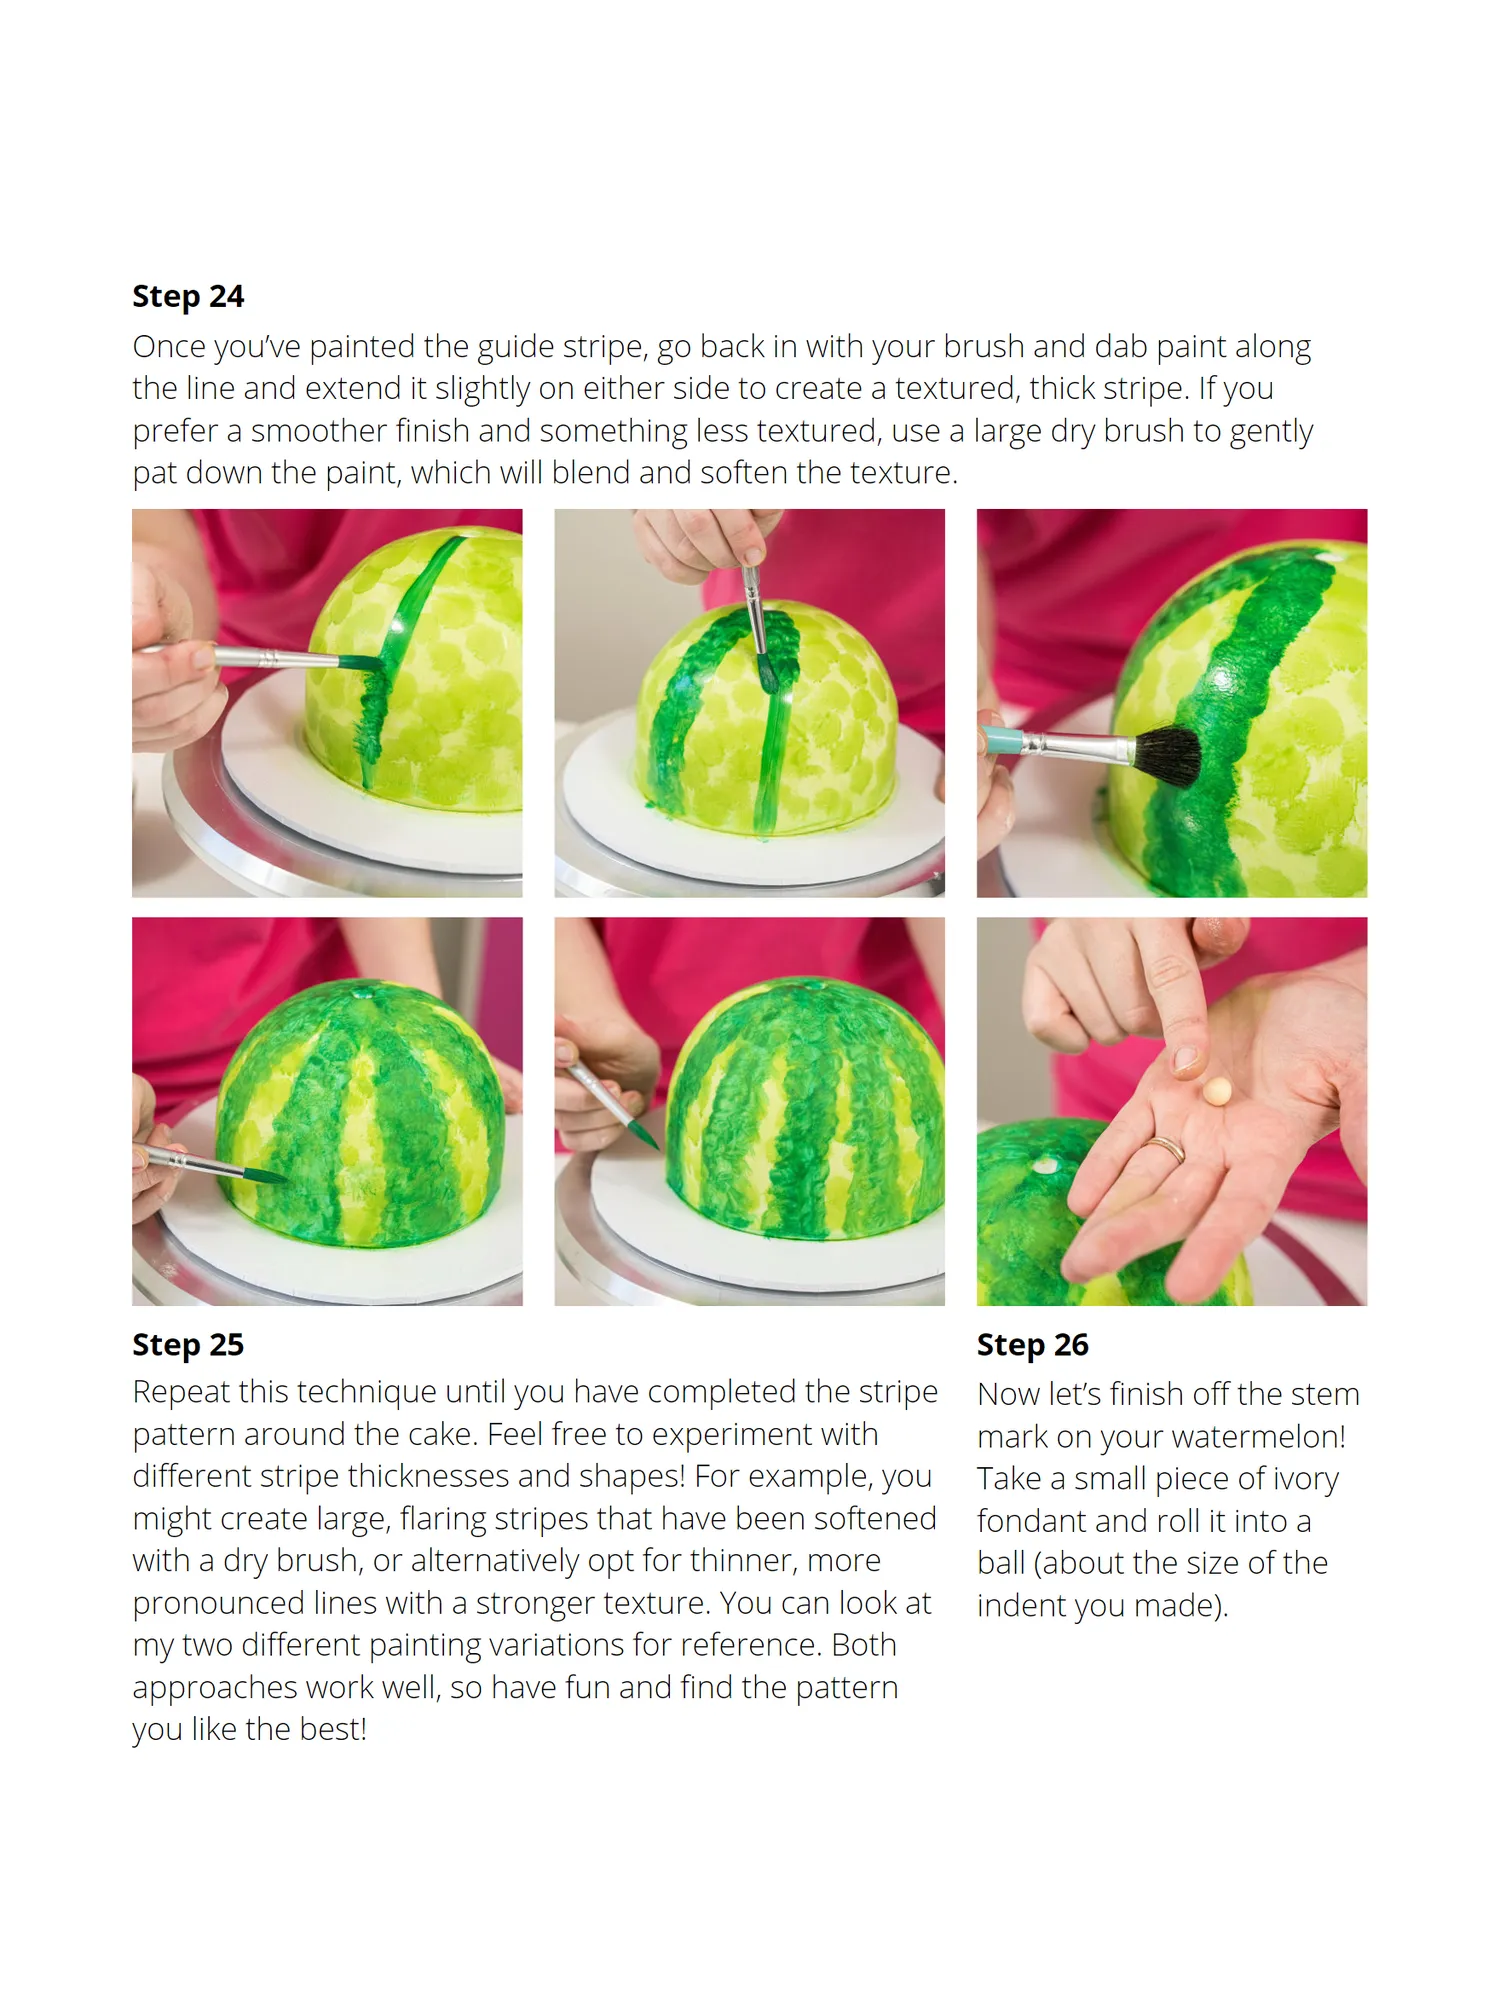
Step 24 Once you’ve painted the guide stripe, go back in with your brush and dab paint along the line and extend it slightly on either side to create a textured, thick stripe. If you prefer a smoother finish and something less textured, use a large dry brush to gently pat down the paint, which will blend and soften the texture. Step 25 Step 26 Repeat this technique until you have completed the stripe Now let’s finish off the stem pattern around the cake. Feel free to experiment with mark on your watermelon! different stripe thicknesses and shapes! For example, you Take a small piece of ivory might create large, flaring stripes that have been softened fondant and roll it into a with a dry brush, or alternatively opt for thinner, more ball (about the size of the pronounced lines with a stronger texture. You can look at indent you made). my two different painting variations for reference. Both approaches work well, so have fun and find the pattern you like the best!
Page 28 text
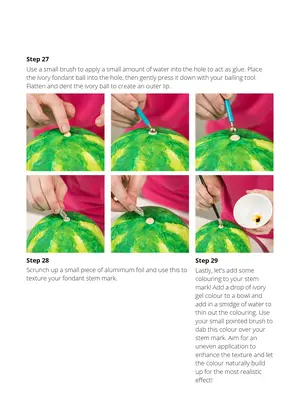
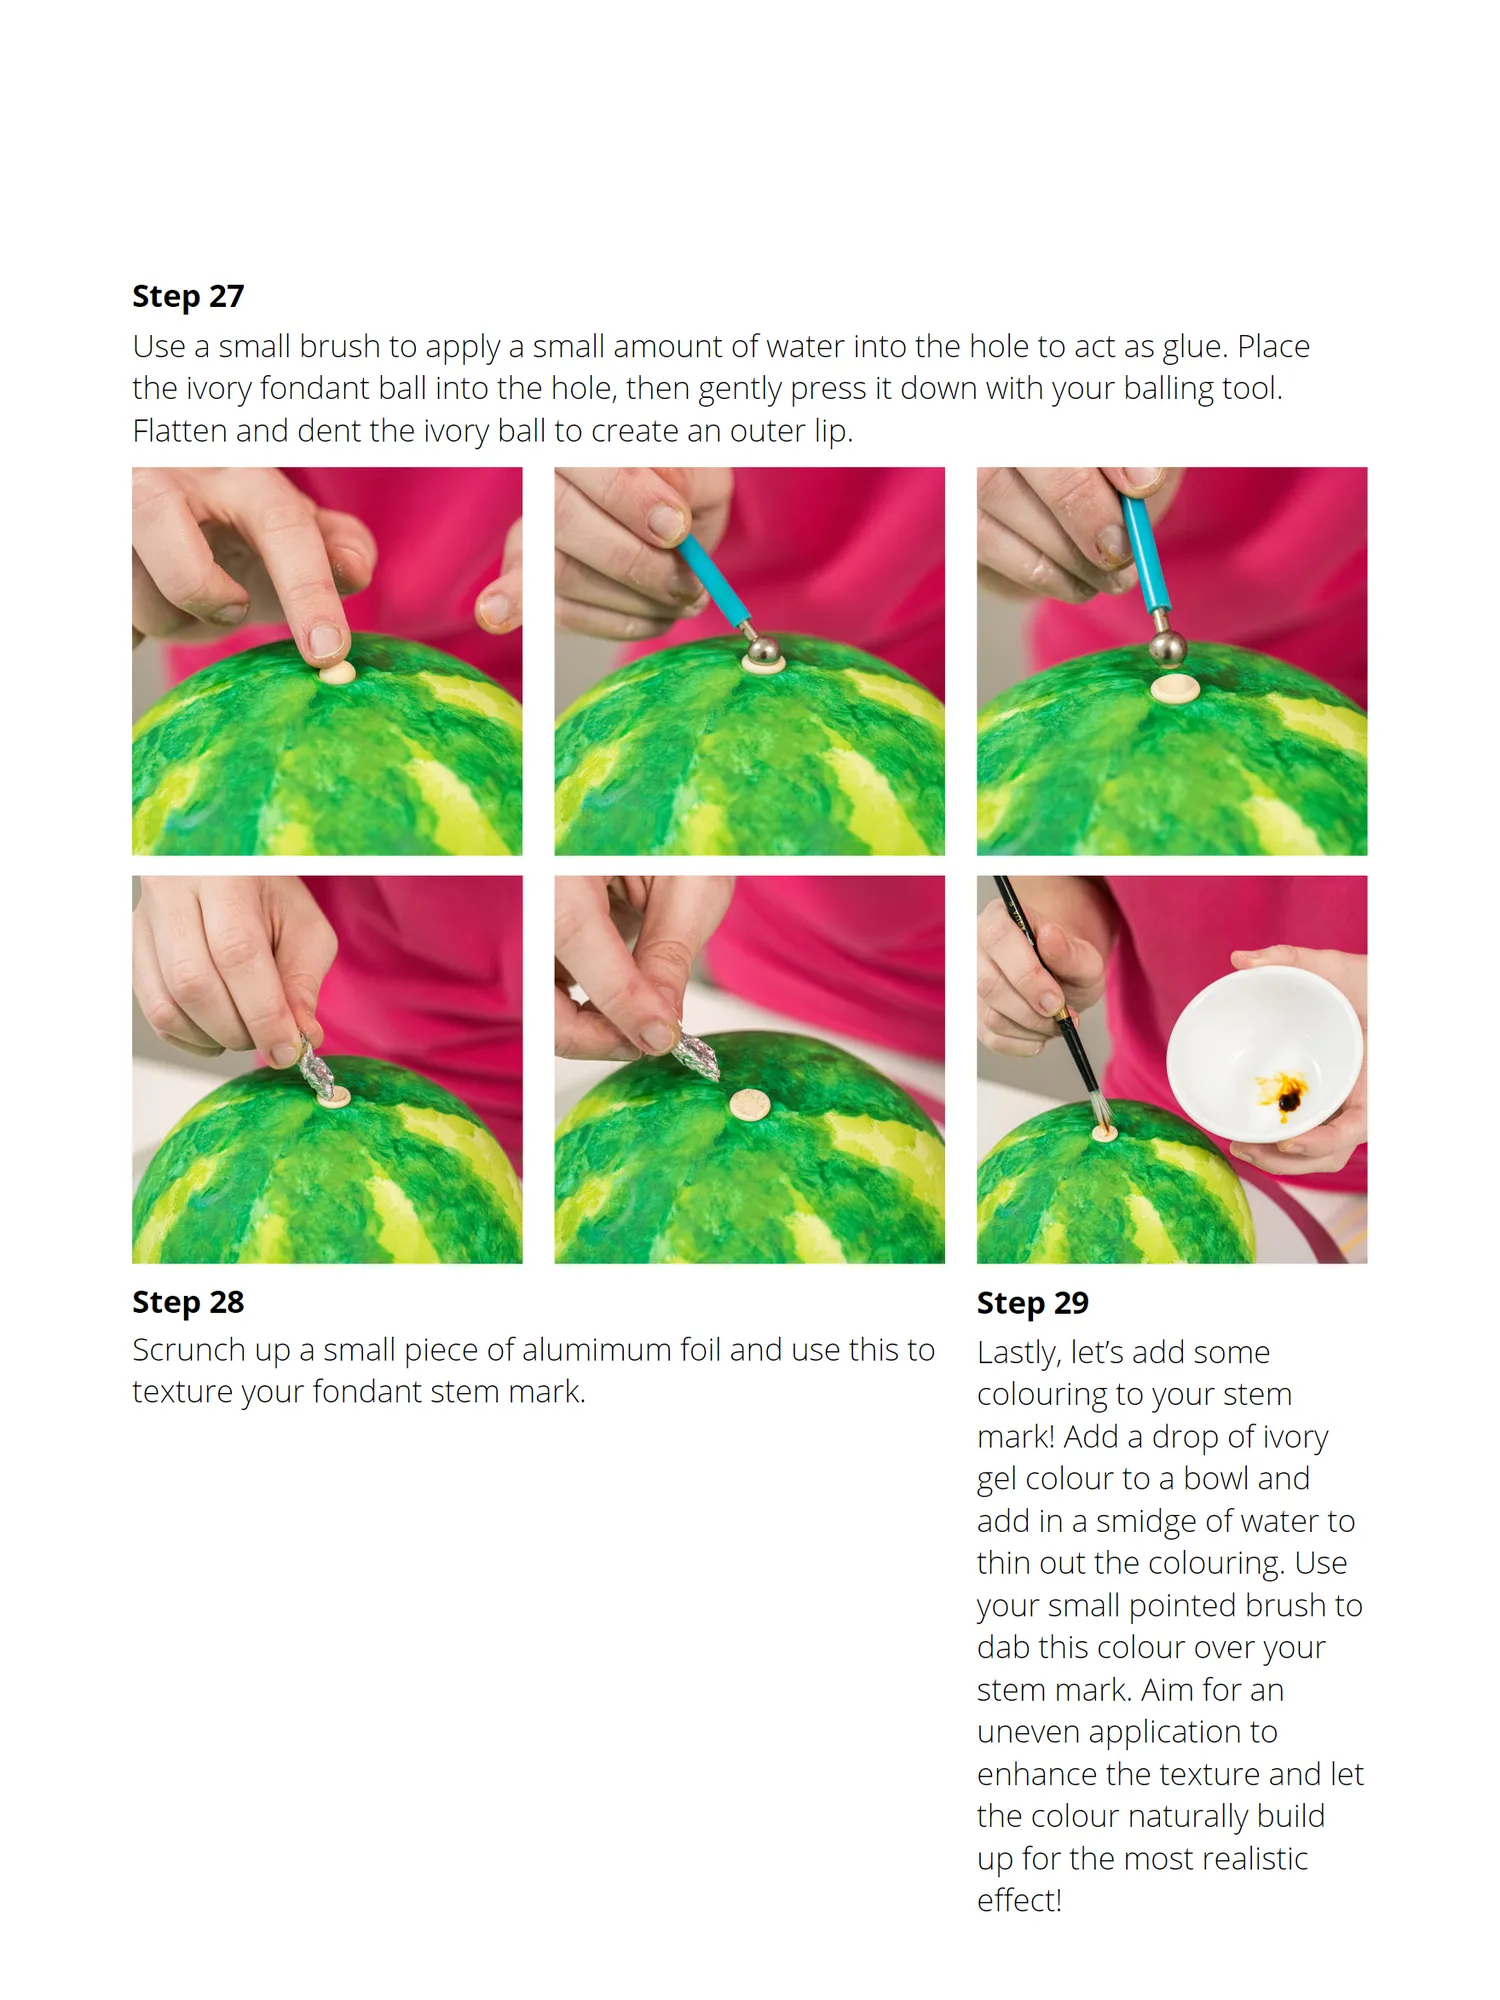
Step 27 Use a small brush to apply a small amount of water into the hole to act as glue. Place the ivory fondant ball into the hole, then gently press it down with your balling tool. Flatten and dent the ivory ball to create an outer lip. Step 28 Step 29 Scrunch up a small piece of alumimum foil and use this to Lastly, let’s add some texture your fondant stem mark. colouring to your stem mark! Add a drop of ivory gel colour to a bowl and add in a smidge of water to thin out the colouring. Use your small pointed brush to dab this colour over your stem mark. Aim for an uneven application to enhance the texture and let the colour naturally build up for the most realistic effect!
Page 29 text
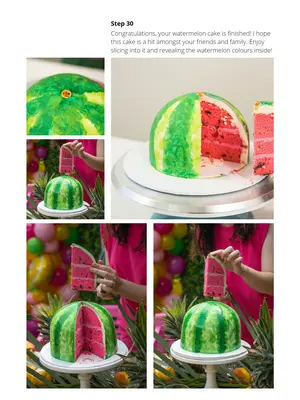
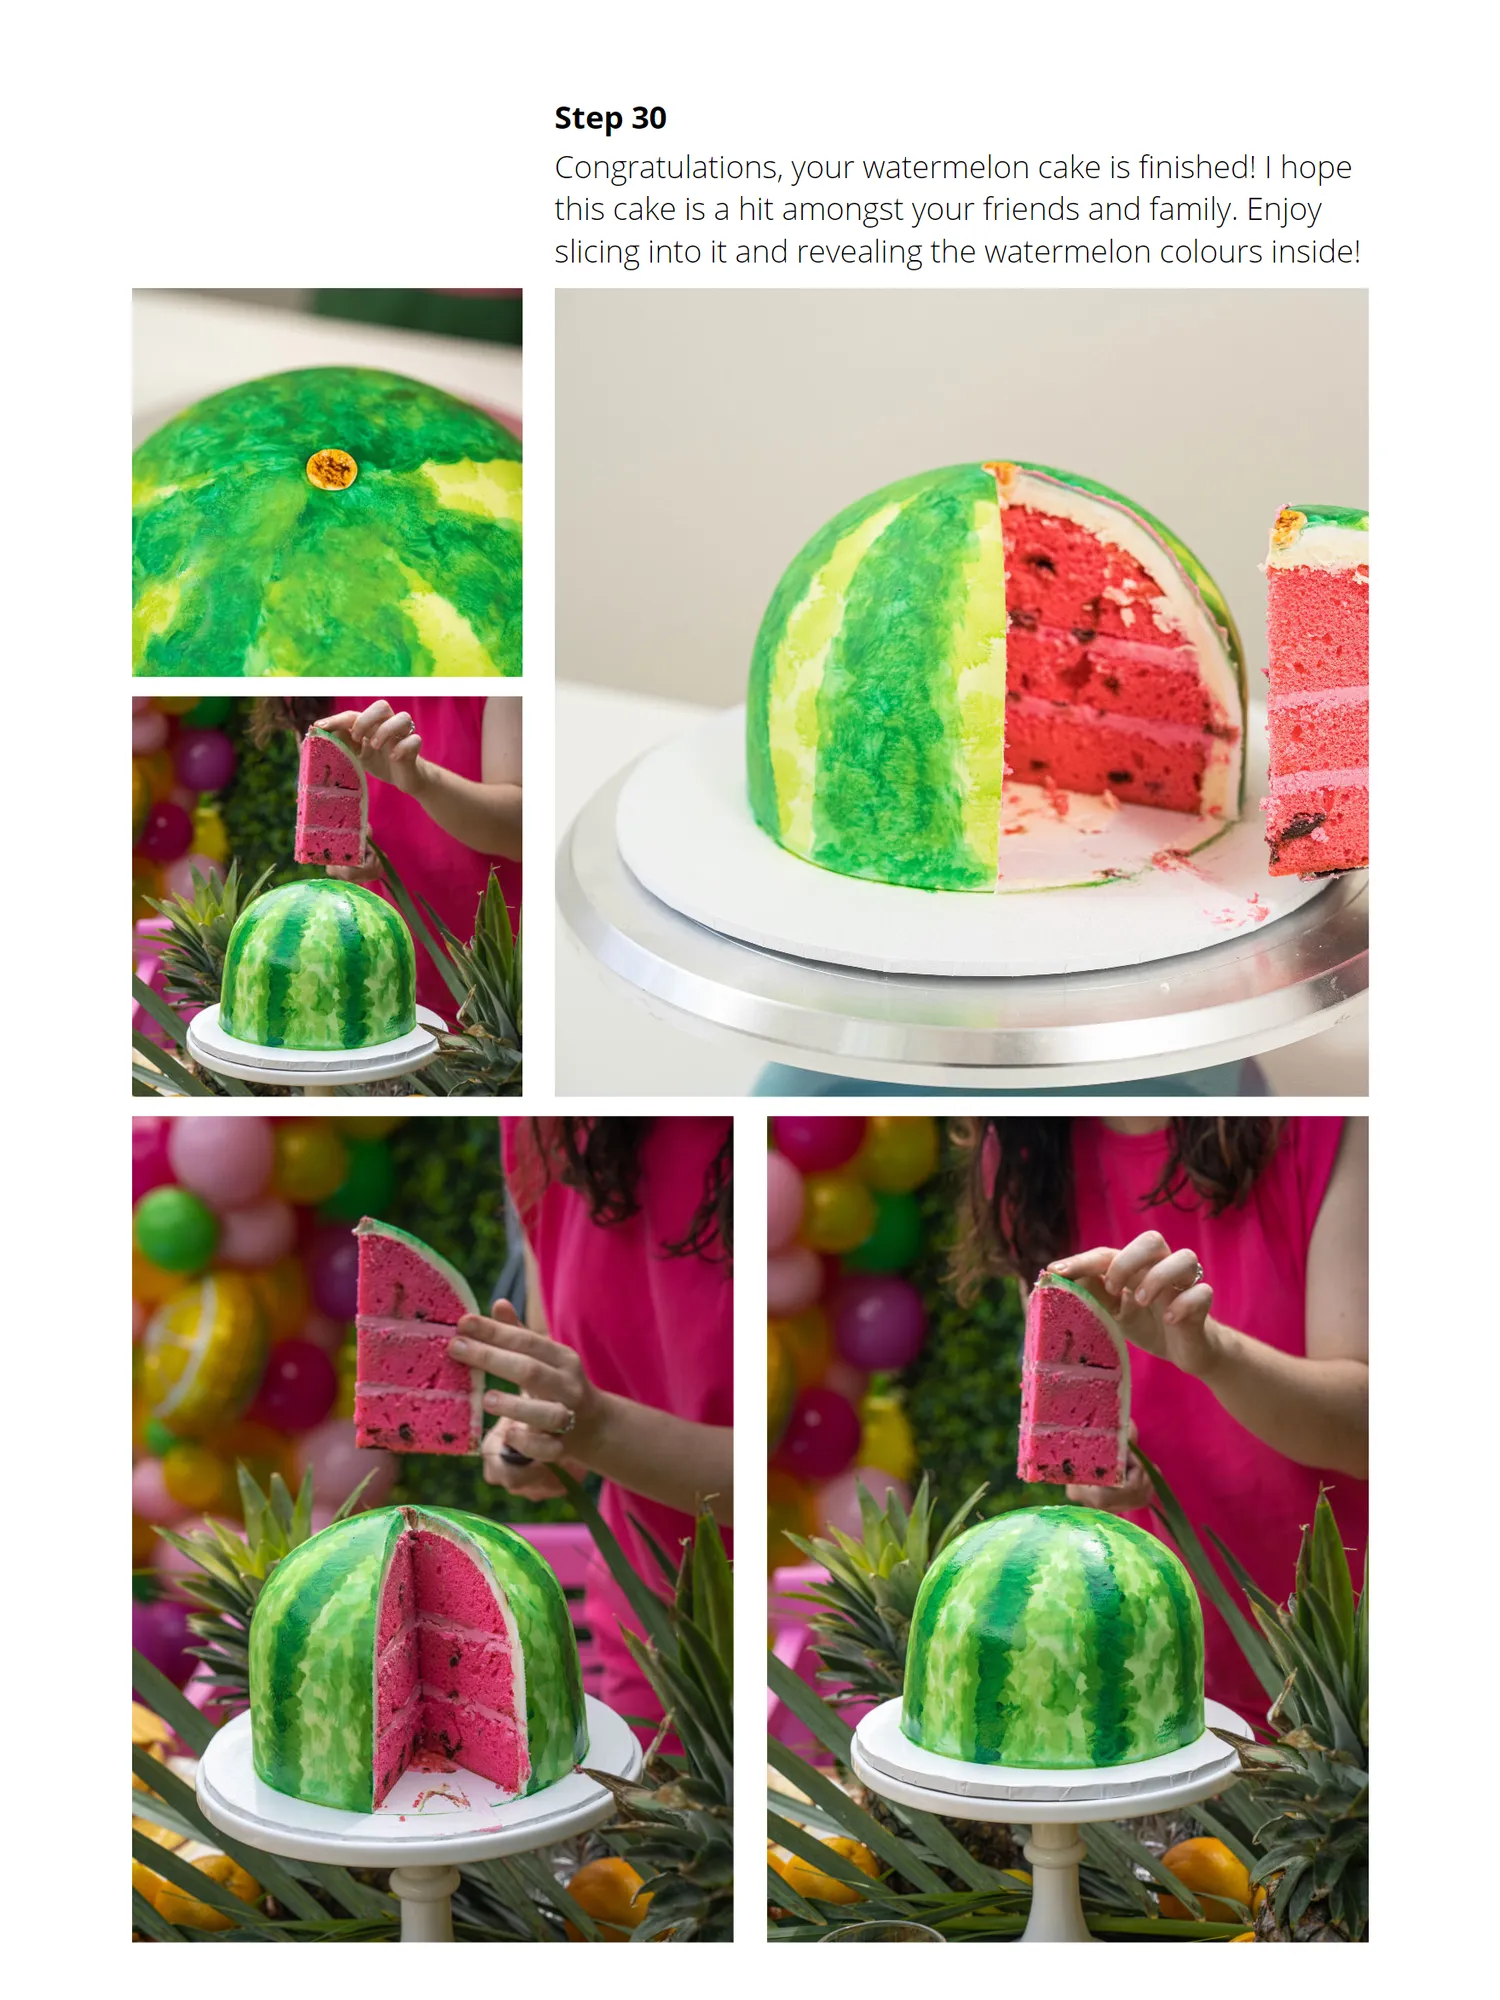
Step 30 Congratulations, your watermelon cake is finished! I hope this cake is a hit amongst your friends and family. Enjoy slicing into it and revealing the watermelon colours inside!
Page 30 text
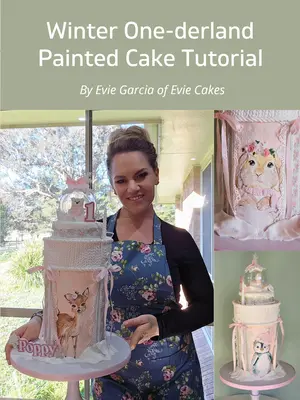
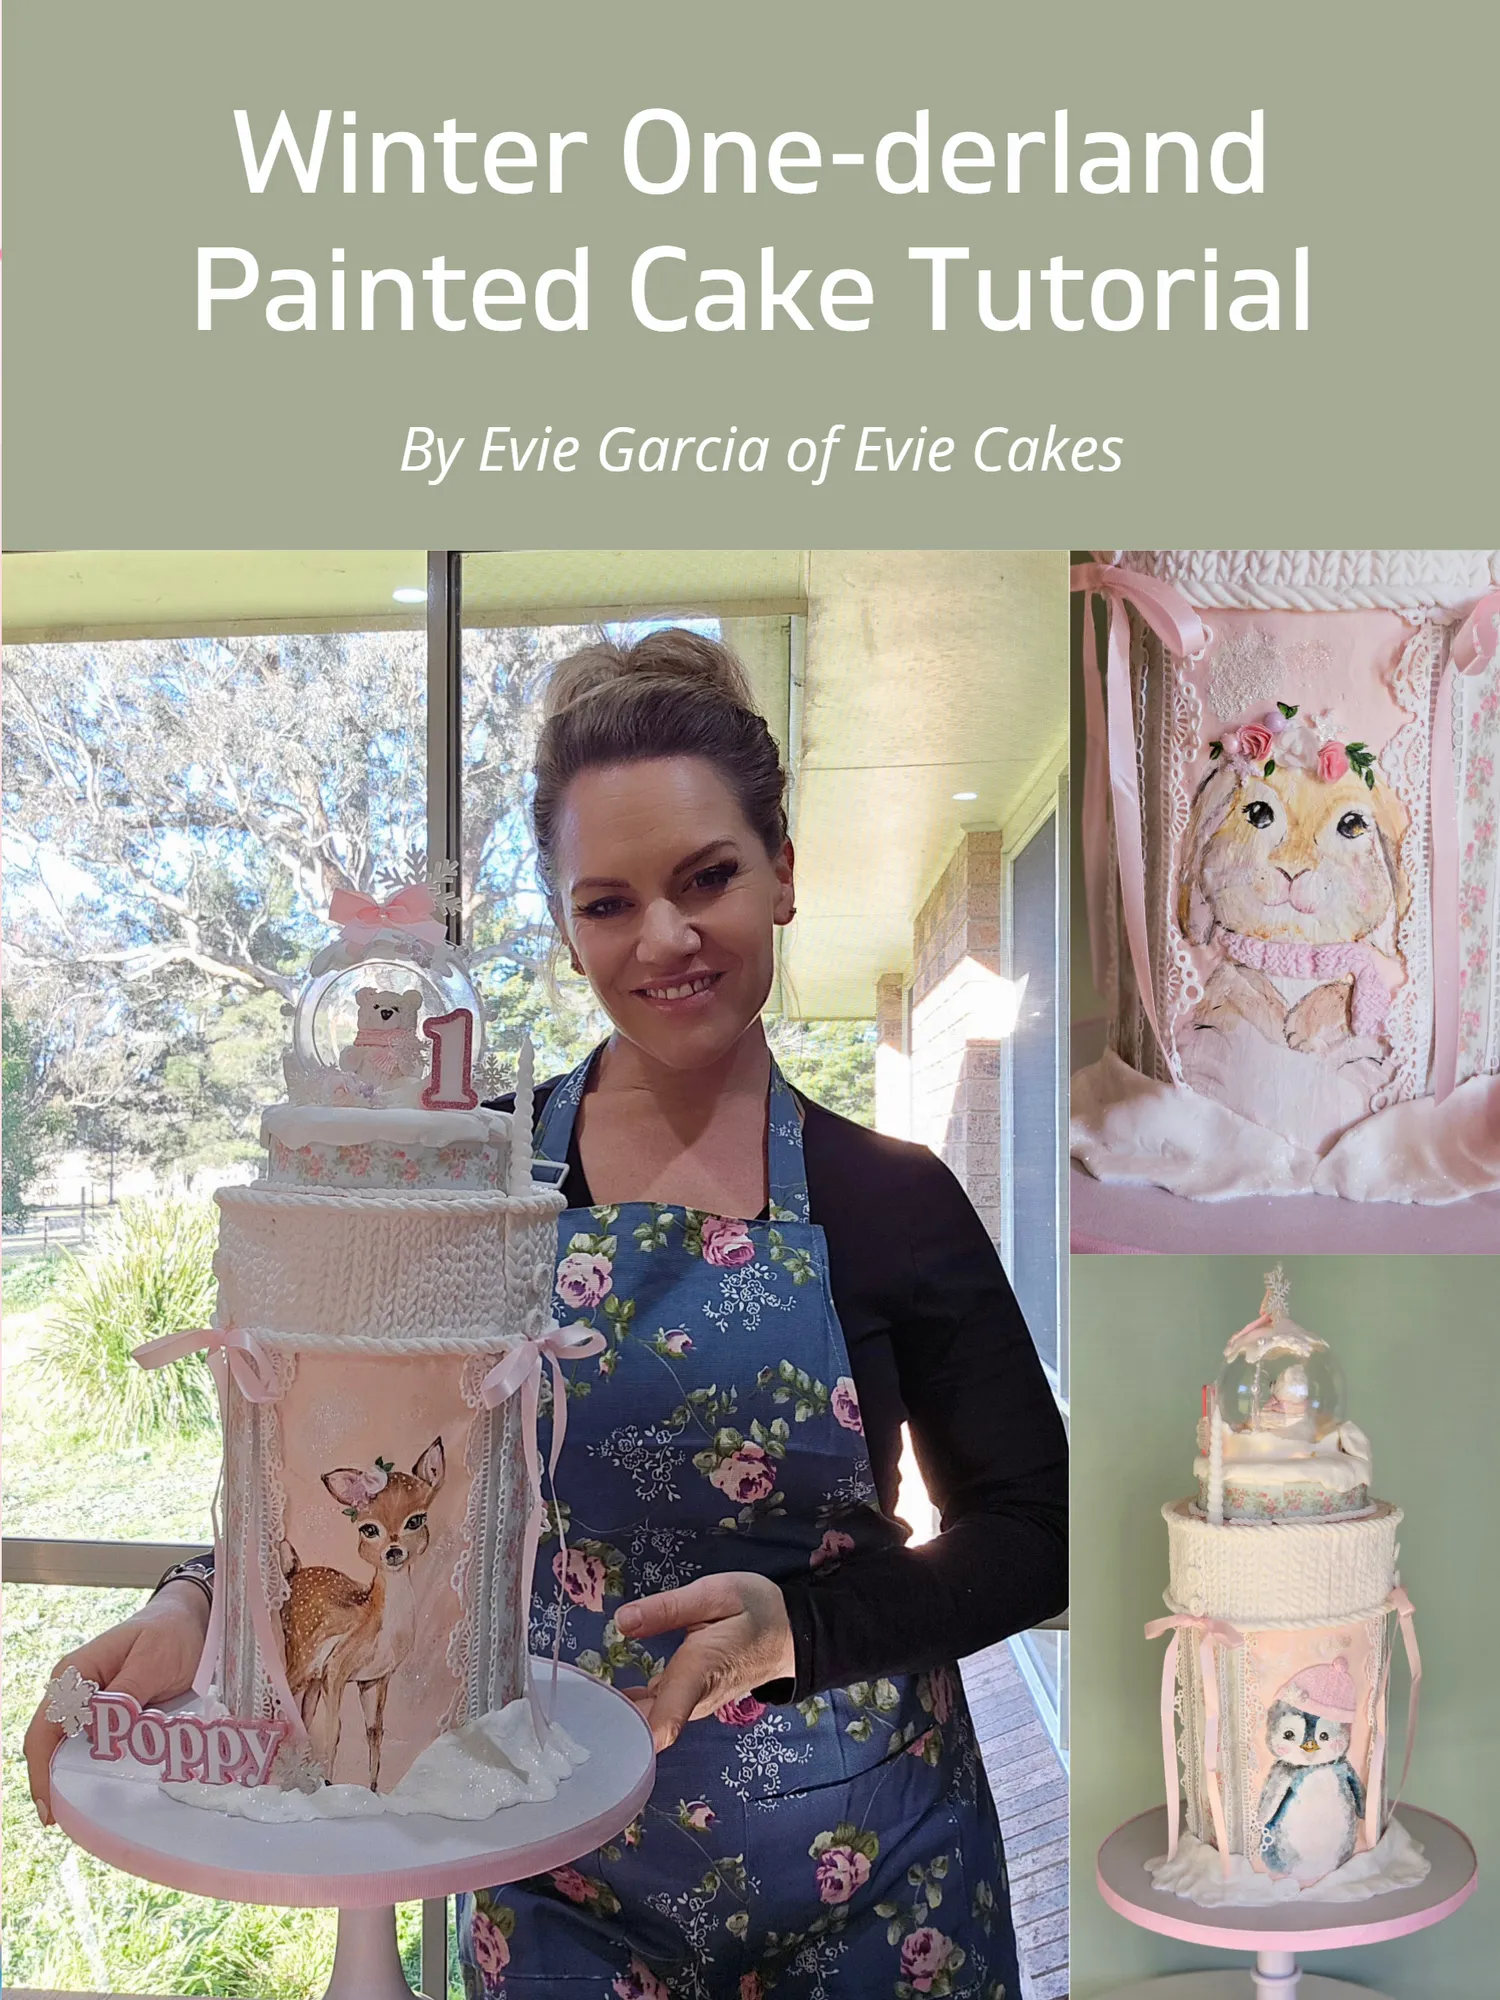
Winter One-derland Painted Cake Tutorial
Page 31 text
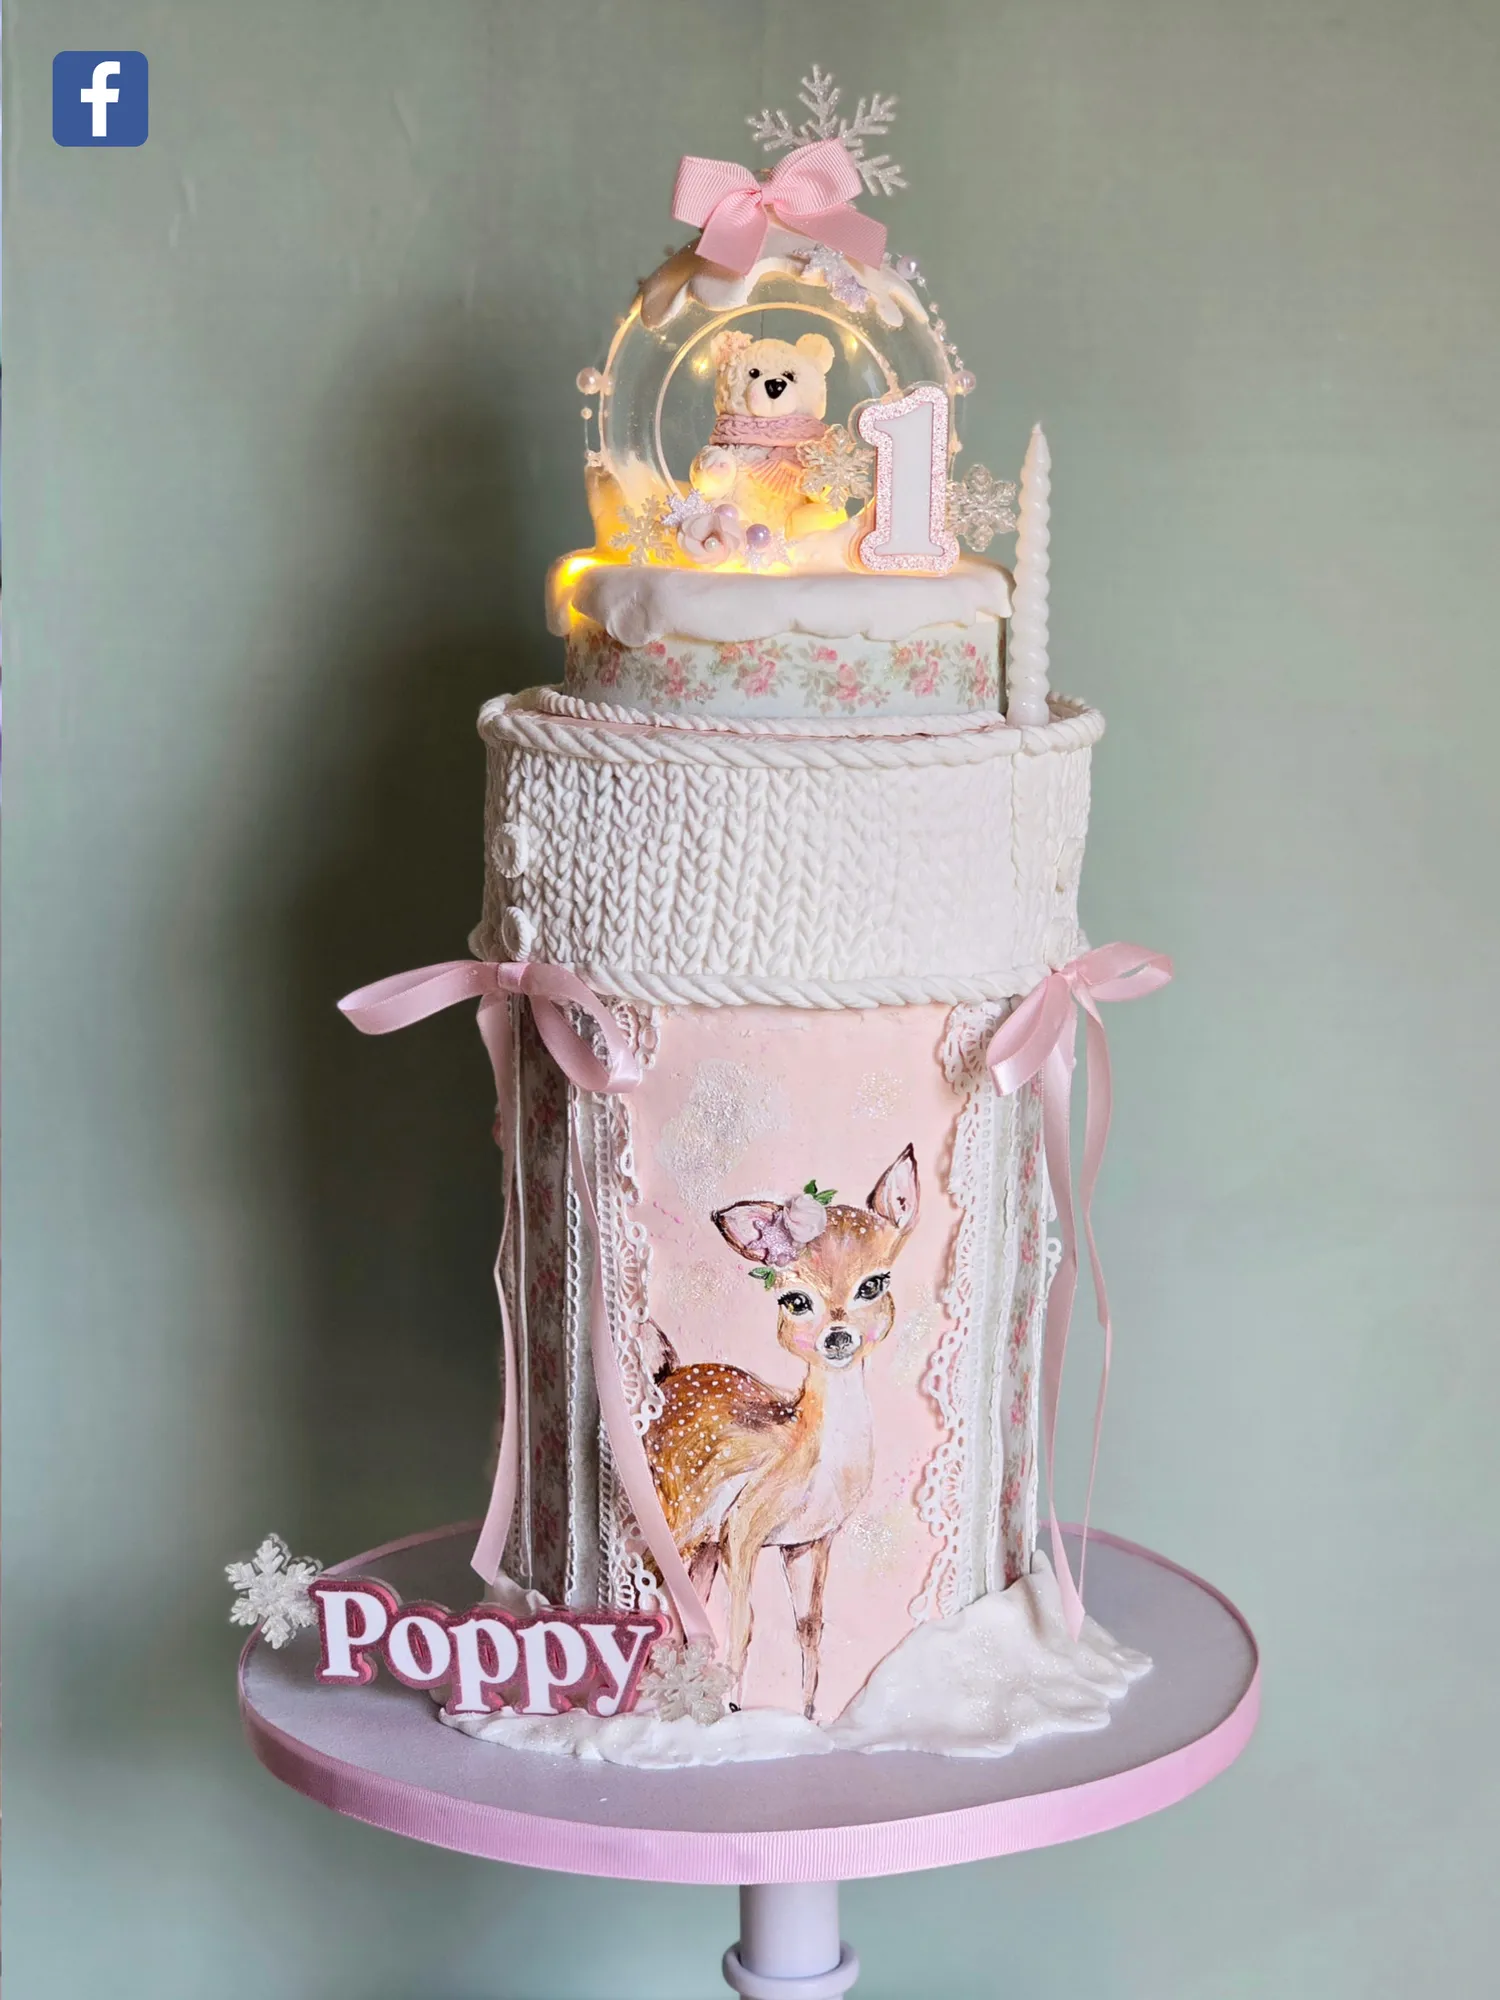
Winter One-derland Painted Cake Tutorial By Evie Garcia of Evie Cakes

Page 32 text
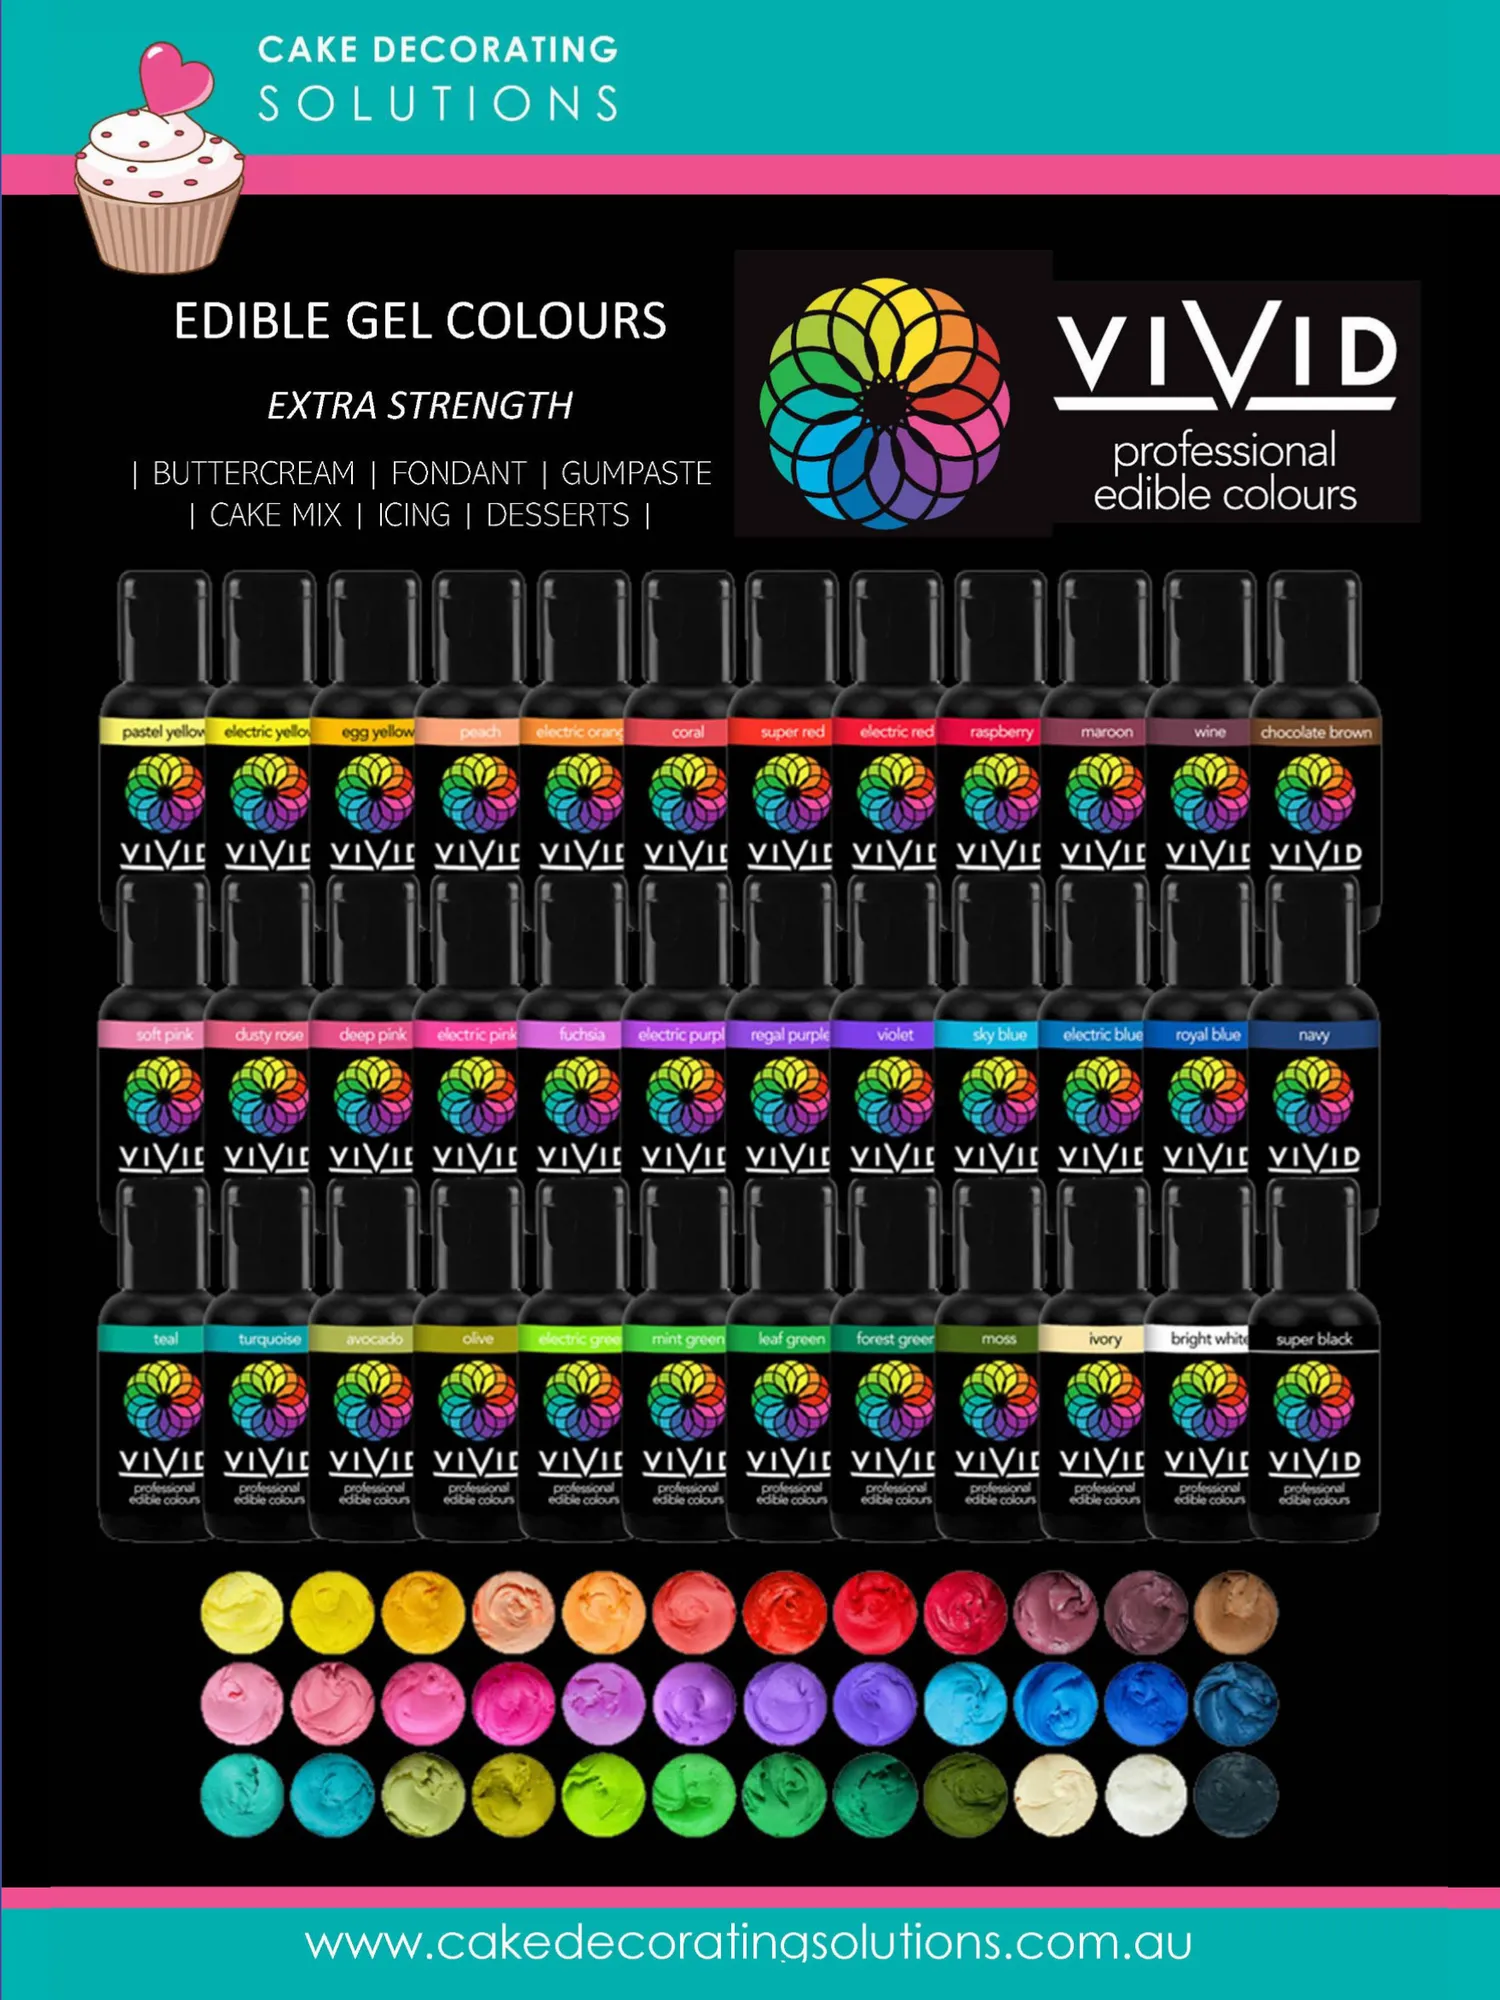
Cake layers and filling of your choosing, enough to make a double barrel cake White chocolate ganache Cocoa butter nibs Oil based food colouring in range of colours relevant to what you want to paint (my preferred colours Are VIVID by Cake Craft Australia)
Page 33 text
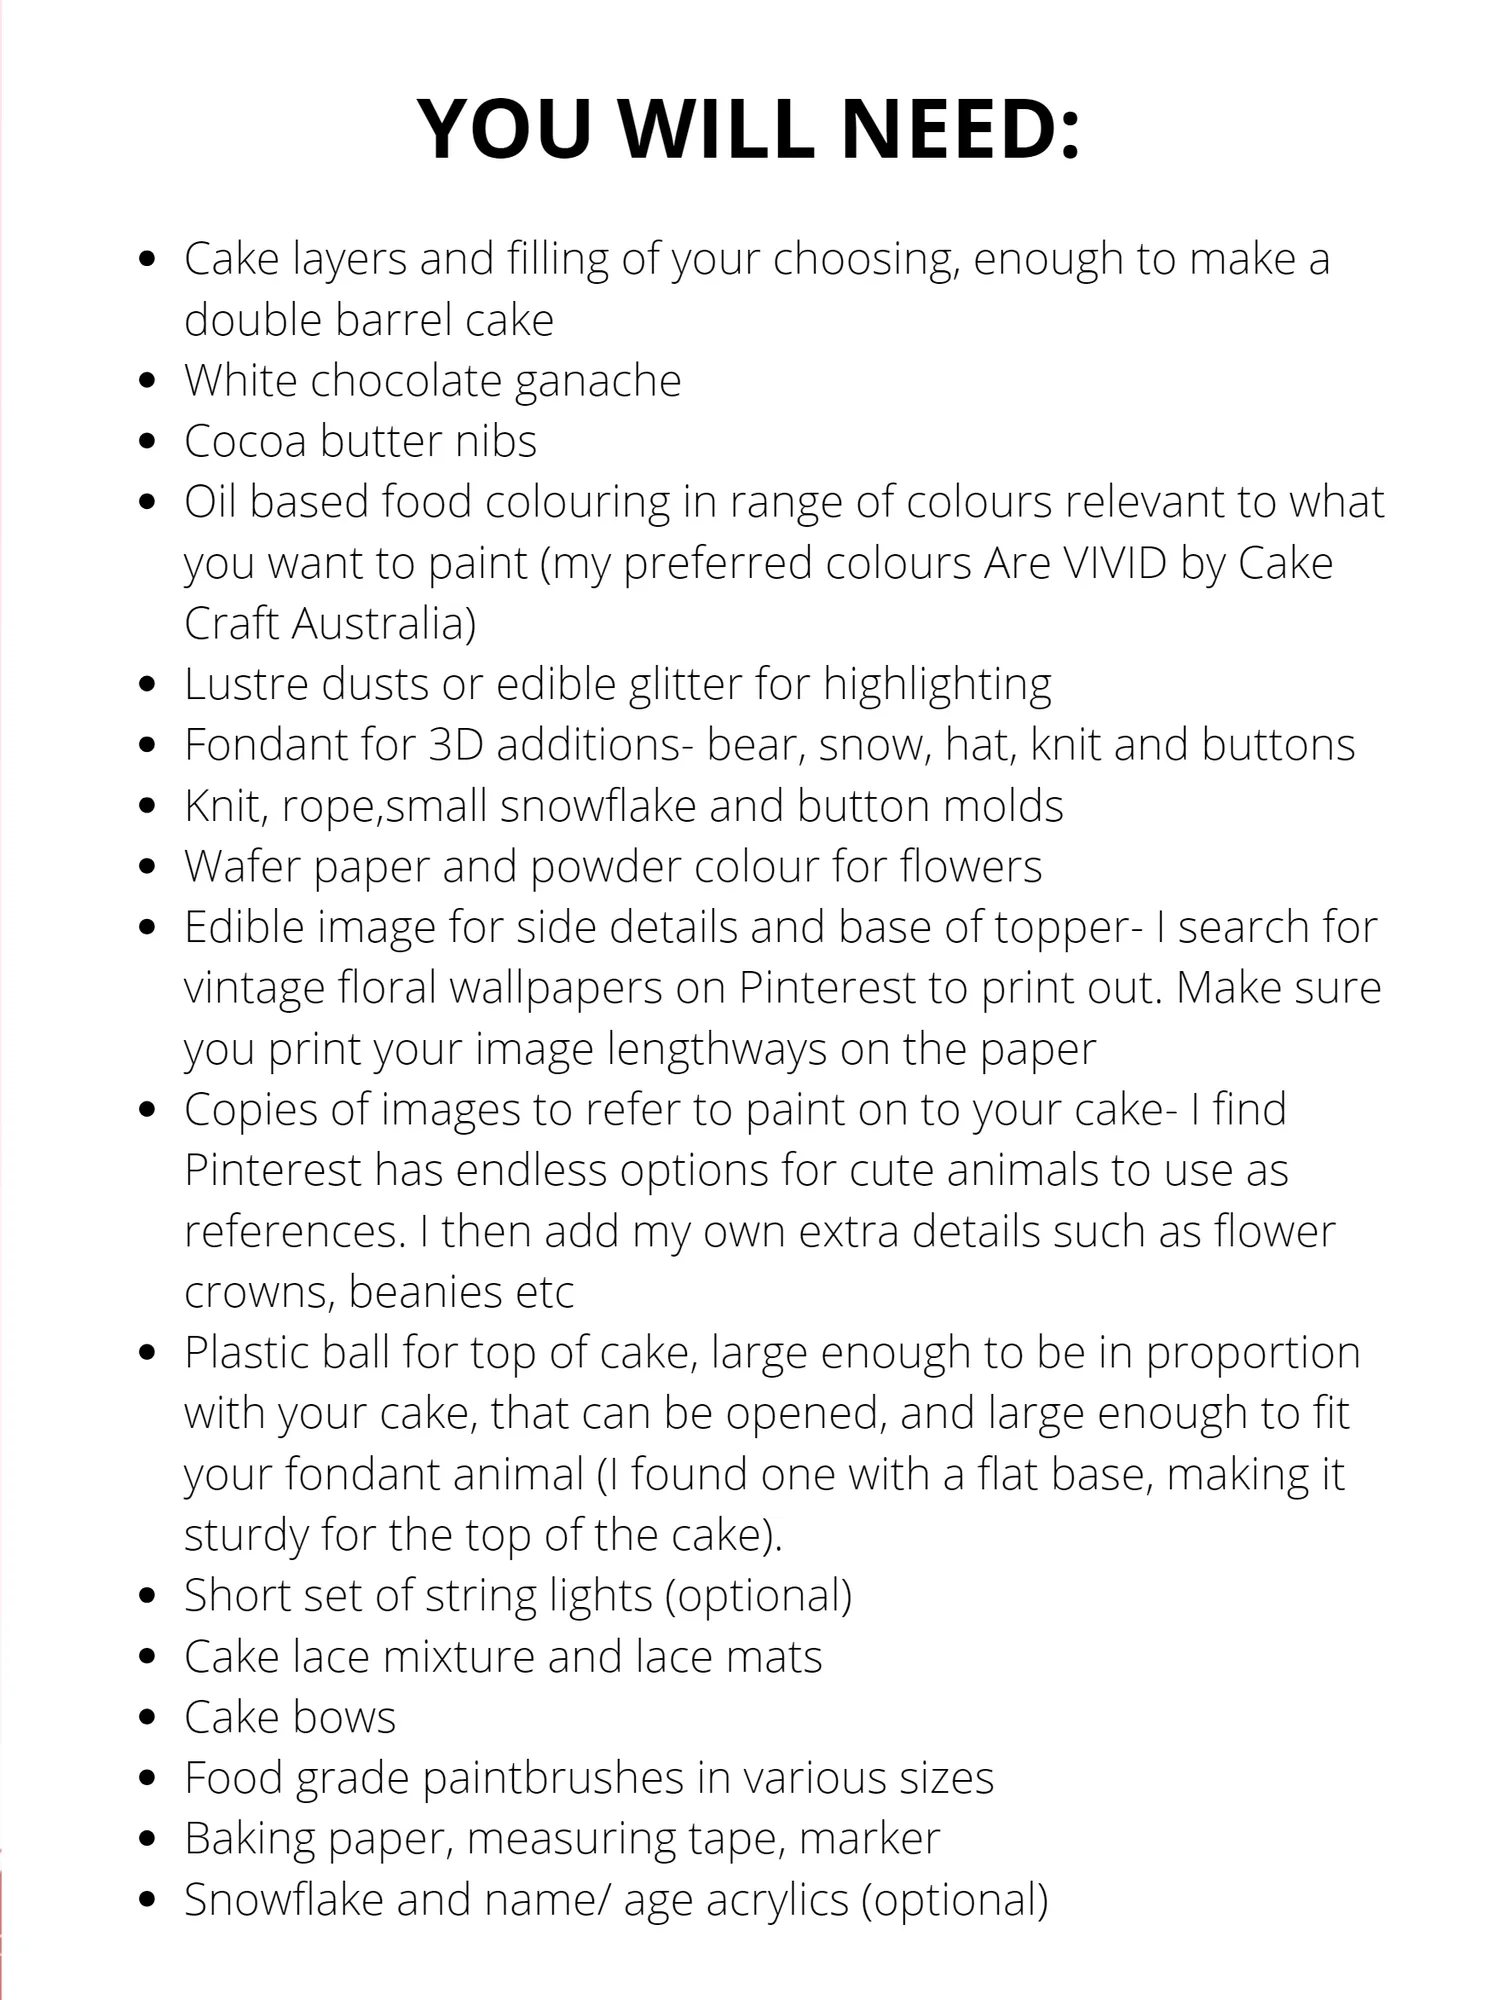
YOU WILL NEED: double barrel cake White chocolate ganache Cocoa butter nibs Oil based food colouring in range of colours relevant to what you want to paint (my preferred colours Are VIVID by Cake
Page 34 text
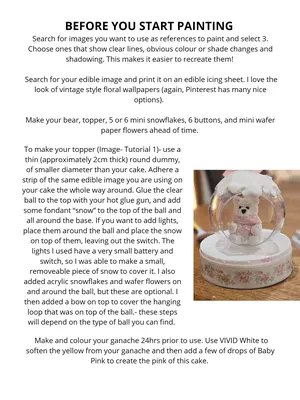
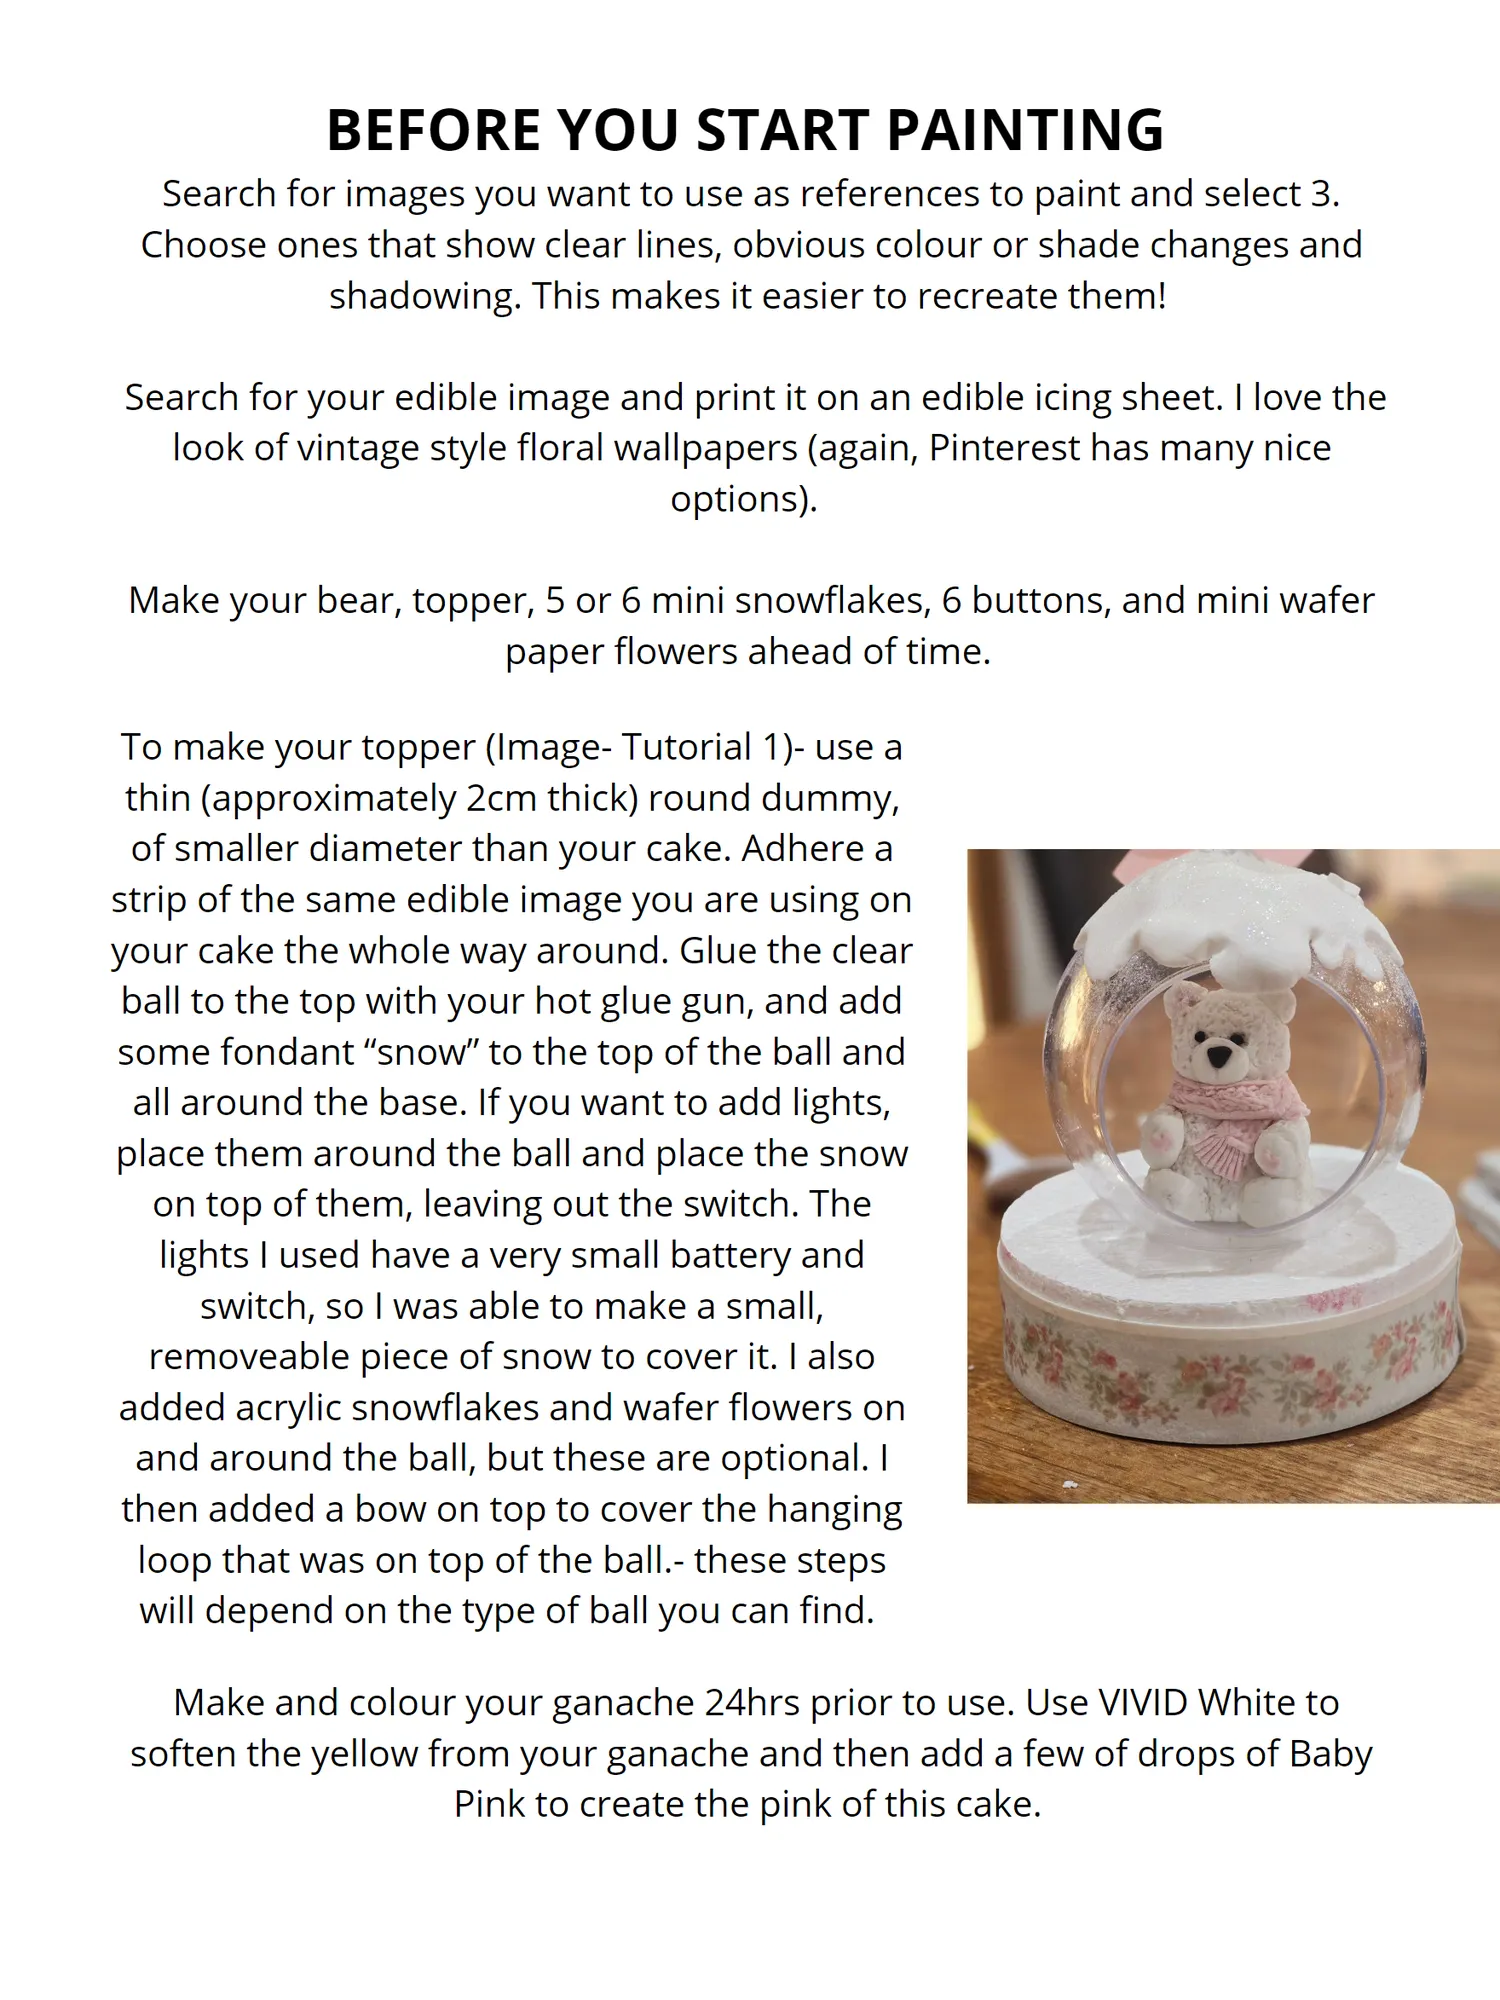
BEFORE YOU START PAINTING Search for images you want to use as references to paint and select 3. Choose ones that show clear lines, obvious colour or shade changes and shadowing. This makes it easier to recreate them! Search for your edible image and print it on an edible icing sheet. I love the look of vintage style floral wallpapers (again, Pinterest has many nice options). Make your bear, topper, 5 or 6 mini snowflakes, 6 buttons, and mini wafer paper flowers ahead of time. To make your topper (Image- Tutorial 1)- use a thin (approximately 2cm thick) round dummy, of smaller diameter than your cake. Adhere a strip of the same edible image you are using on your cake the whole way around. Glue the clear ball to the top with your hot glue gun, and add some fondant “snow” to the top of the ball and all around the base. If you want to add lights, place them around the ball and place the snow on top of them, leaving out the switch. The lights I used have a very small battery and switch, so I was able to make a small, removeable piece of snow to cover it. I also added acrylic snowflakes and wafer flowers on and around the ball, but these are optional. I then added a bow on top to cover the hanging loop that was on top of the ball.- these steps will depend on the type of ball you can find. Make and colour your ganache 24hrs prior to use. Use VIVID White to soften the yellow from your ganache and then add a few of drops of Baby Pink to create the pink of this cake.
Page 35 text
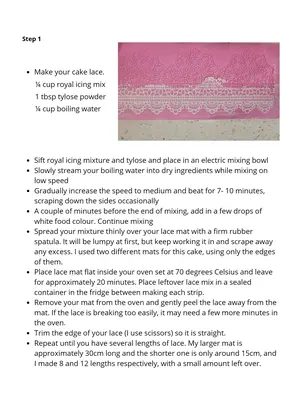
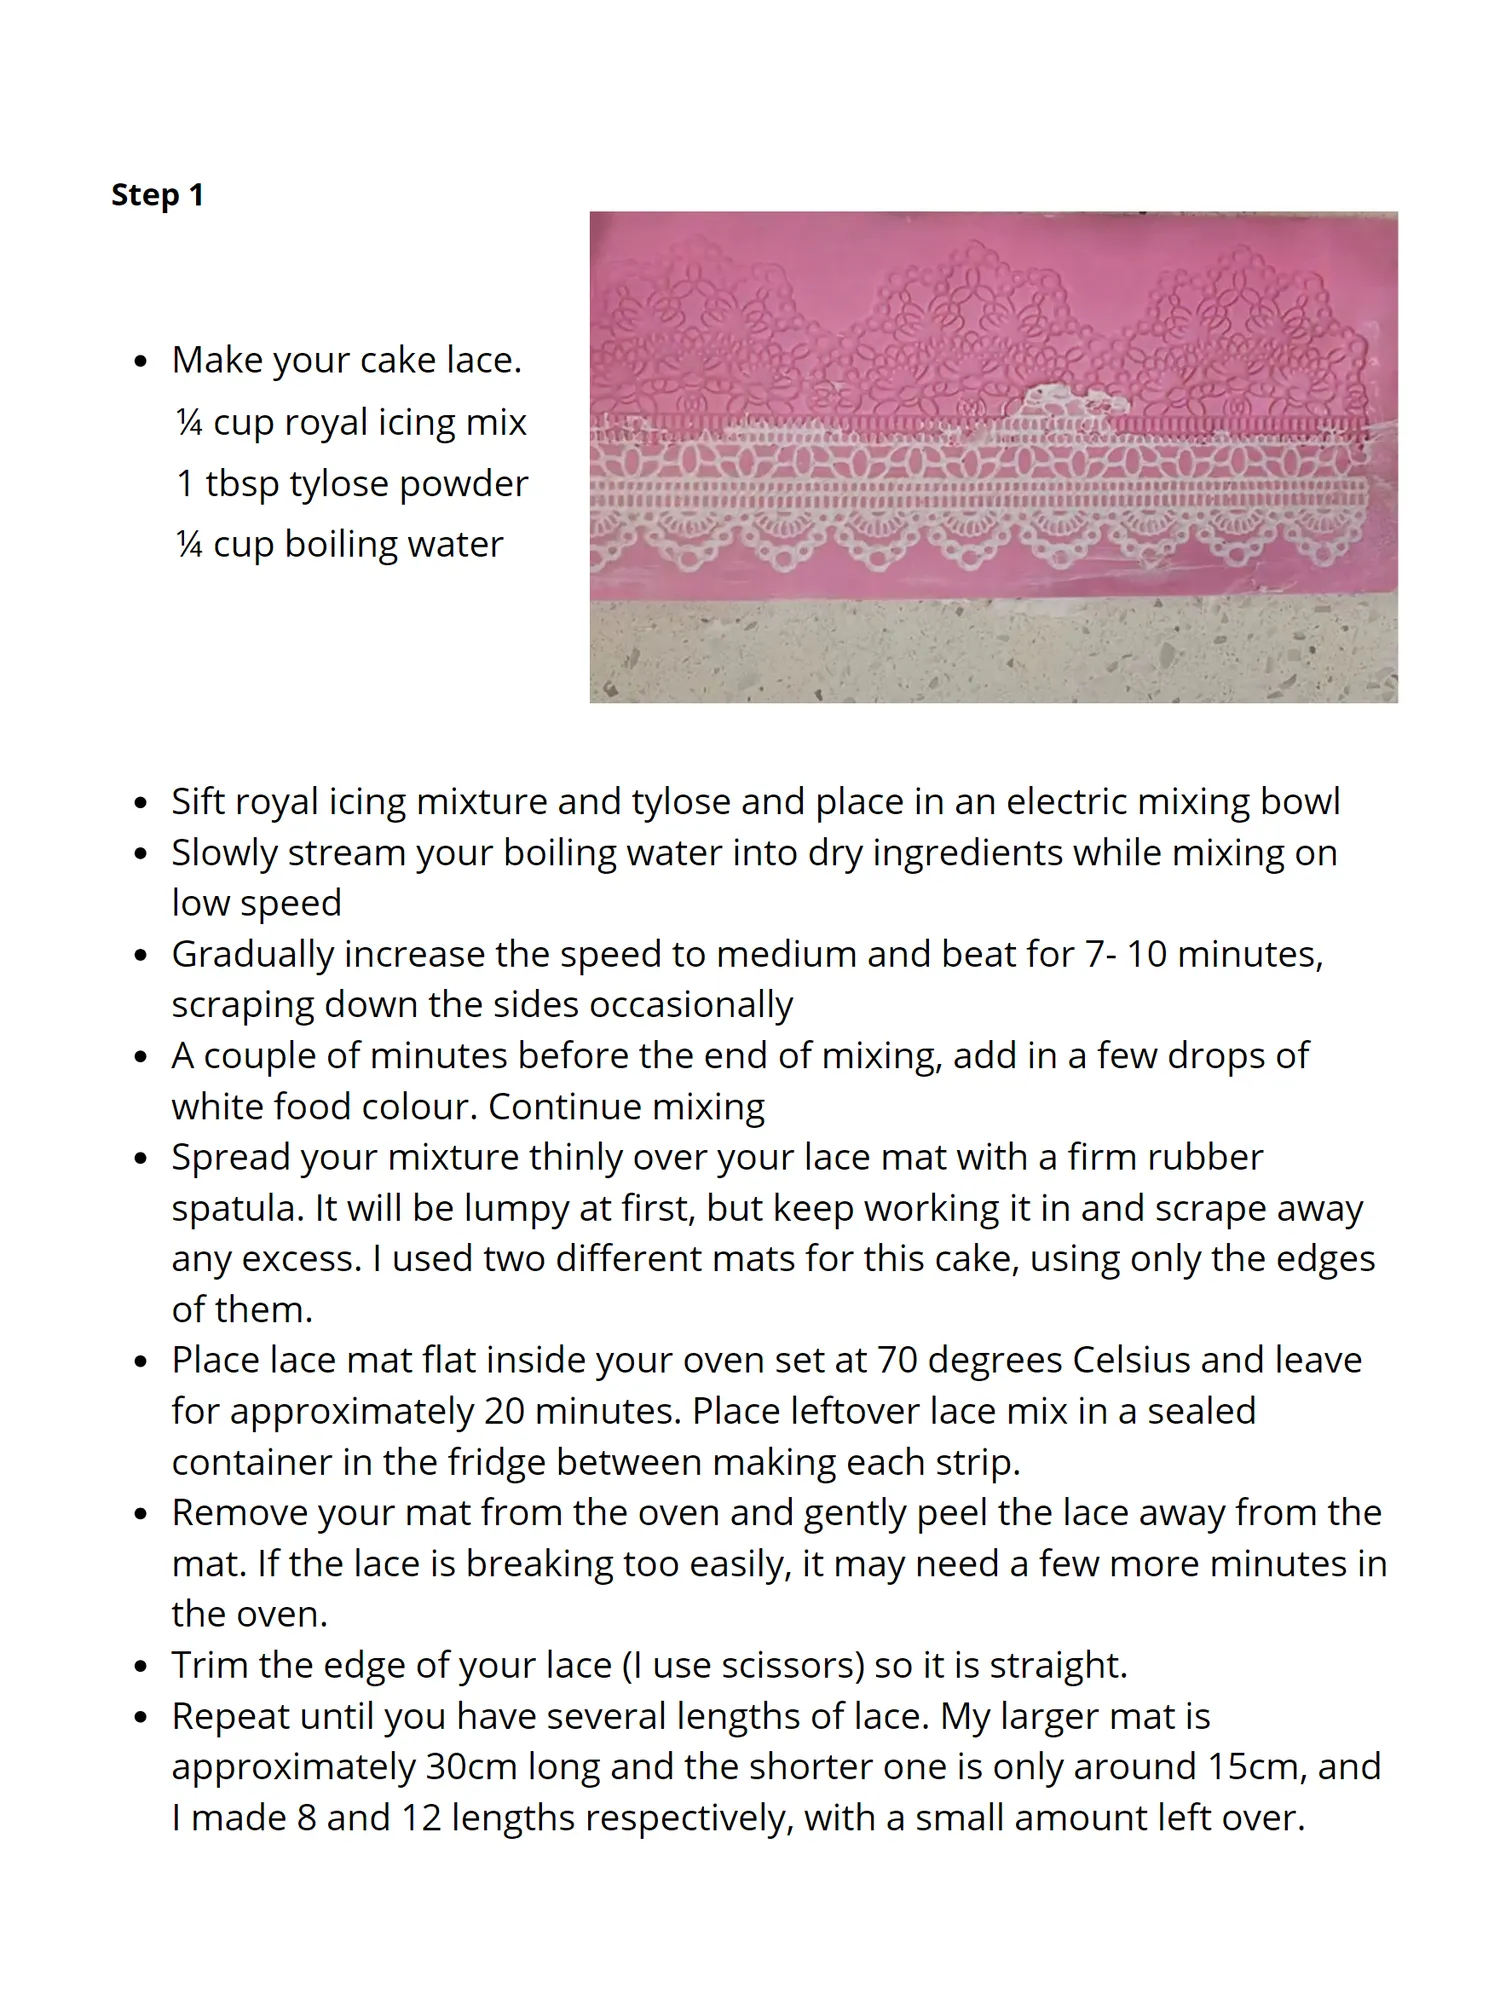
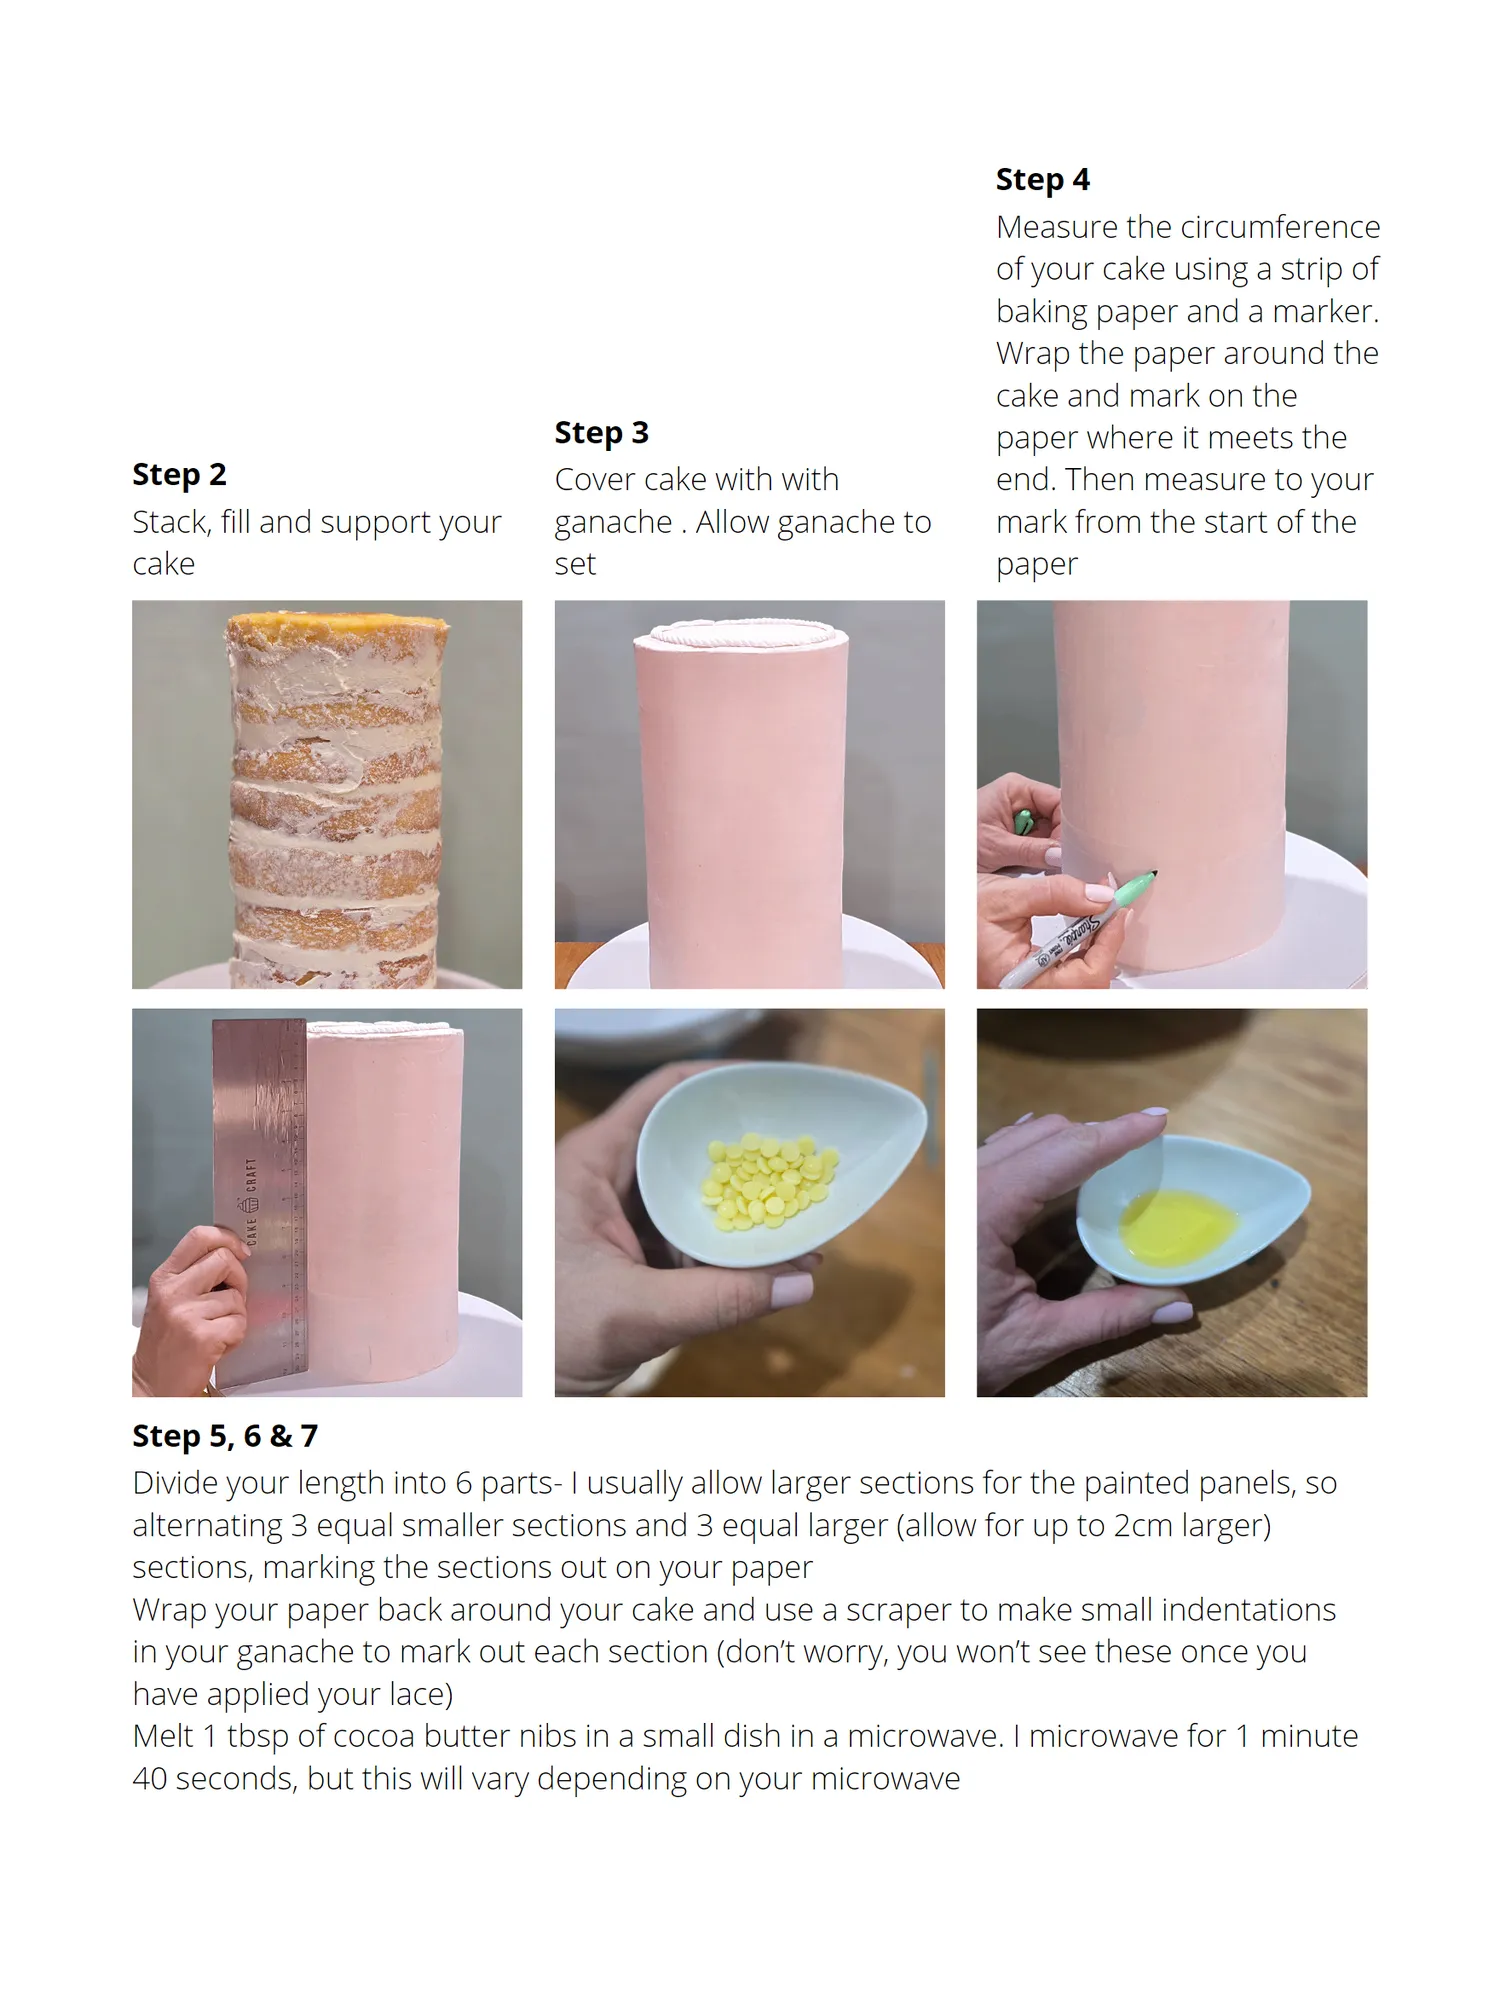
Step 1 Make your cake lace. ¼ cup royal icing mix 1 tbsp tylose powder ¼ cup boiling water Sift royal icing mixture and tylose and place in an electric mixing bowl Slowly stream your boiling water into dry ingredients while mixing on low speed Gradually increase the speed to medium and beat for 7- 10 minutes, scraping down the sides occasionally A couple of minutes before the end of mixing, add in a few drops of white food colour. Continue mixing Spread your mixture thinly over your lace mat with a firm rubber spatula. It will be lumpy at first, but keep working it in and scrape away any excess. I used two different mats for this cake, using only the edges of them. Place lace mat flat inside your oven set at 70 degrees Celsius and leave for approximately 20 minutes. Place leftover lace mix in a sealed container in the fridge between making each strip. Remove your mat from the oven and gently peel the lace away from the mat. If the lace is breaking too easily, it may need a few more minutes in the oven. Trim the edge of your lace (I use scissors) so it is straight. Repeat until you have several lengths of lace. My larger mat is approximately 30cm long and the shorter one is only around 15cm, and I made 8 and 12 lengths respectively, with a small amount left over.
Page 36 text
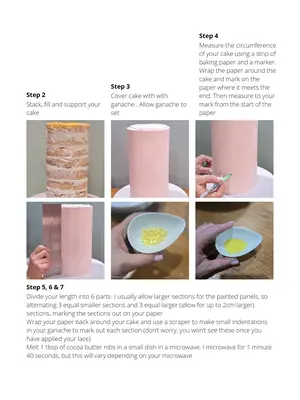
Step 4 Measure the circumference of your cake using a strip of baking paper and a marker. Wrap the paper around the cake and mark on the Step 3 paper where it meets the Step 2 Cover cake with with end. Then measure to your Stack, fill and support your ganache . Allow ganache to mark from the start of the cake set paper Step 5, 6 & 7 Divide your length into 6 parts- I usually allow larger sections for the painted panels, so alternating 3 equal smaller sections and 3 equal larger (allow for up to 2cm larger) sections, marking the sections out on your paper Wrap your paper back around your cake and use a scraper to make small indentations in your ganache to mark out each section (don’t worry, you won’t see these once you have applied your lace) Melt 1 tbsp of cocoa butter nibs in a small dish in a microwave. I microwave for 1 minute 40 seconds, but this will vary depending on your microwave
Page 37 text
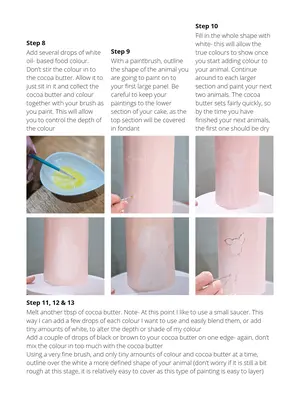
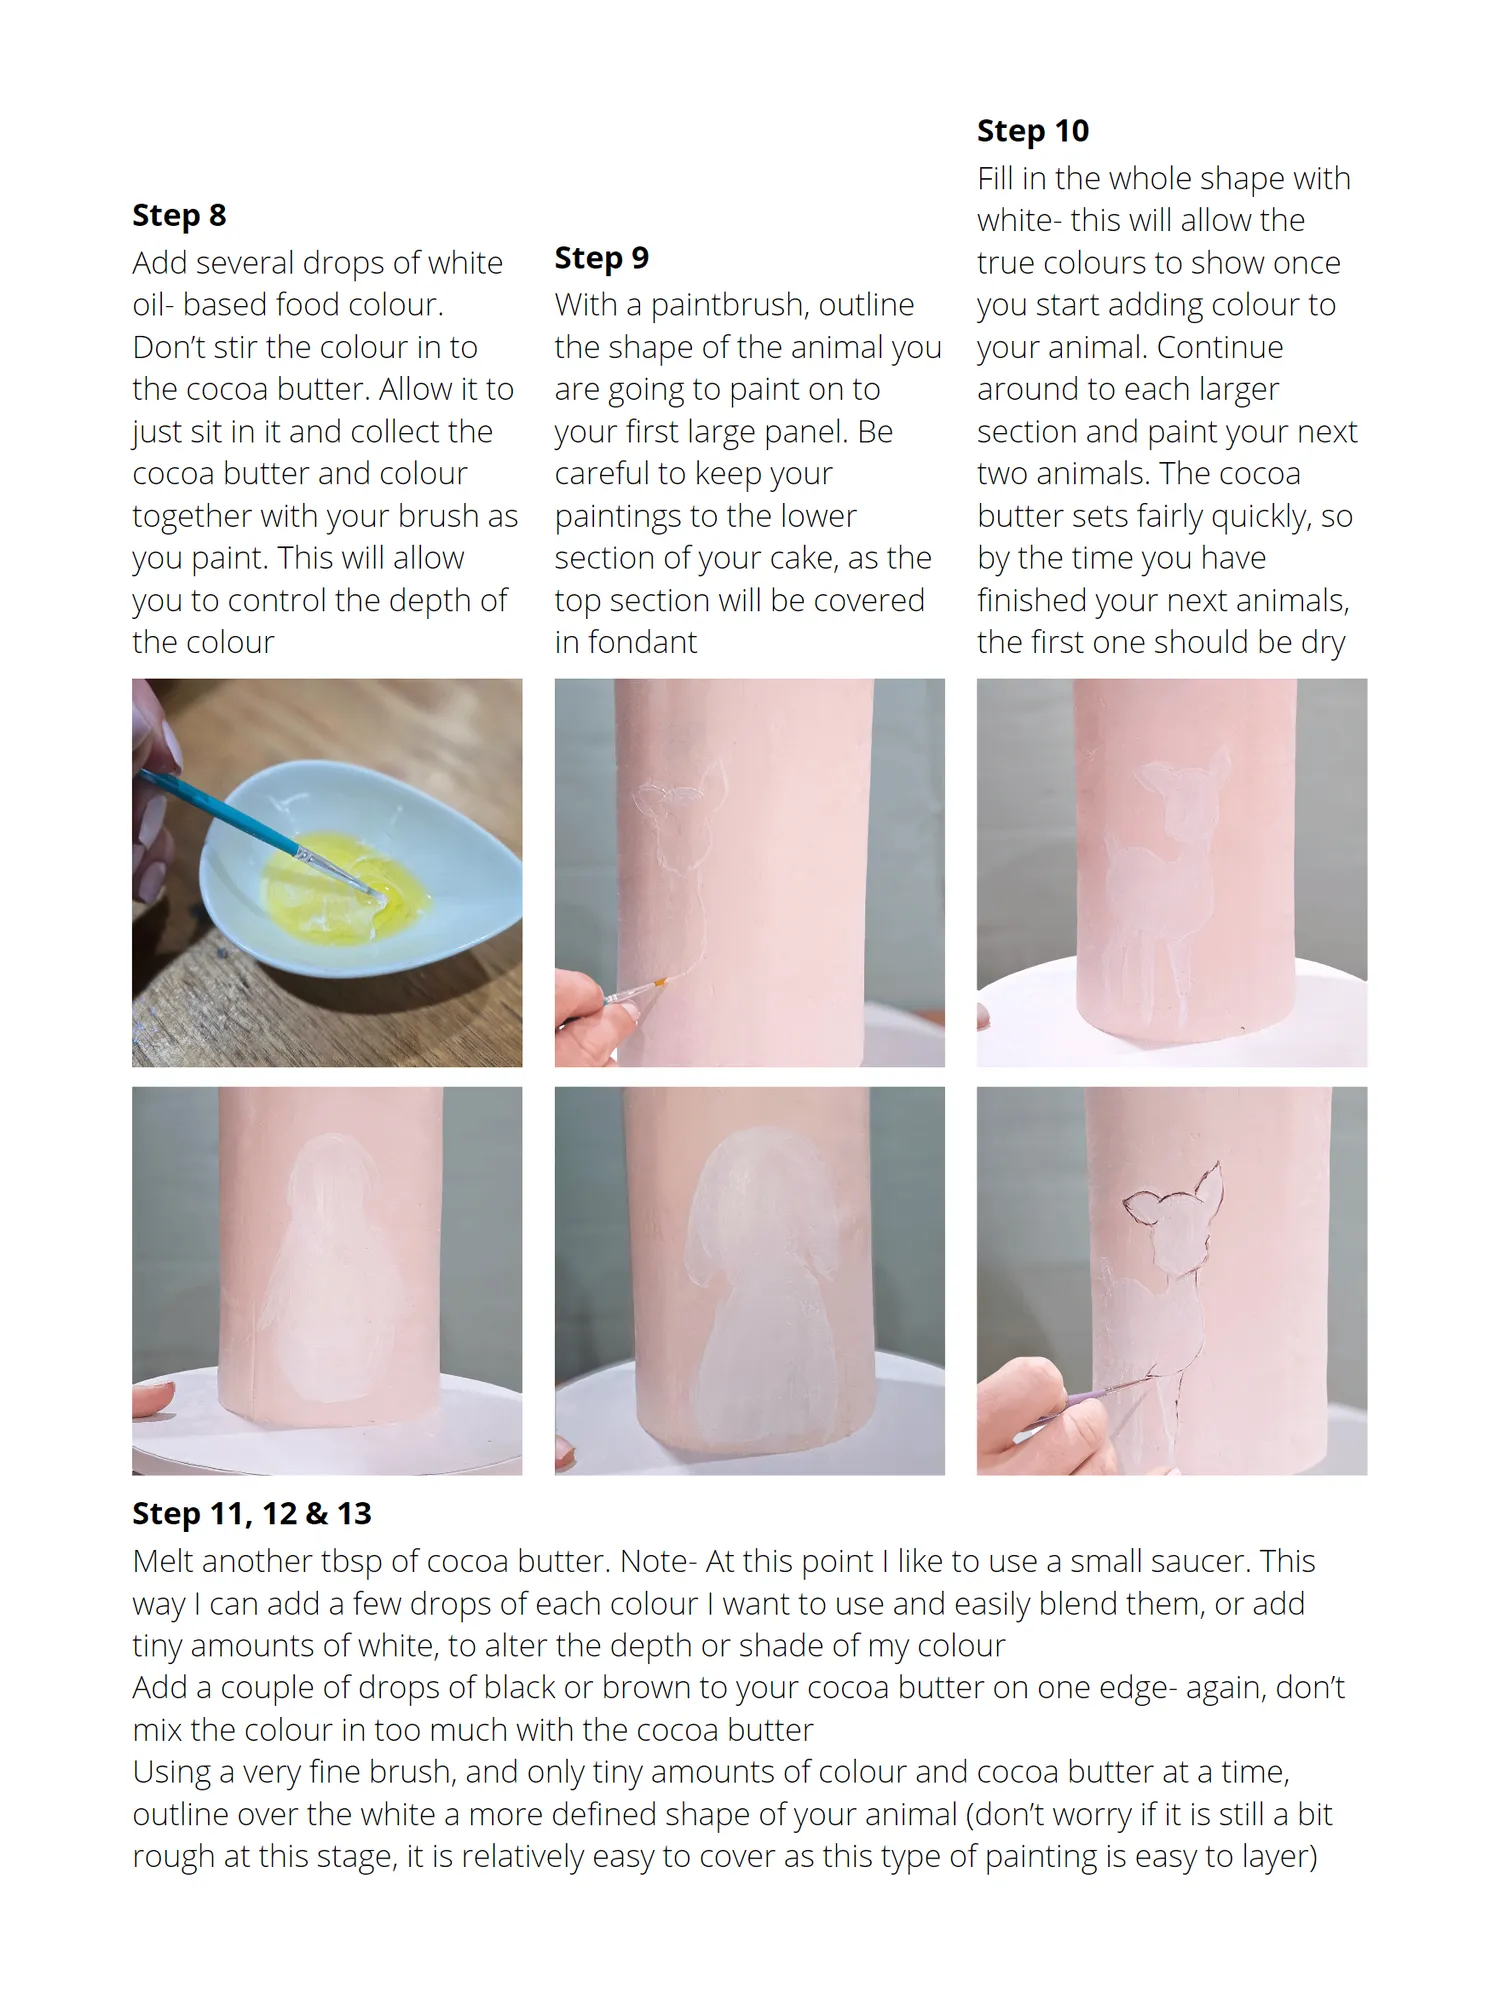
Step 10 Fill in the whole shape with Step 8 white- this will allow the Add several drops of white Step 9 true colours to show once oil- based food colour. With a paintbrush, outline you start adding colour to Don’t stir the colour in to the shape of the animal you your animal. Continue the cocoa butter. Allow it to are going to paint on to around to each larger just sit in it and collect the your first large panel. Be section and paint your next cocoa butter and colour careful to keep your two animals. The cocoa together with your brush as paintings to the lower butter sets fairly quickly, so you paint. This will allow section of your cake, as the by the time you have you to control the depth of top section will be covered finished your next animals, the colour in fondant the first one should be dry Step 11, 12 & 13 Melt another tbsp of cocoa butter. Note- At this point I like to use a small saucer. This way I can add a few drops of each colour I want to use and easily blend them, or add tiny amounts of white, to alter the depth or shade of my colour Add a couple of drops of black or brown to your cocoa butter on one edge- again, don’t mix the colour in too much with the cocoa butter Using a very fine brush, and only tiny amounts of colour and cocoa butter at a time, outline over the white a more defined shape of your animal (don’t worry if it is still a bit rough at this stage, it is relatively easy to cover as this type of painting is easy to layer)
Page 38 text
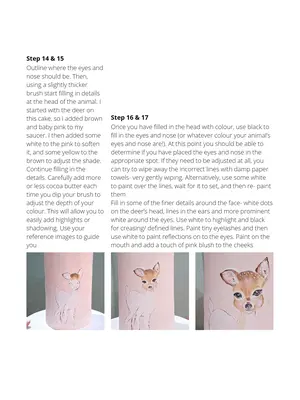
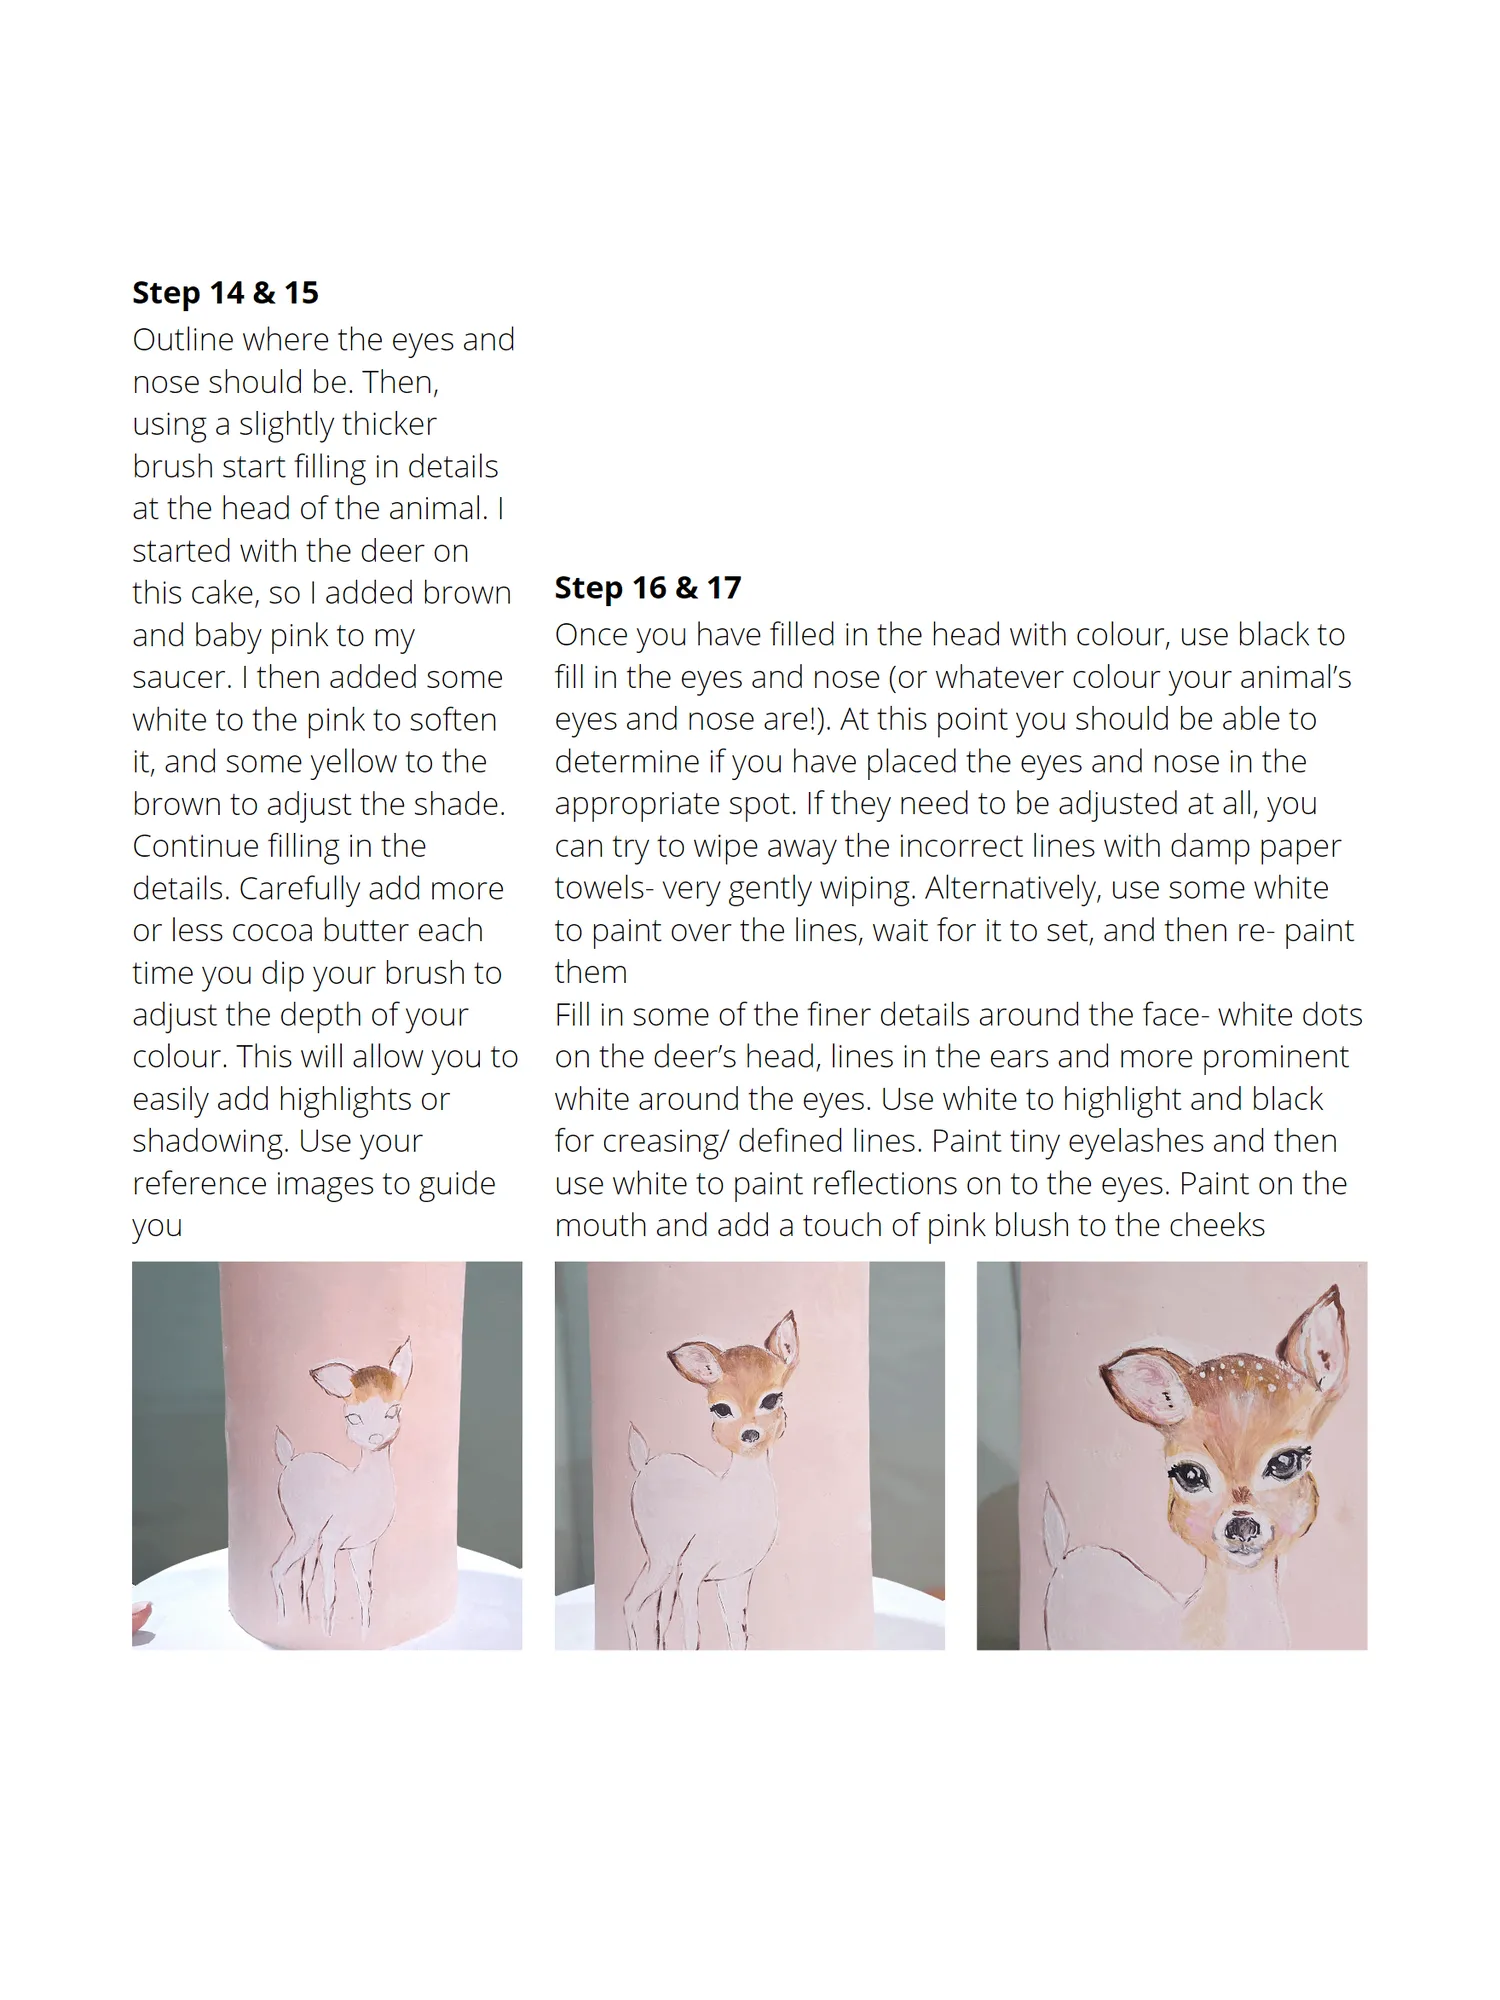
Step 14 & 15 Outline where the eyes and nose should be. Then, using a slightly thicker brush start filling in details at the head of the animal. I started with the deer on this cake, so I added brown Step 16 & 17 and baby pink to my Once you have filled in the head with colour, use black to saucer. I then added some fill in the eyes and nose (or whatever colour your animal’s white to the pink to soften eyes and nose are!). At this point you should be able to it, and some yellow to the determine if you have placed the eyes and nose in the brown to adjust the shade. appropriate spot. If they need to be adjusted at all, you Continue filling in the can try to wipe away the incorrect lines with damp paper details. Carefully add more towels- very gently wiping. Alternatively, use some white or less cocoa butter each to paint over the lines, wait for it to set, and then re- paint time you dip your brush to them adjust the depth of your Fill in some of the finer details around the face- white dots colour. This will allow you to on the deer’s head, lines in the ears and more prominent easily add highlights or white around the eyes. Use white to highlight and black shadowing. Use your for creasing/ defined lines. Paint tiny eyelashes and then reference images to guide use white to paint reflections on to the eyes. Paint on the you mouth and add a touch of pink blush to the cheeks
Page 39 text
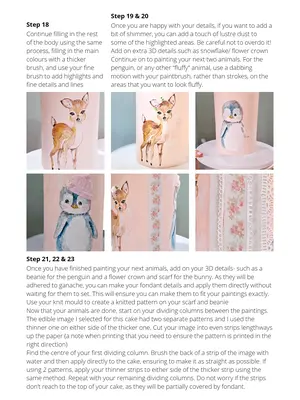
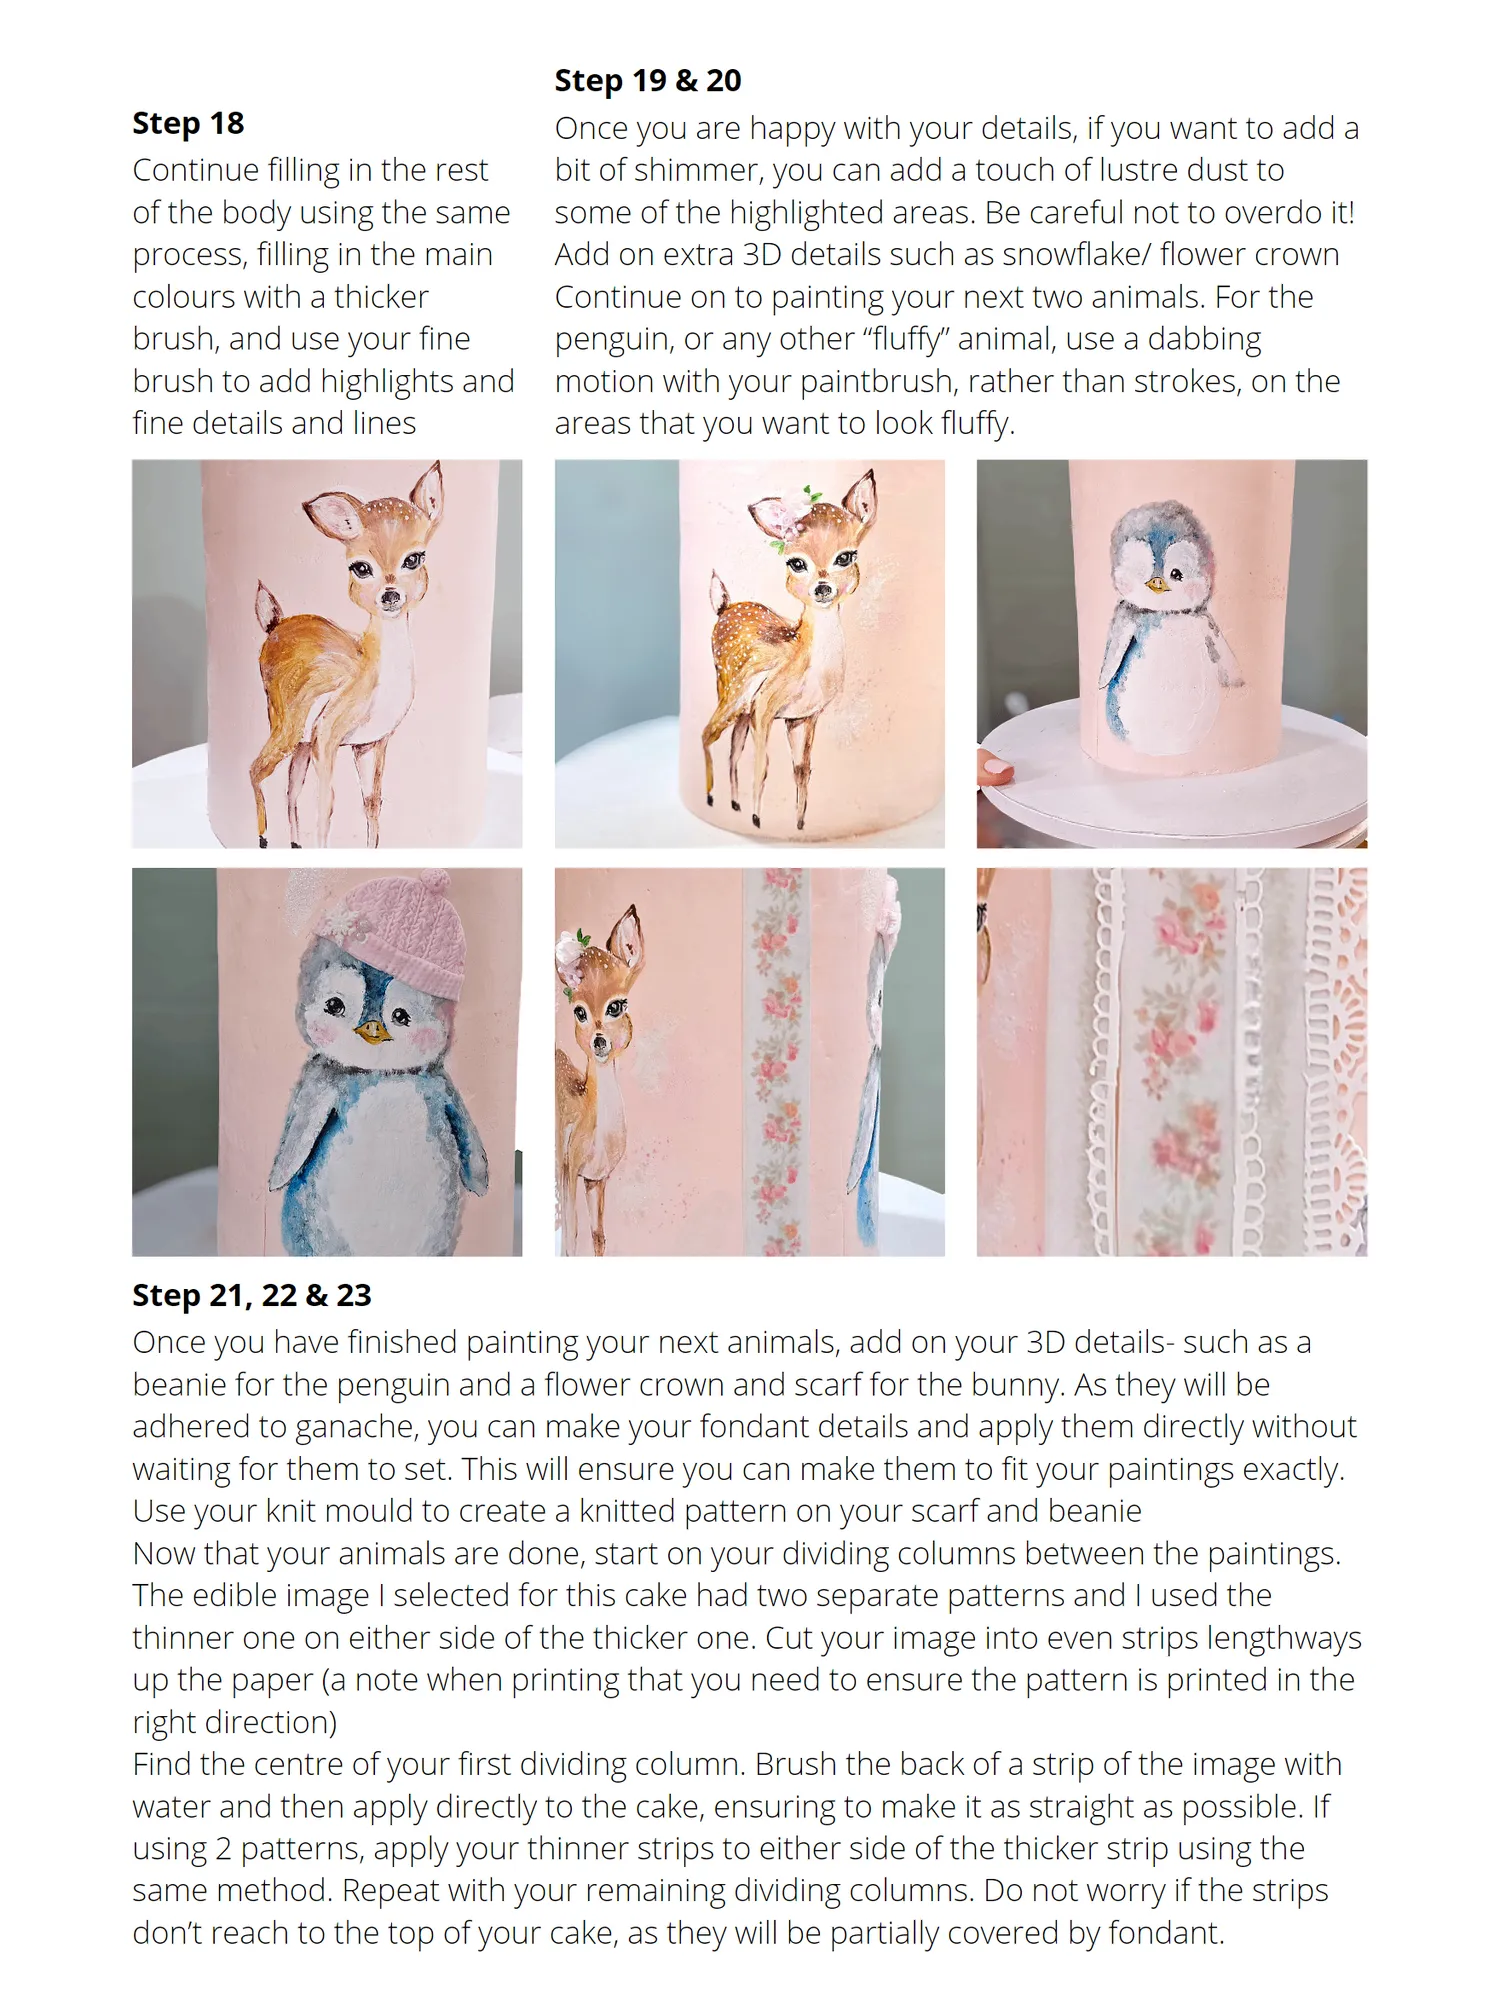
Step 19 & 20 Step 18 Once you are happy with your details, if you want to add a Continue filling in the rest bit of shimmer, you can add a touch of lustre dust to of the body using the same some of the highlighted areas. Be careful not to overdo it! process, filling in the main Add on extra 3D details such as snowflake/ flower crown colours with a thicker Continue on to painting your next two animals. For the brush, and use your fine penguin, or any other “fluffy” animal, use a dabbing brush to add highlights and motion with your paintbrush, rather than strokes, on the fine details and lines areas that you want to look fluffy. Step 21, 22 & 23 Once you have finished painting your next animals, add on your 3D details- such as a beanie for the penguin and a flower crown and scarf for the bunny. As they will be adhered to ganache, you can make your fondant details and apply them directly without waiting for them to set. This will ensure you can make them to fit your paintings exactly. Use your knit mould to create a knitted pattern on your scarf and beanie Now that your animals are done, start on your dividing columns between the paintings. The edible image I selected for this cake had two separate patterns and I used the thinner one on either side of the thicker one. Cut your image into even strips lengthways up the paper (a note when printing that you need to ensure the pattern is printed in the right direction) Find the centre of your first dividing column. Brush the back of a strip of the image with water and then apply directly to the cake, ensuring to make it as straight as possible. If using 2 patterns, apply your thinner strips to either side of the thicker strip using the same method. Repeat with your remaining dividing columns. Do not worry if the strips don’t reach to the top of your cake, as they will be partially covered by fondant.
Page 40 text
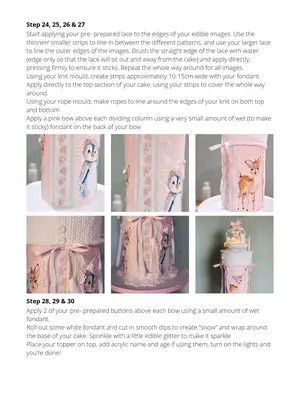
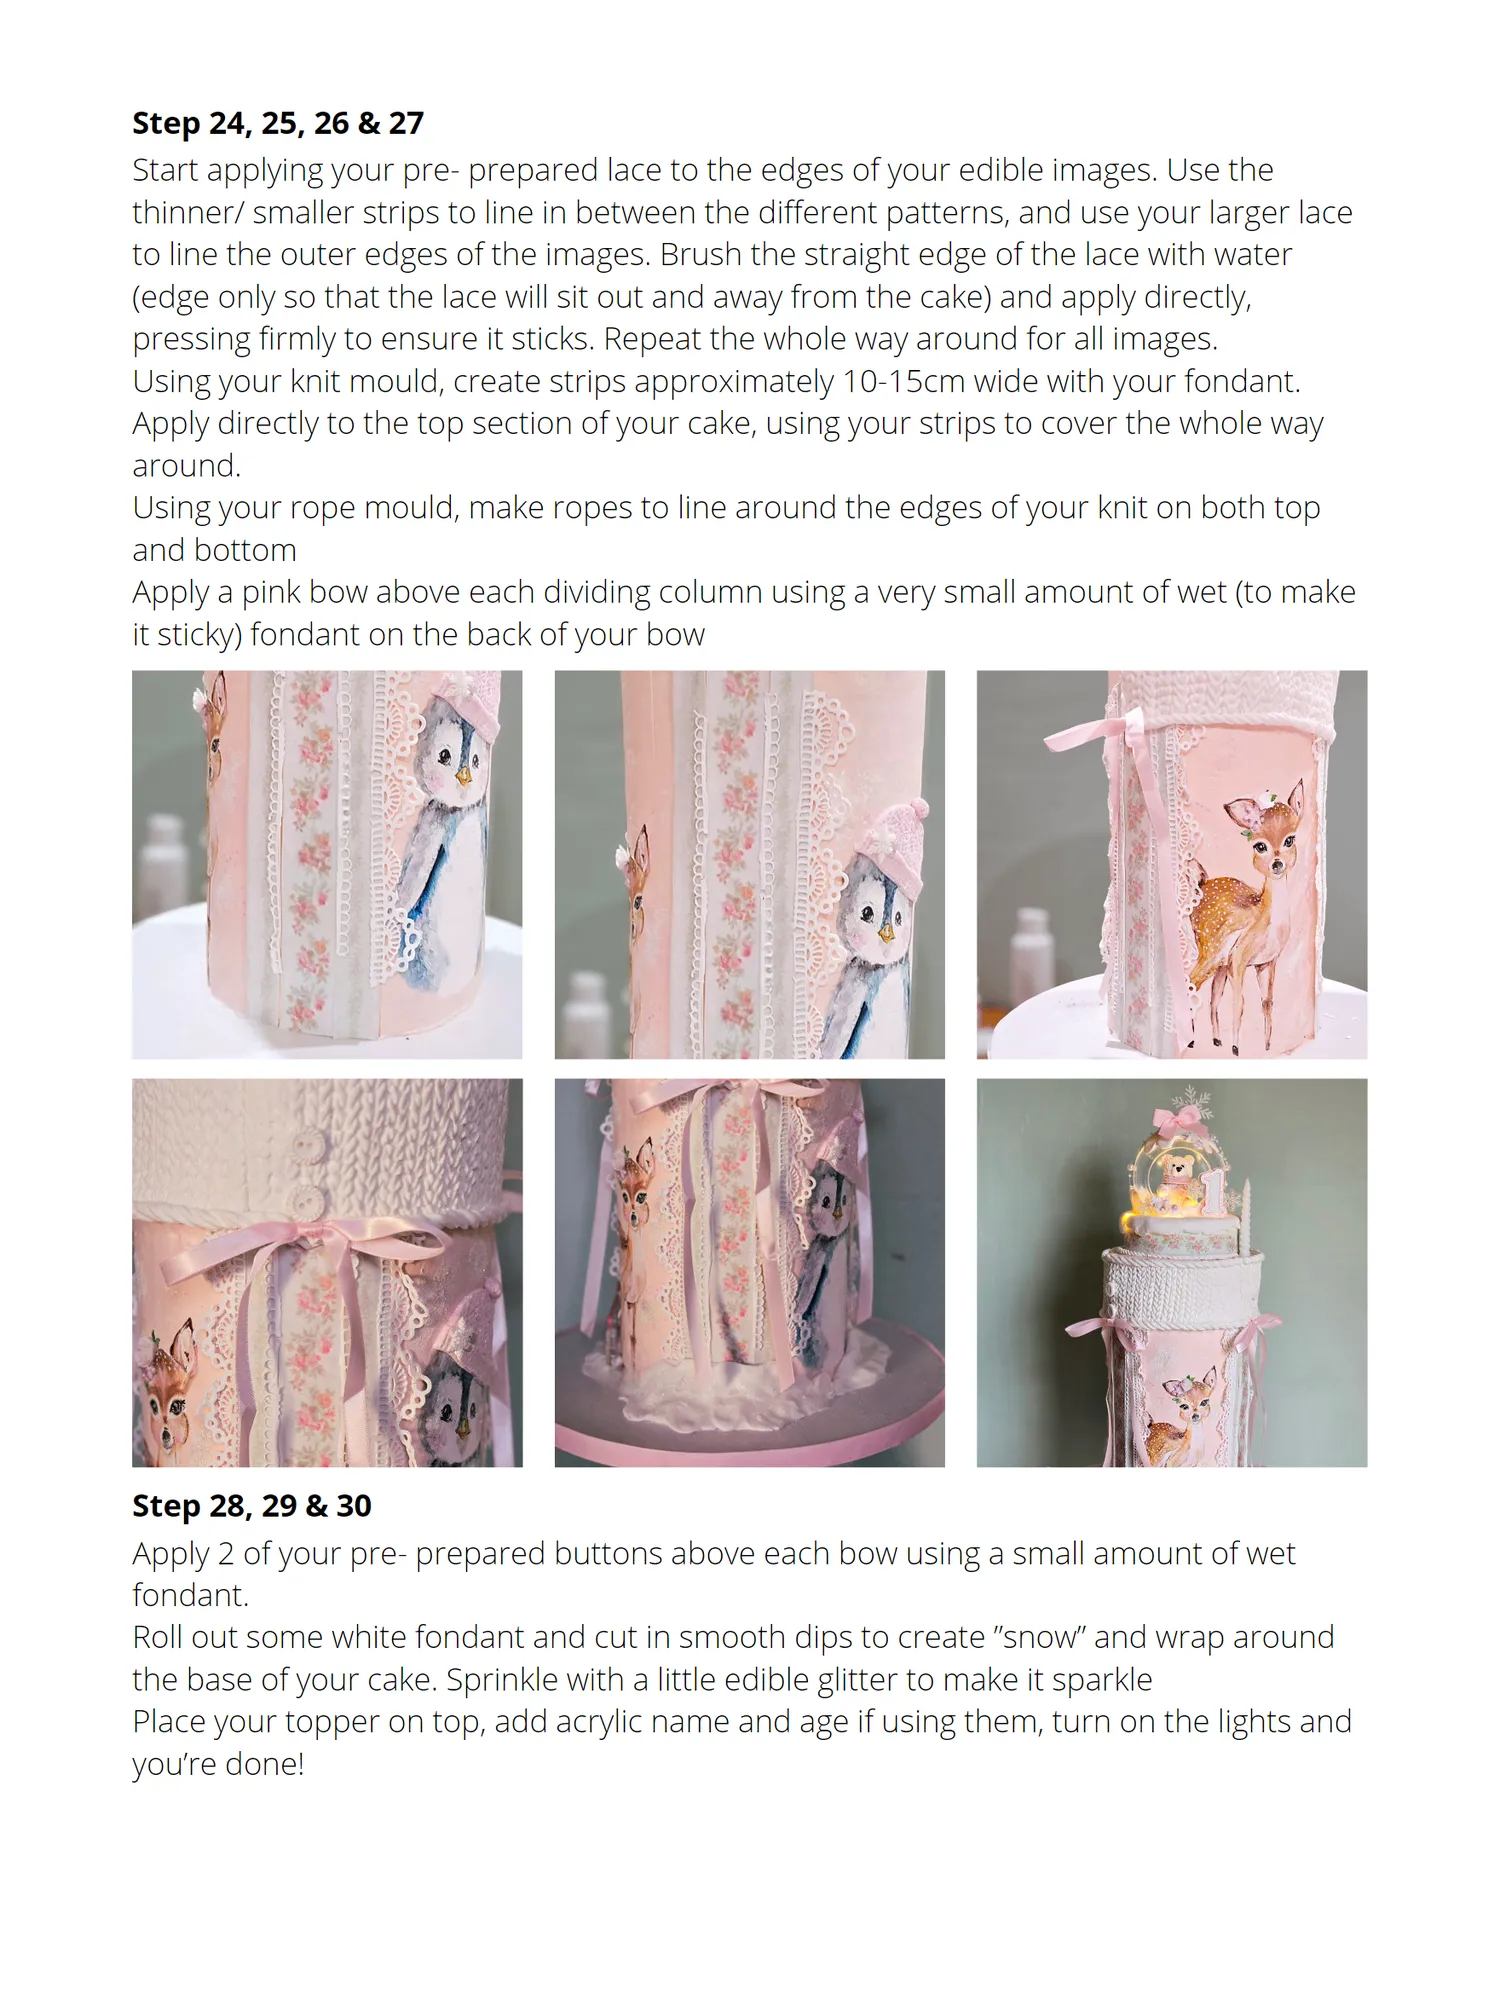
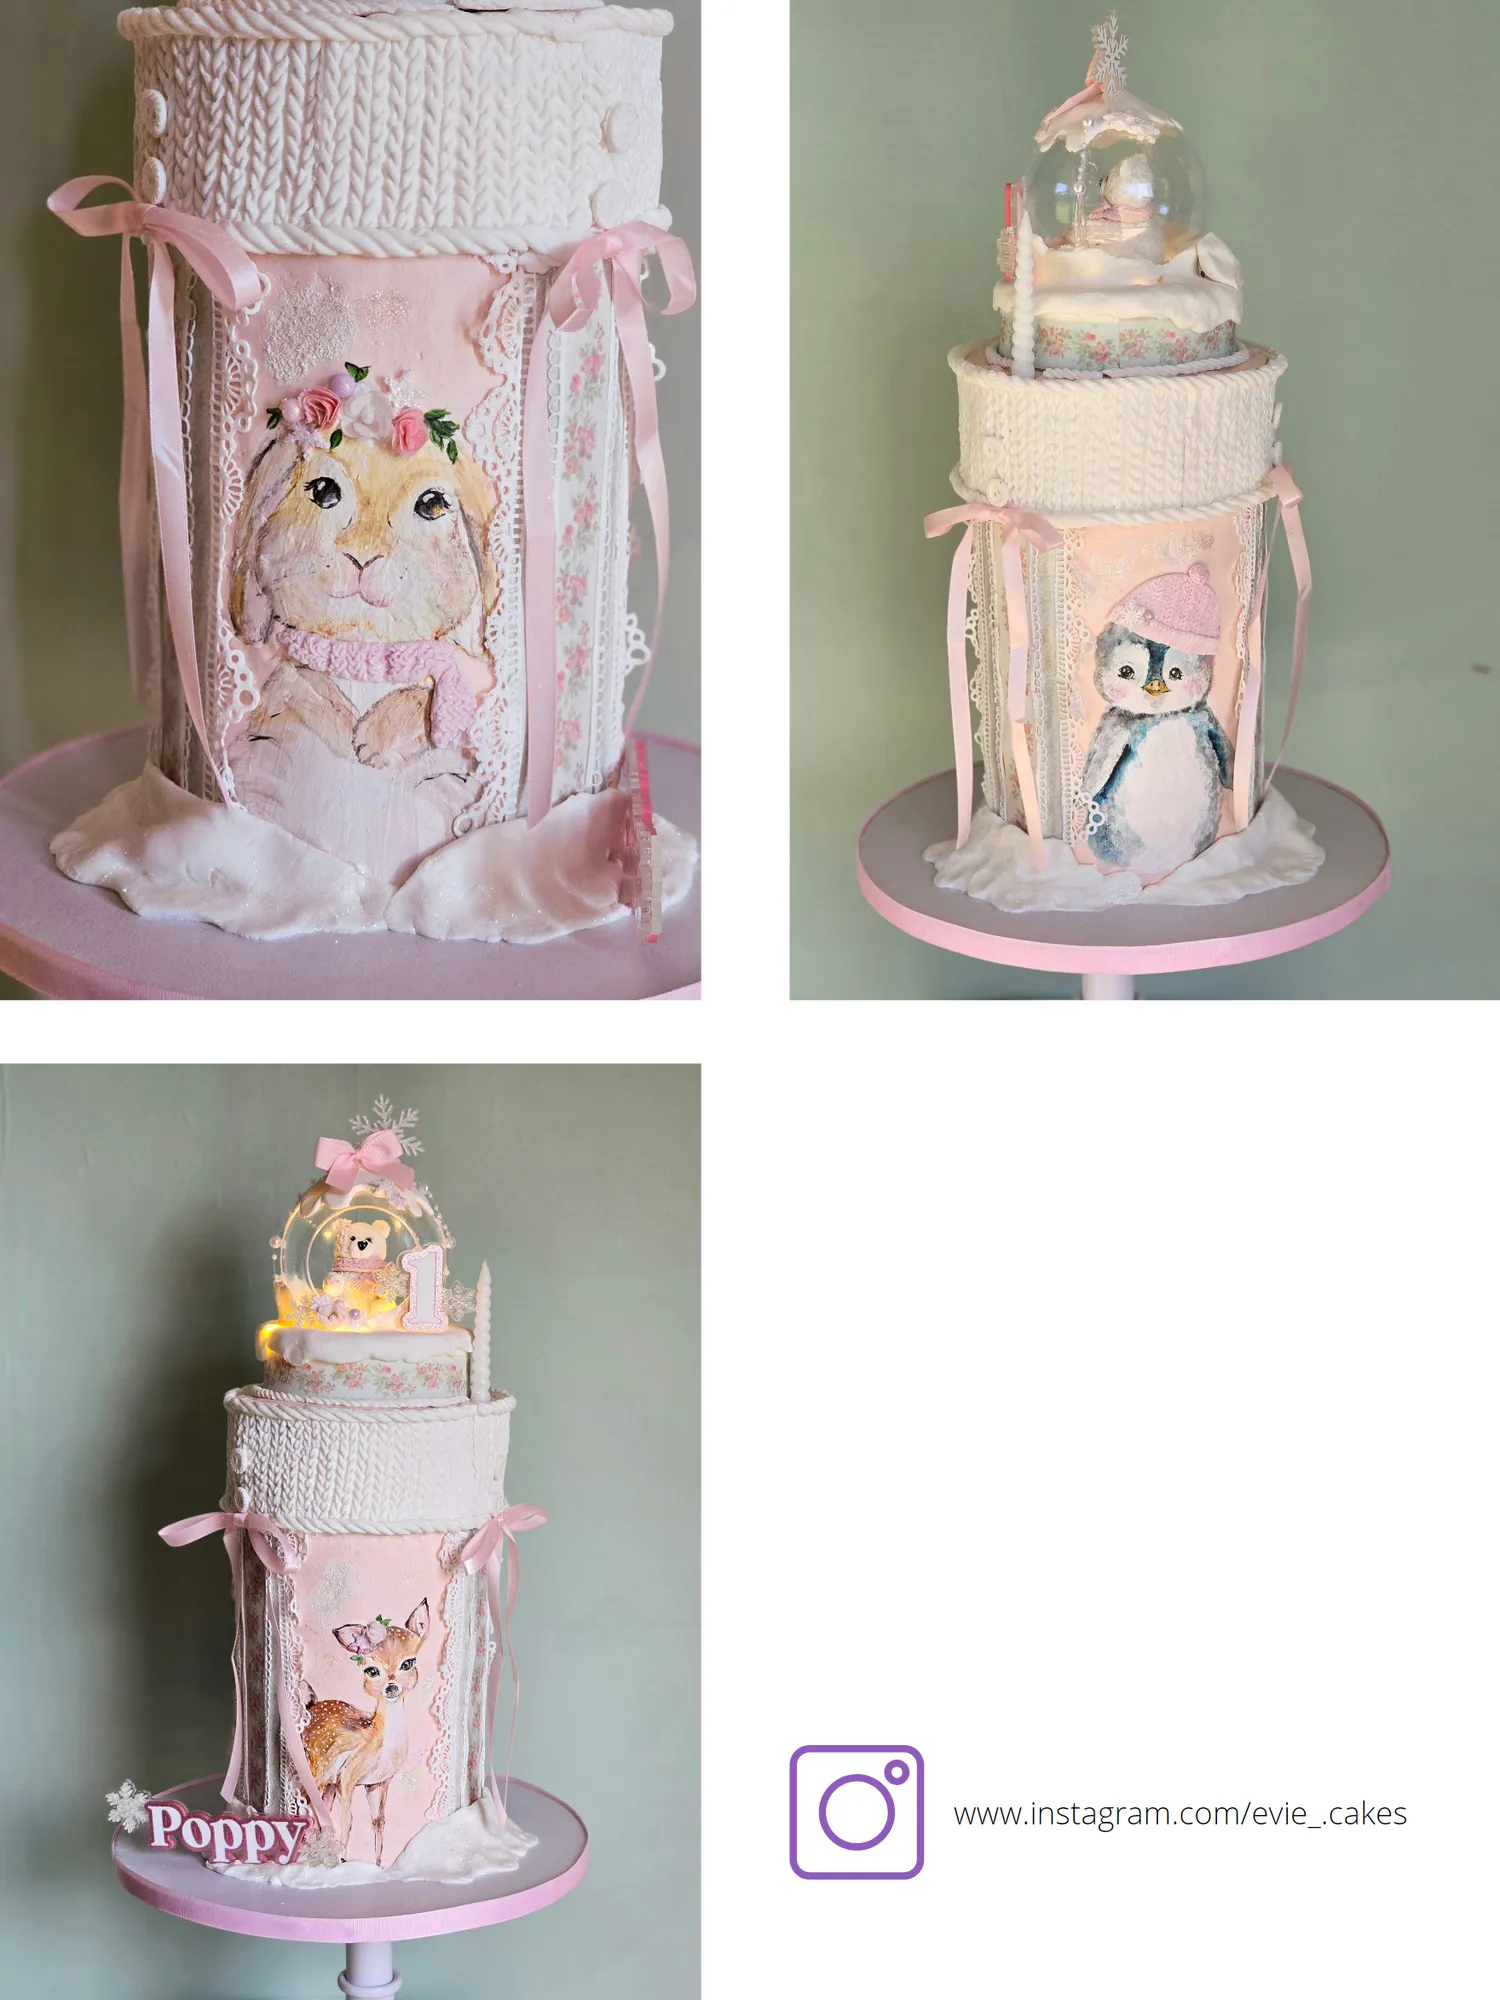
Step 24, 25, 26 & 27 Start applying your pre- prepared lace to the edges of your edible images. Use the thinner/ smaller strips to line in between the different patterns, and use your larger lace to line the outer edges of the images. Brush the straight edge of the lace with water (edge only so that the lace will sit out and away from the cake) and apply directly, pressing firmly to ensure it sticks. Repeat the whole way around for all images. Using your knit mould, create strips approximately 10-15cm wide with your fondant. Apply directly to the top section of your cake, using your strips to cover the whole way around. Using your rope mould, make ropes to line around the edges of your knit on both top and bottom Apply a pink bow above each dividing column using a very small amount of wet (to make it sticky) fondant on the back of your bow Step 28, 29 & 30 Apply 2 of your pre- prepared buttons above each bow using a small amount of wet fondant. Roll out some white fondant and cut in smooth dips to create ”snow” and wrap around the base of your cake. Sprinkle with a little edible glitter to make it sparkle Place your topper on top, add acrylic name and age if using them, turn on the lights and you’re done!
Page 41 text
www.instagram.com/evie_.cakes


Page 42 text
2 1 + 2 2 S E P T E M B E R 2 0 2 4 Grab your ticket and more info A N D A L L T H I N G S S W E E T M E L B O U R N E 2 1 + 2 2 S E P T E M B E R 2 0 2 4 Follow the QR Code Grab your ticket and more info F E S T I V A L O F C A K E . C O M . A U B R O U G H T T O Y O U B Y P R O U D L Y S U P P O R T E D B Y


Page 44 text
PROUDLY SUPPORTED BY
Page 45 text
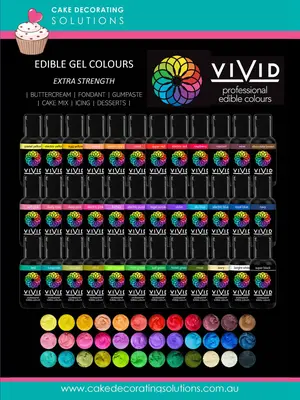
PROUDLY SUPPORTED BY





Page 49 text
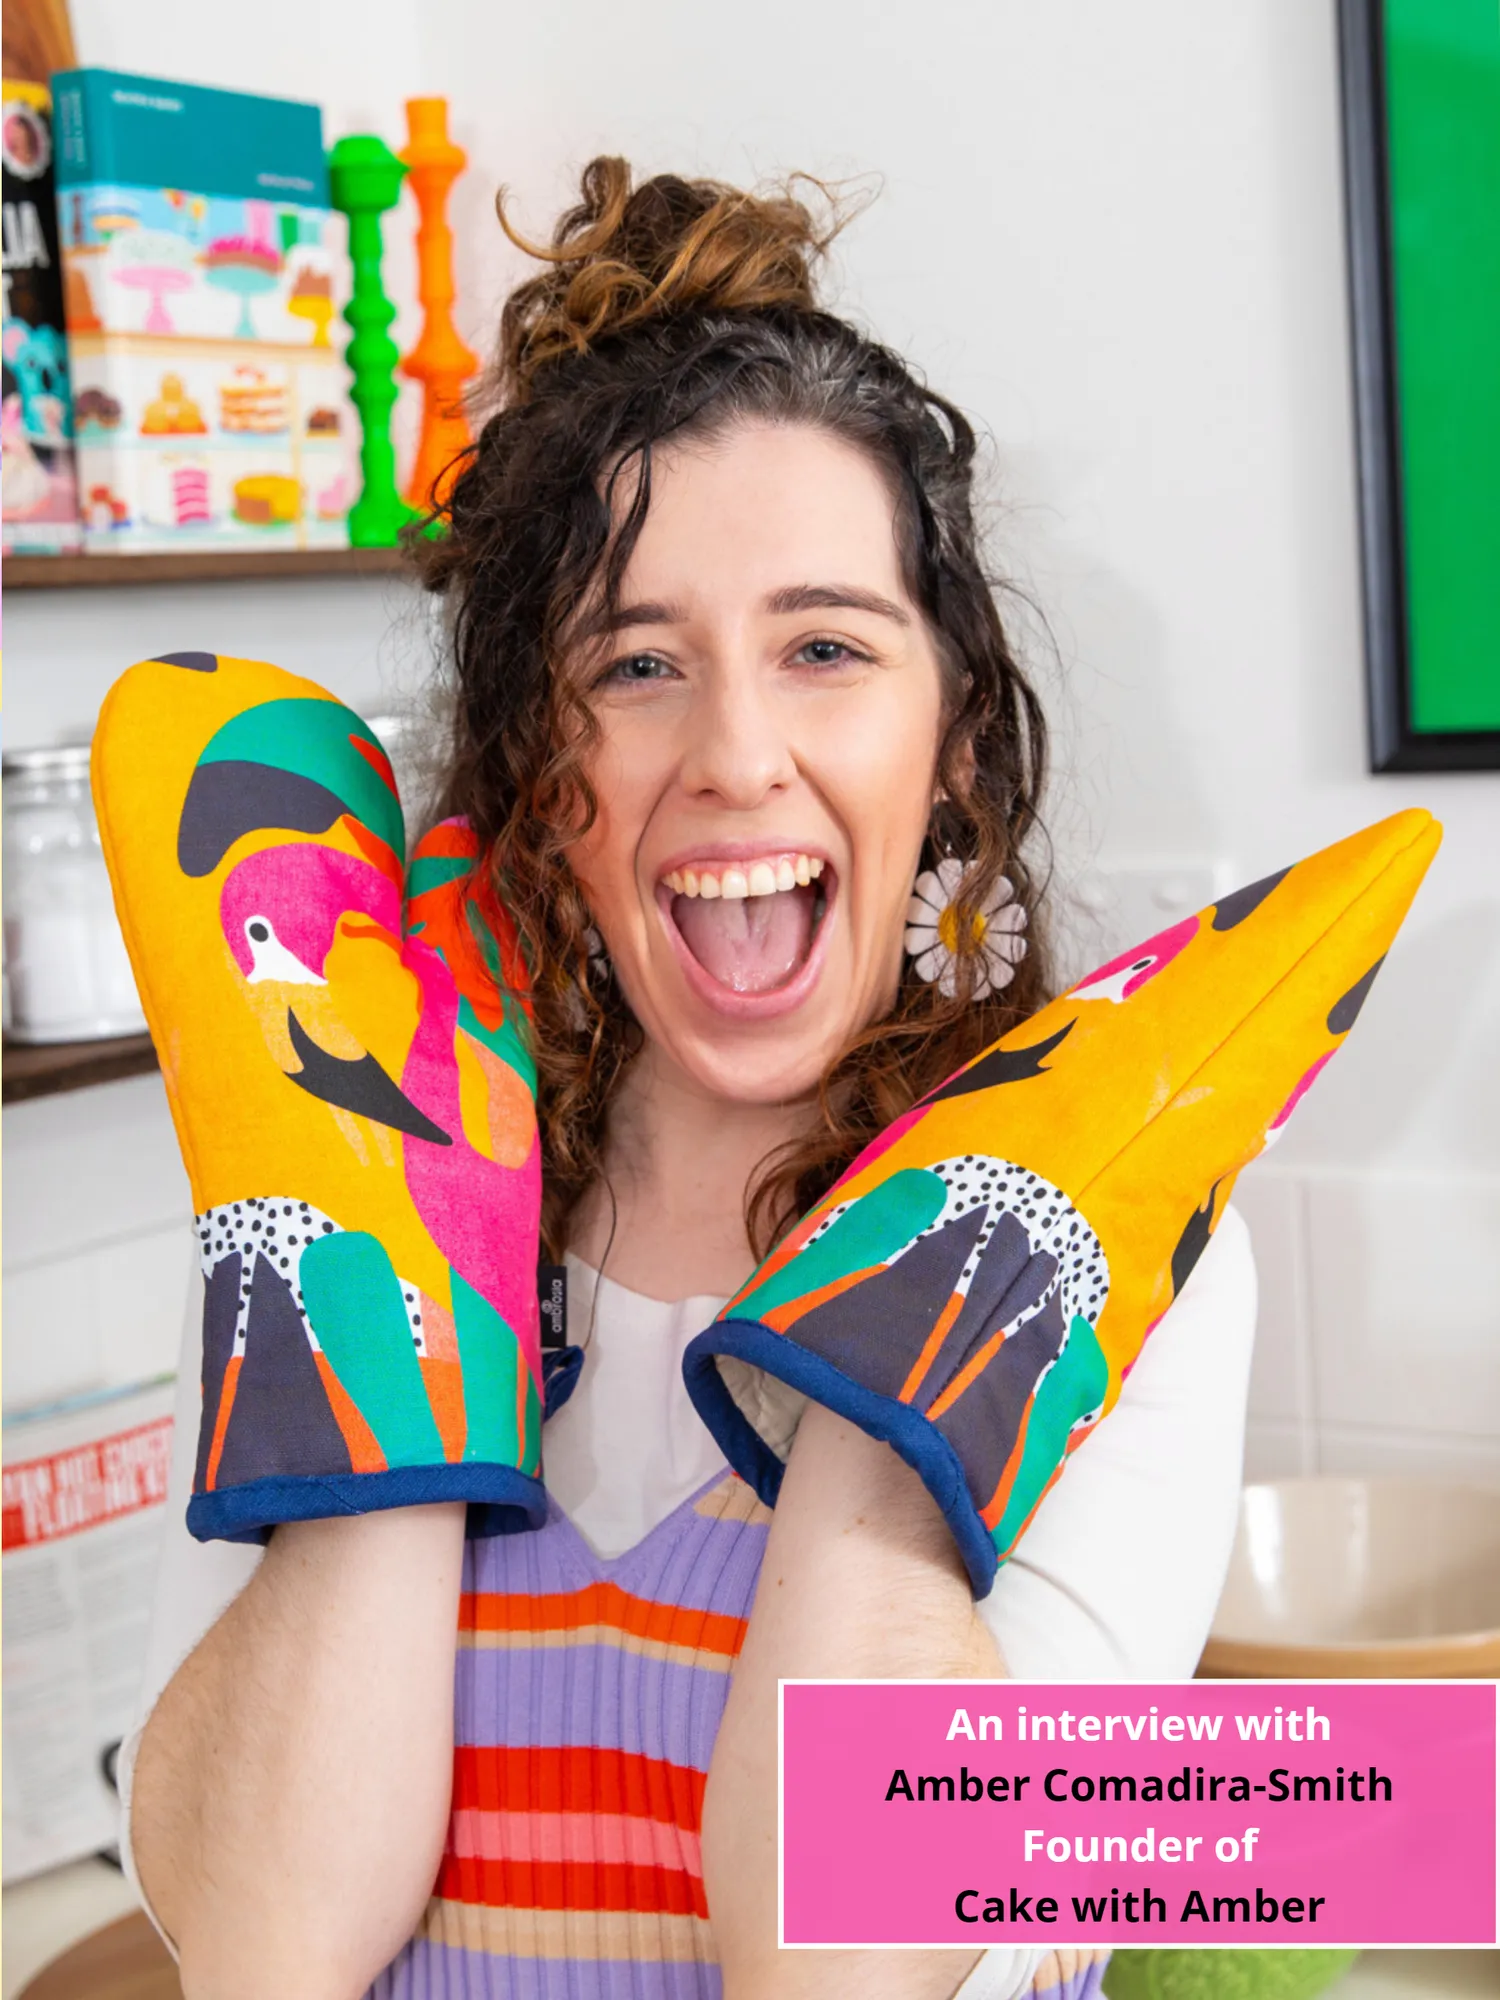
An interview with Amber Comadira-Smith Founder of Cake with Amber
Page 50 text
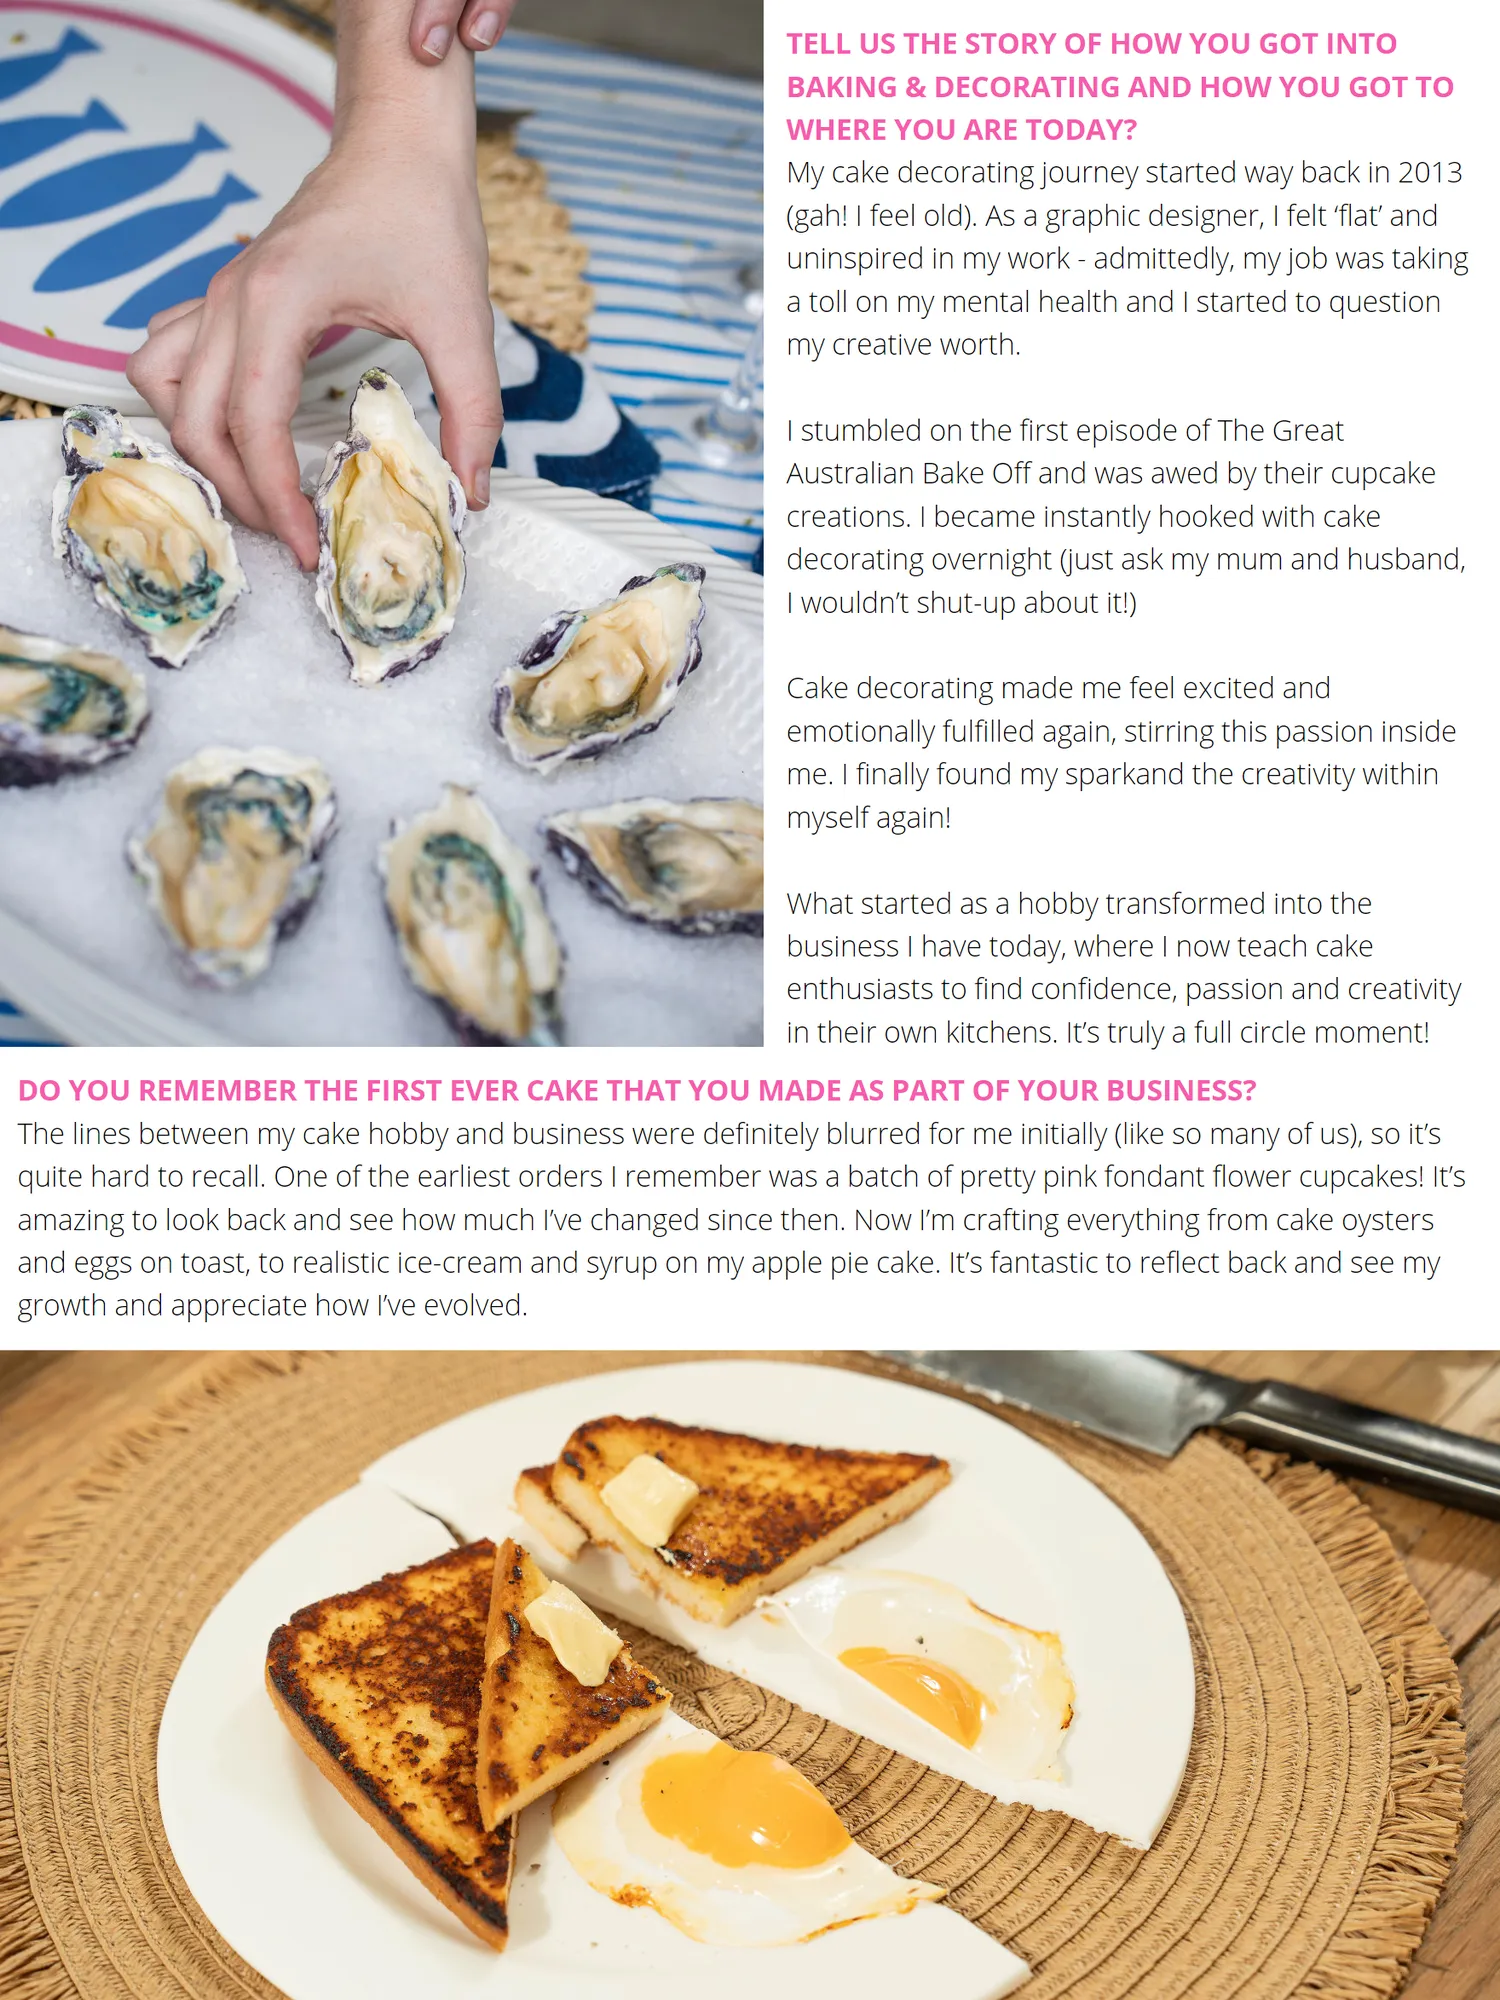
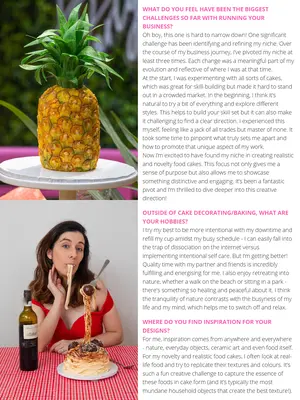
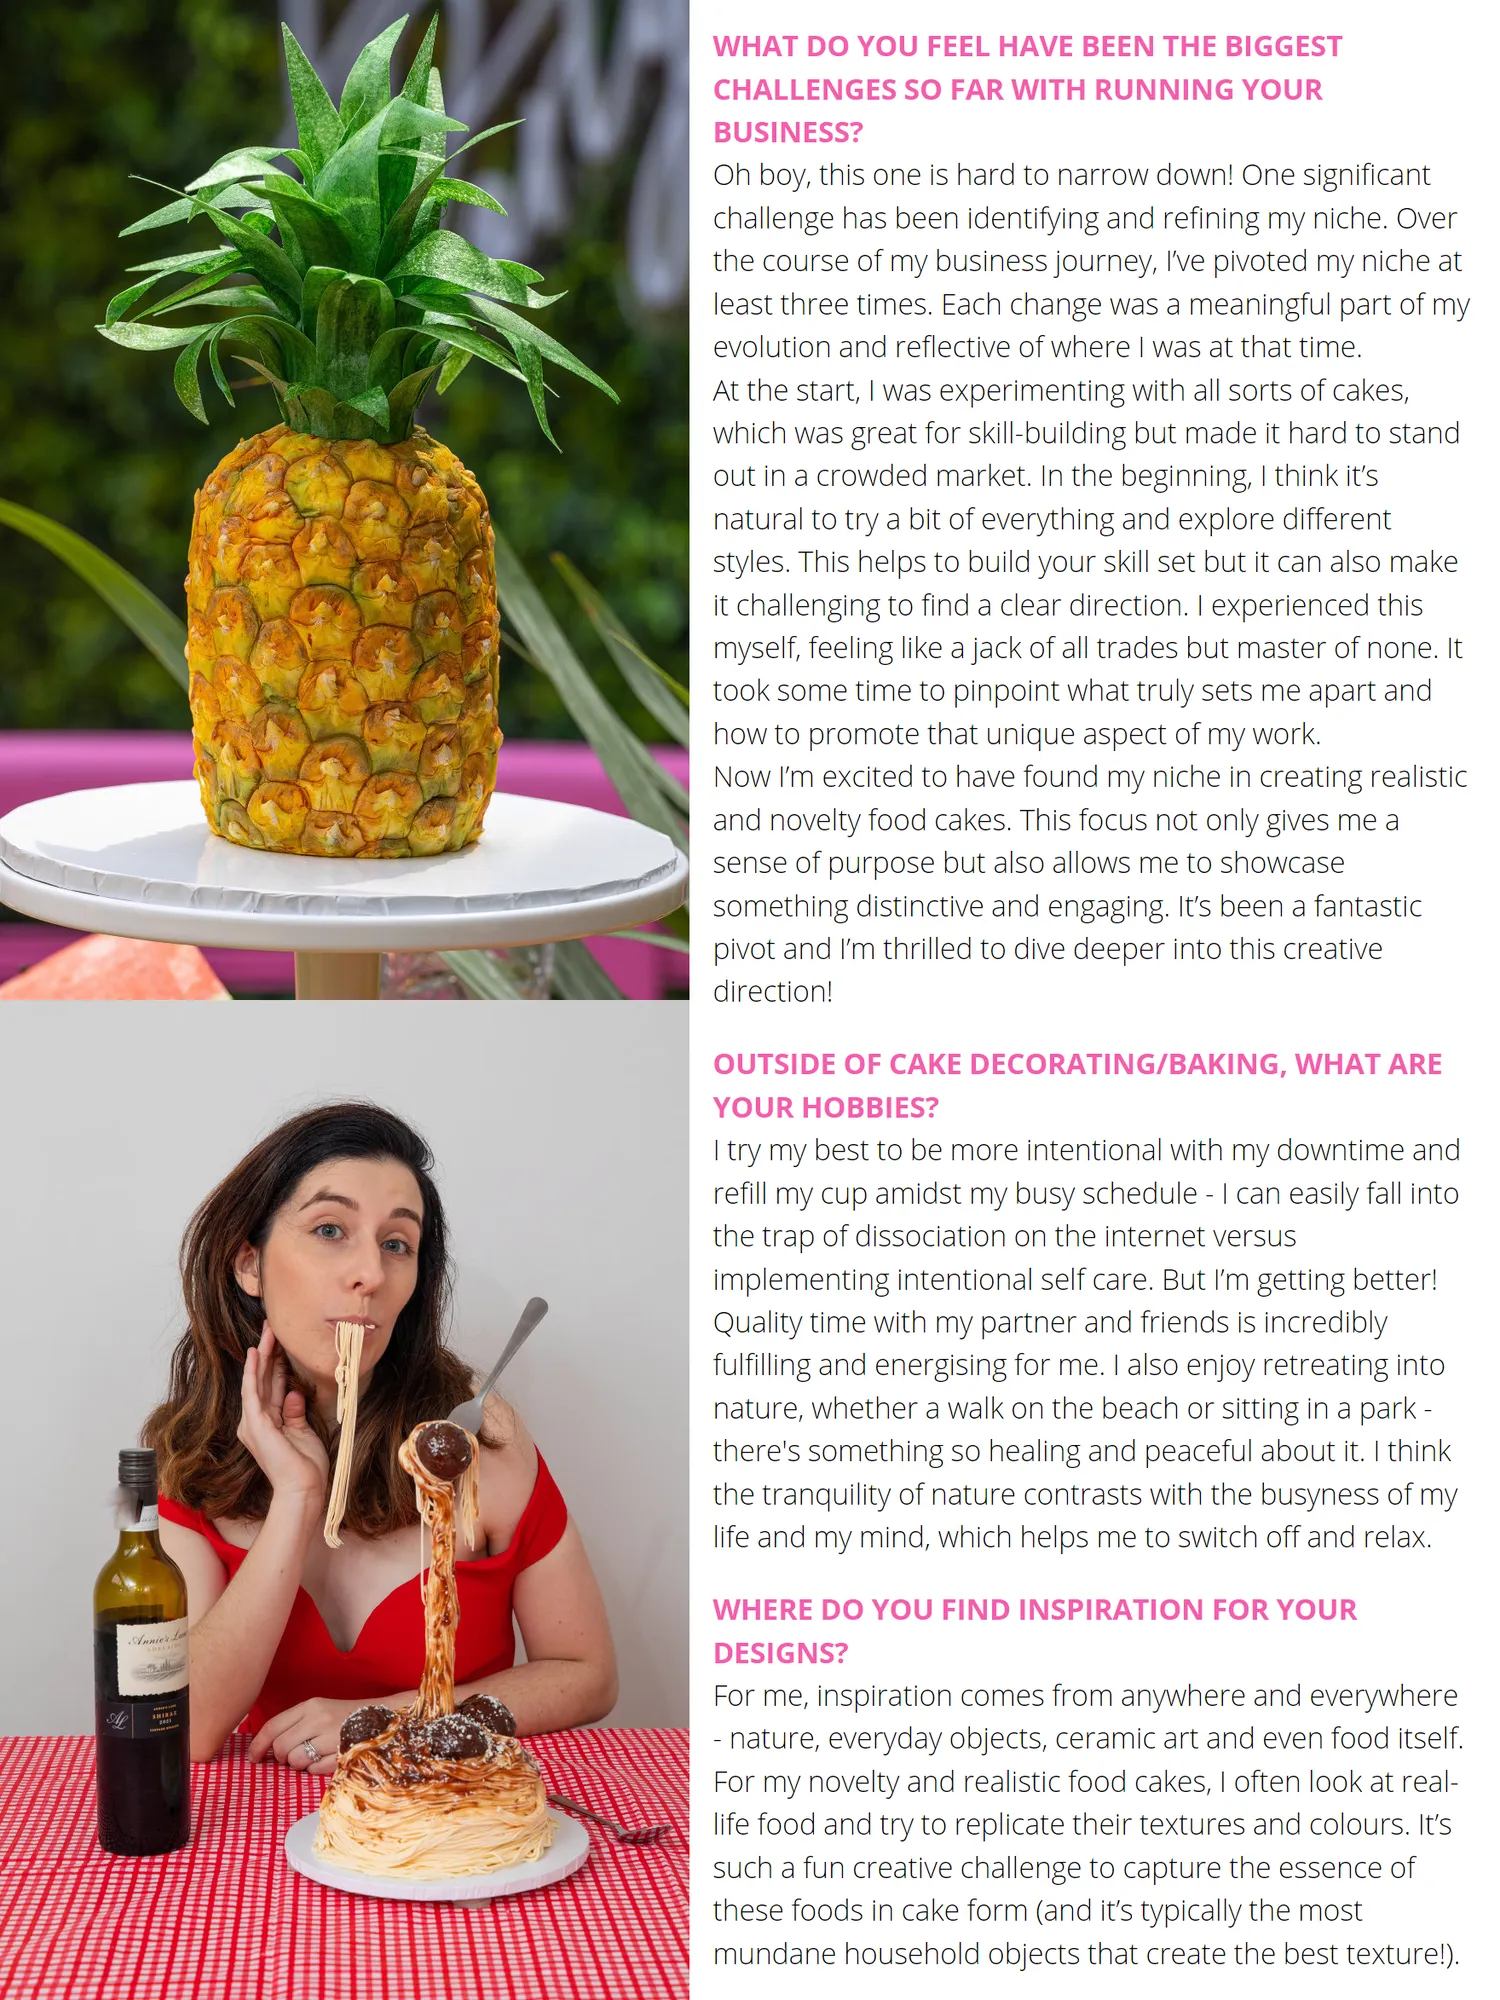
TELL US THE STORY OF HOW YOU GOT INTO BAKING & DECORATING AND HOW YOU GOT TO WHERE YOU ARE TODAY? My cake decorating journey started way back in 2013 (gah! I feel old). As a graphic designer, I felt ‘flat’ and uninspired in my work - admittedly, my job was taking a toll on my mental health and I started to question my creative worth. I stumbled on the first episode of The Great Australian Bake Off and was awed by their cupcake creations. I became instantly hooked with cake decorating overnight (just ask my mum and husband, I wouldn’t shut-up about it!) Cake decorating made me feel excited and emotionally fulfilled again, stirring this passion inside me. I finally found my sparkand the creativity within myself again! What started as a hobby transformed into the business I have today, where I now teach cake enthusiasts to find confidence, passion and creativity in their own kitchens. It’s truly a full circle moment! DO YOU REMEMBER THE FIRST EVER CAKE THAT YOU MADE AS PART OF YOUR BUSINESS? The lines between my cake hobby and business were definitely blurred for me initially (like so many of us), so it’s quite hard to recall. One of the earliest orders I remember was a batch of pretty pink fondant flower cupcakes! It’s amazing to look back and see how much I’ve changed since then. Now I’m crafting everything from cake oysters and eggs on toast, to realistic ice-cream and syrup on my apple pie cake. It’s fantastic to reflect back and see my growth and appreciate how I’ve evolved.
Page 51 text
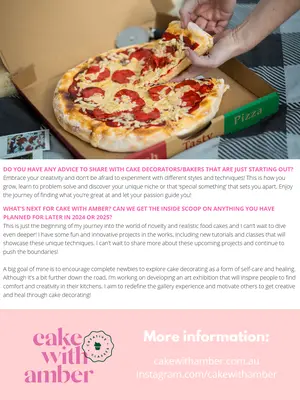
WHAT DO YOU FEEL HAVE BEEN THE BIGGEST CHALLENGES SO FAR WITH RUNNING YOUR BUSINESS? Oh boy, this one is hard to narrow down! One significant challenge has been identifying and refining my niche. Over the course of my business journey, I’ve pivoted my niche at least three times. Each change was a meaningful part of my evolution and reflective of where I was at that time. At the start, I was experimenting with all sorts of cakes, which was great for skill-building but made it hard to stand out in a crowded market. In the beginning, I think it’s natural to try a bit of everything and explore different styles. This helps to build your skill set but it can also make it challenging to find a clear direction. I experienced this myself, feeling like a jack of all trades but master of none. It took some time to pinpoint what truly sets me apart and how to promote that unique aspect of my work. Now I’m excited to have found my niche in creating realistic and novelty food cakes. This focus not only gives me a sense of purpose but also allows me to showcase something distinctive and engaging. It’s been a fantastic pivot and I’m thrilled to dive deeper into this creative direction! OUTSIDE OF CAKE DECORATING/BAKING, WHAT ARE YOUR HOBBIES? I try my best to be more intentional with my downtime and refill my cup amidst my busy schedule - I can easily fall into the trap of dissociation on the internet versus implementing intentional self care. But I’m getting better! Quality time with my partner and friends is incredibly fulfilling and energising for me. I also enjoy retreating into nature, whether a walk on the beach or sitting in a park - there's something so healing and peaceful about it. I think the tranquility of nature contrasts with the busyness of my life and my mind, which helps me to switch off and relax. WHERE DO YOU FIND INSPIRATION FOR YOUR DESIGNS? For me, inspiration comes from anywhere and everywhere - nature, everyday objects, ceramic art and even food itself. For my novelty and realistic food cakes, I often look at real- life food and try to replicate their textures and colours. It’s such a fun creative challenge to capture the essence of these foods in cake form (and it’s typically the most mundane household objects that create the best texture!).
Page 52 text
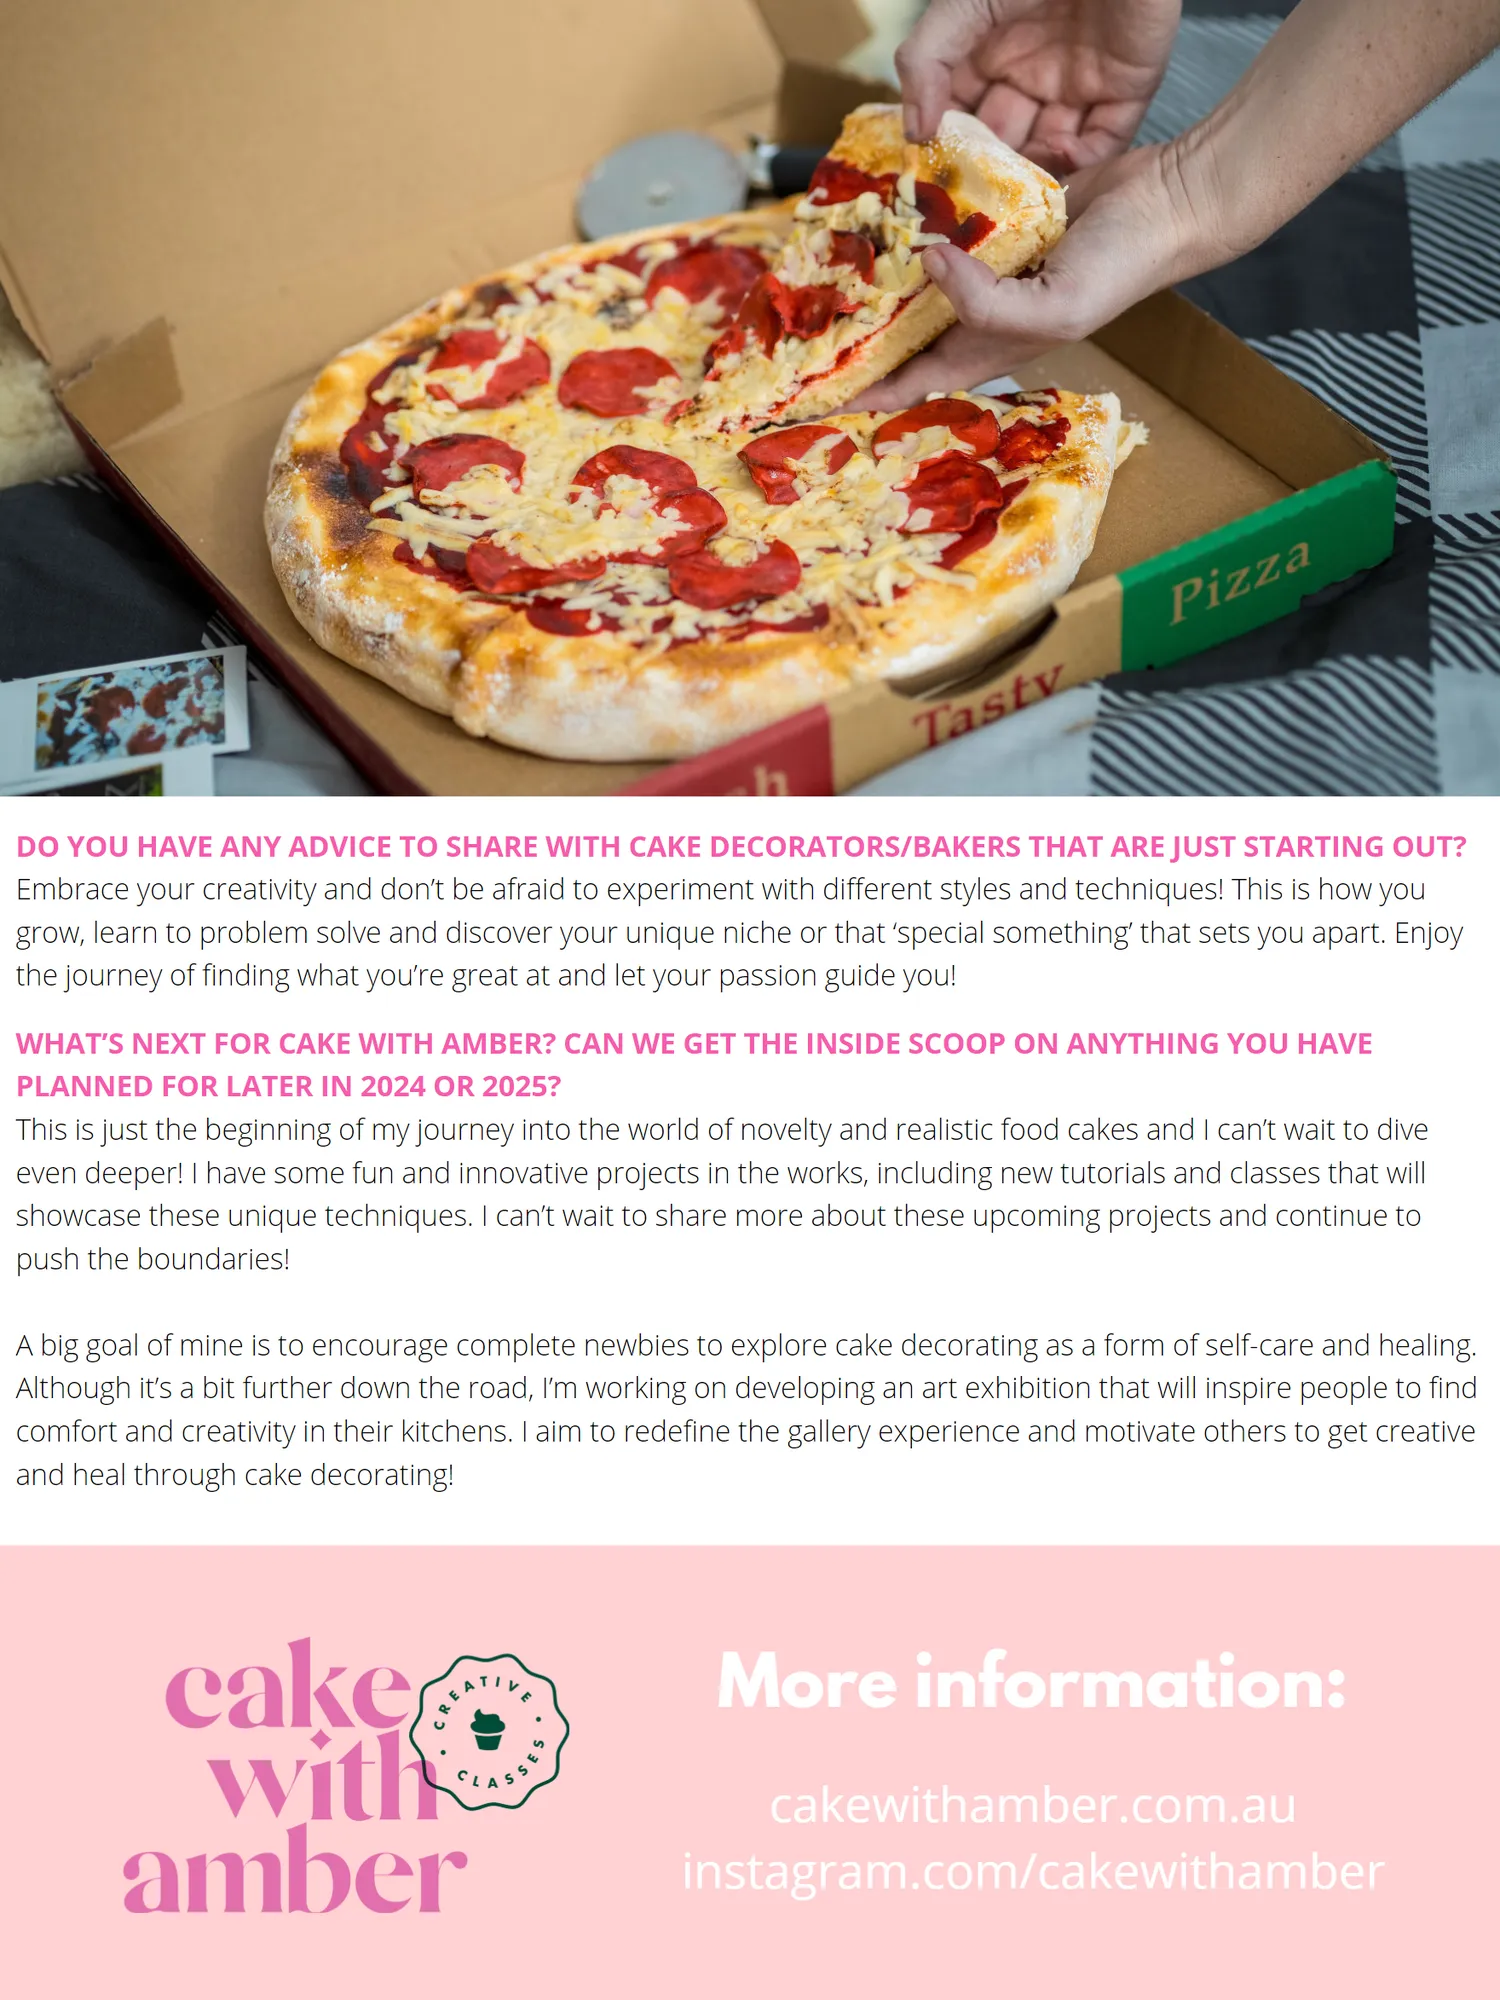
DO YOU HAVE ANY ADVICE TO SHARE WITH CAKE DECORATORS / BAKERS THAT ARE JUST STARTING OUT ? Embrace your creativity and don ’ t be afraid to experiment with different styles and techniques ! This is how you grow , learn to problem solve and discover your unique niche or that ‘ special something ’ that sets you apart . Enjoy the journey of finding what you ’ re great at and let your passion guide you ! WHAT ’ S NEXT FOR CAKE WITH AMBER ? CAN WE GET THE INSIDE SCOOP ON ANYTHING YOU HAVE PLANNED FOR LATER IN 2024 OR 2025 ? This is just the beginning of my journey into the world of novelty and realistic food cakes and I can ’ t wait to dive even deeper ! I have some fun and innovative projects in the works , including new tutorials and classes that will showcase these unique techniques . I can ’ t wait to share more about these upcoming projects and continue to push the boundaries ! A big goal of mine is to encourage complete newbies to explore cake decorating as a form of self-care and healing . Although it ’ s a bit further down the road , I ’ m working on developing an art exhibition that will inspire people to find comfort and creativity in their kitchens . I aim to redefine the gallery experience and motivate others to get creative and heal through cake decorating ! More information : cakewithamber . com . au instagram . com / cakewithamber




Page 54 text
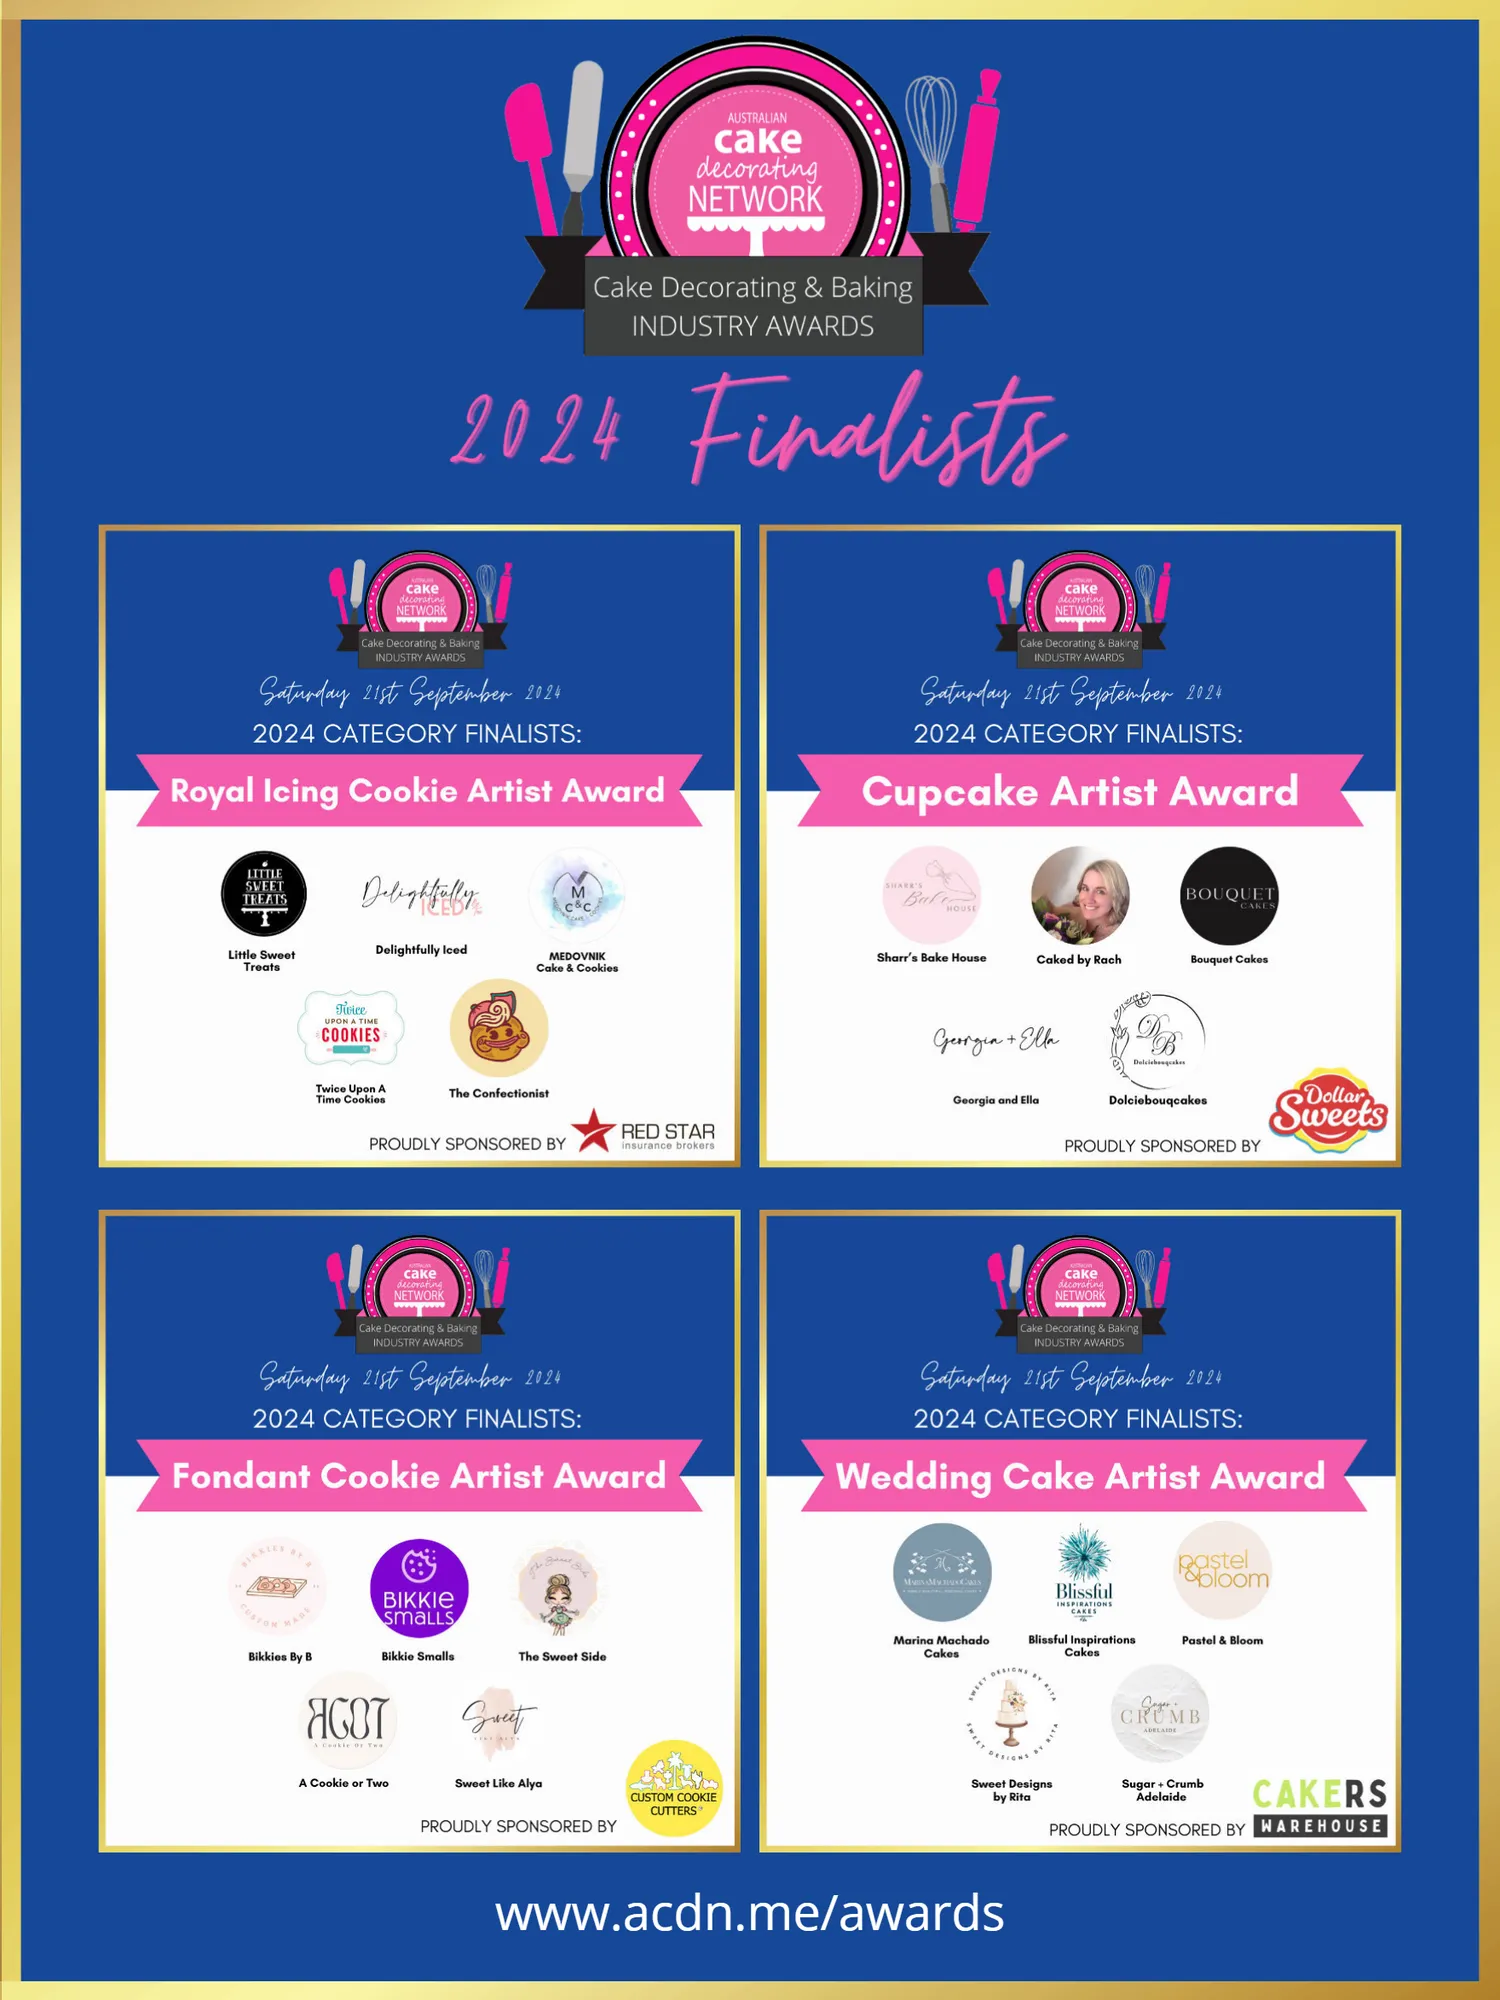
TICKETS ON SALE NOW SATURDAY 21ST SEPTEMBER 2024 www . acdn . me / awards

Page 55 text
www . acdn . me / awards

Page 56 text
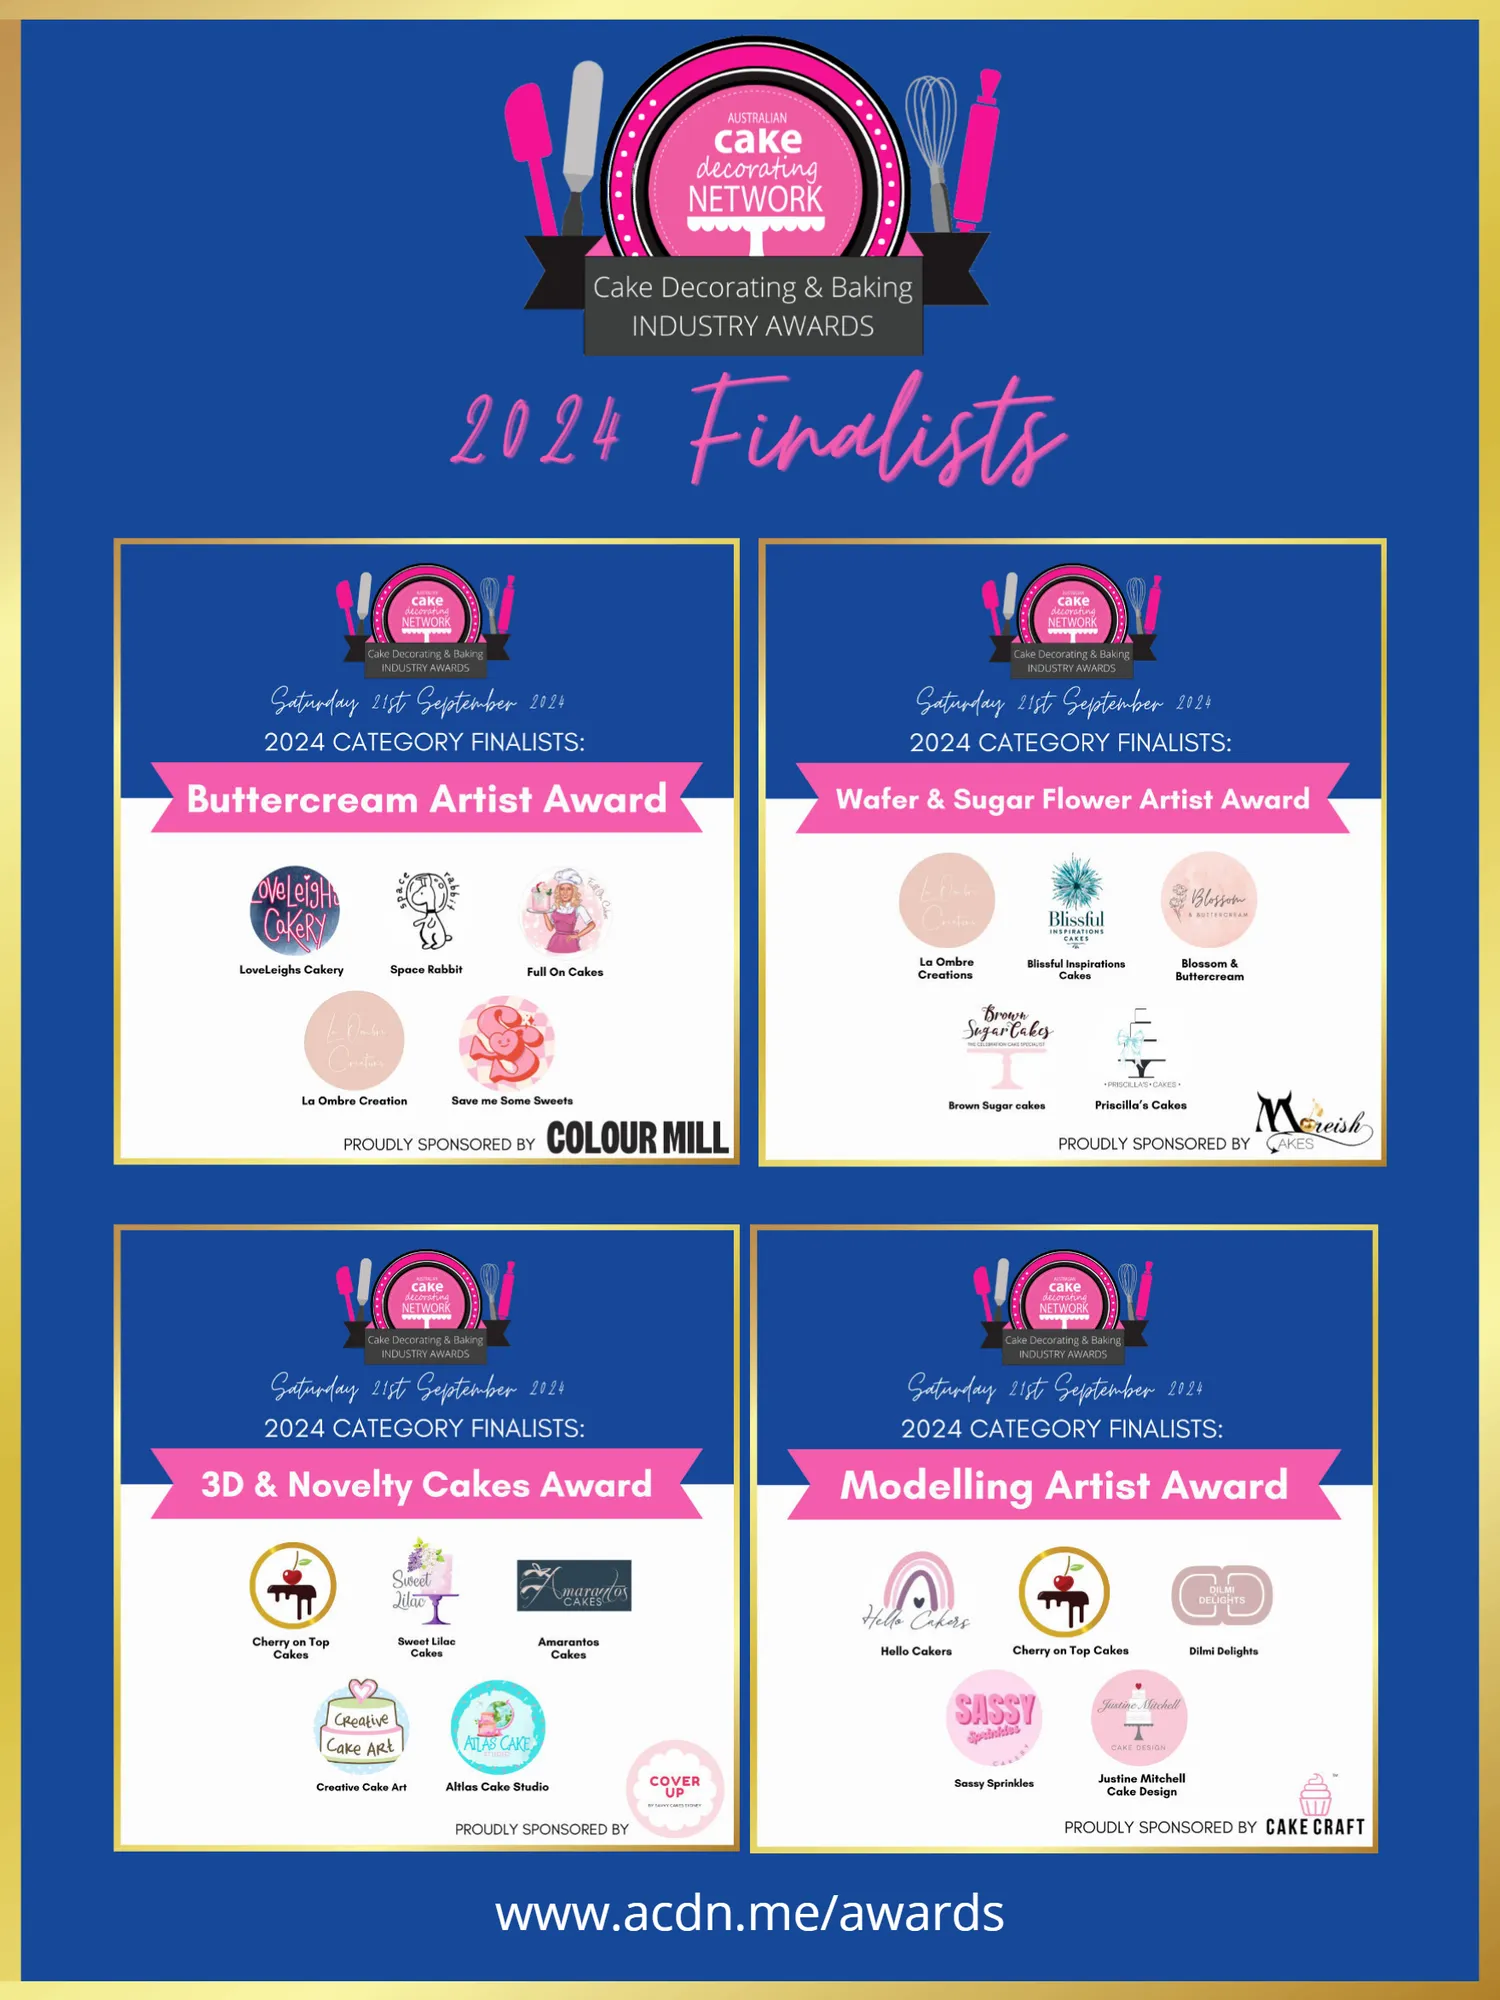
www . acdn . me / awards


Page 57 text
www . acdn . me / awards


Page 58 text
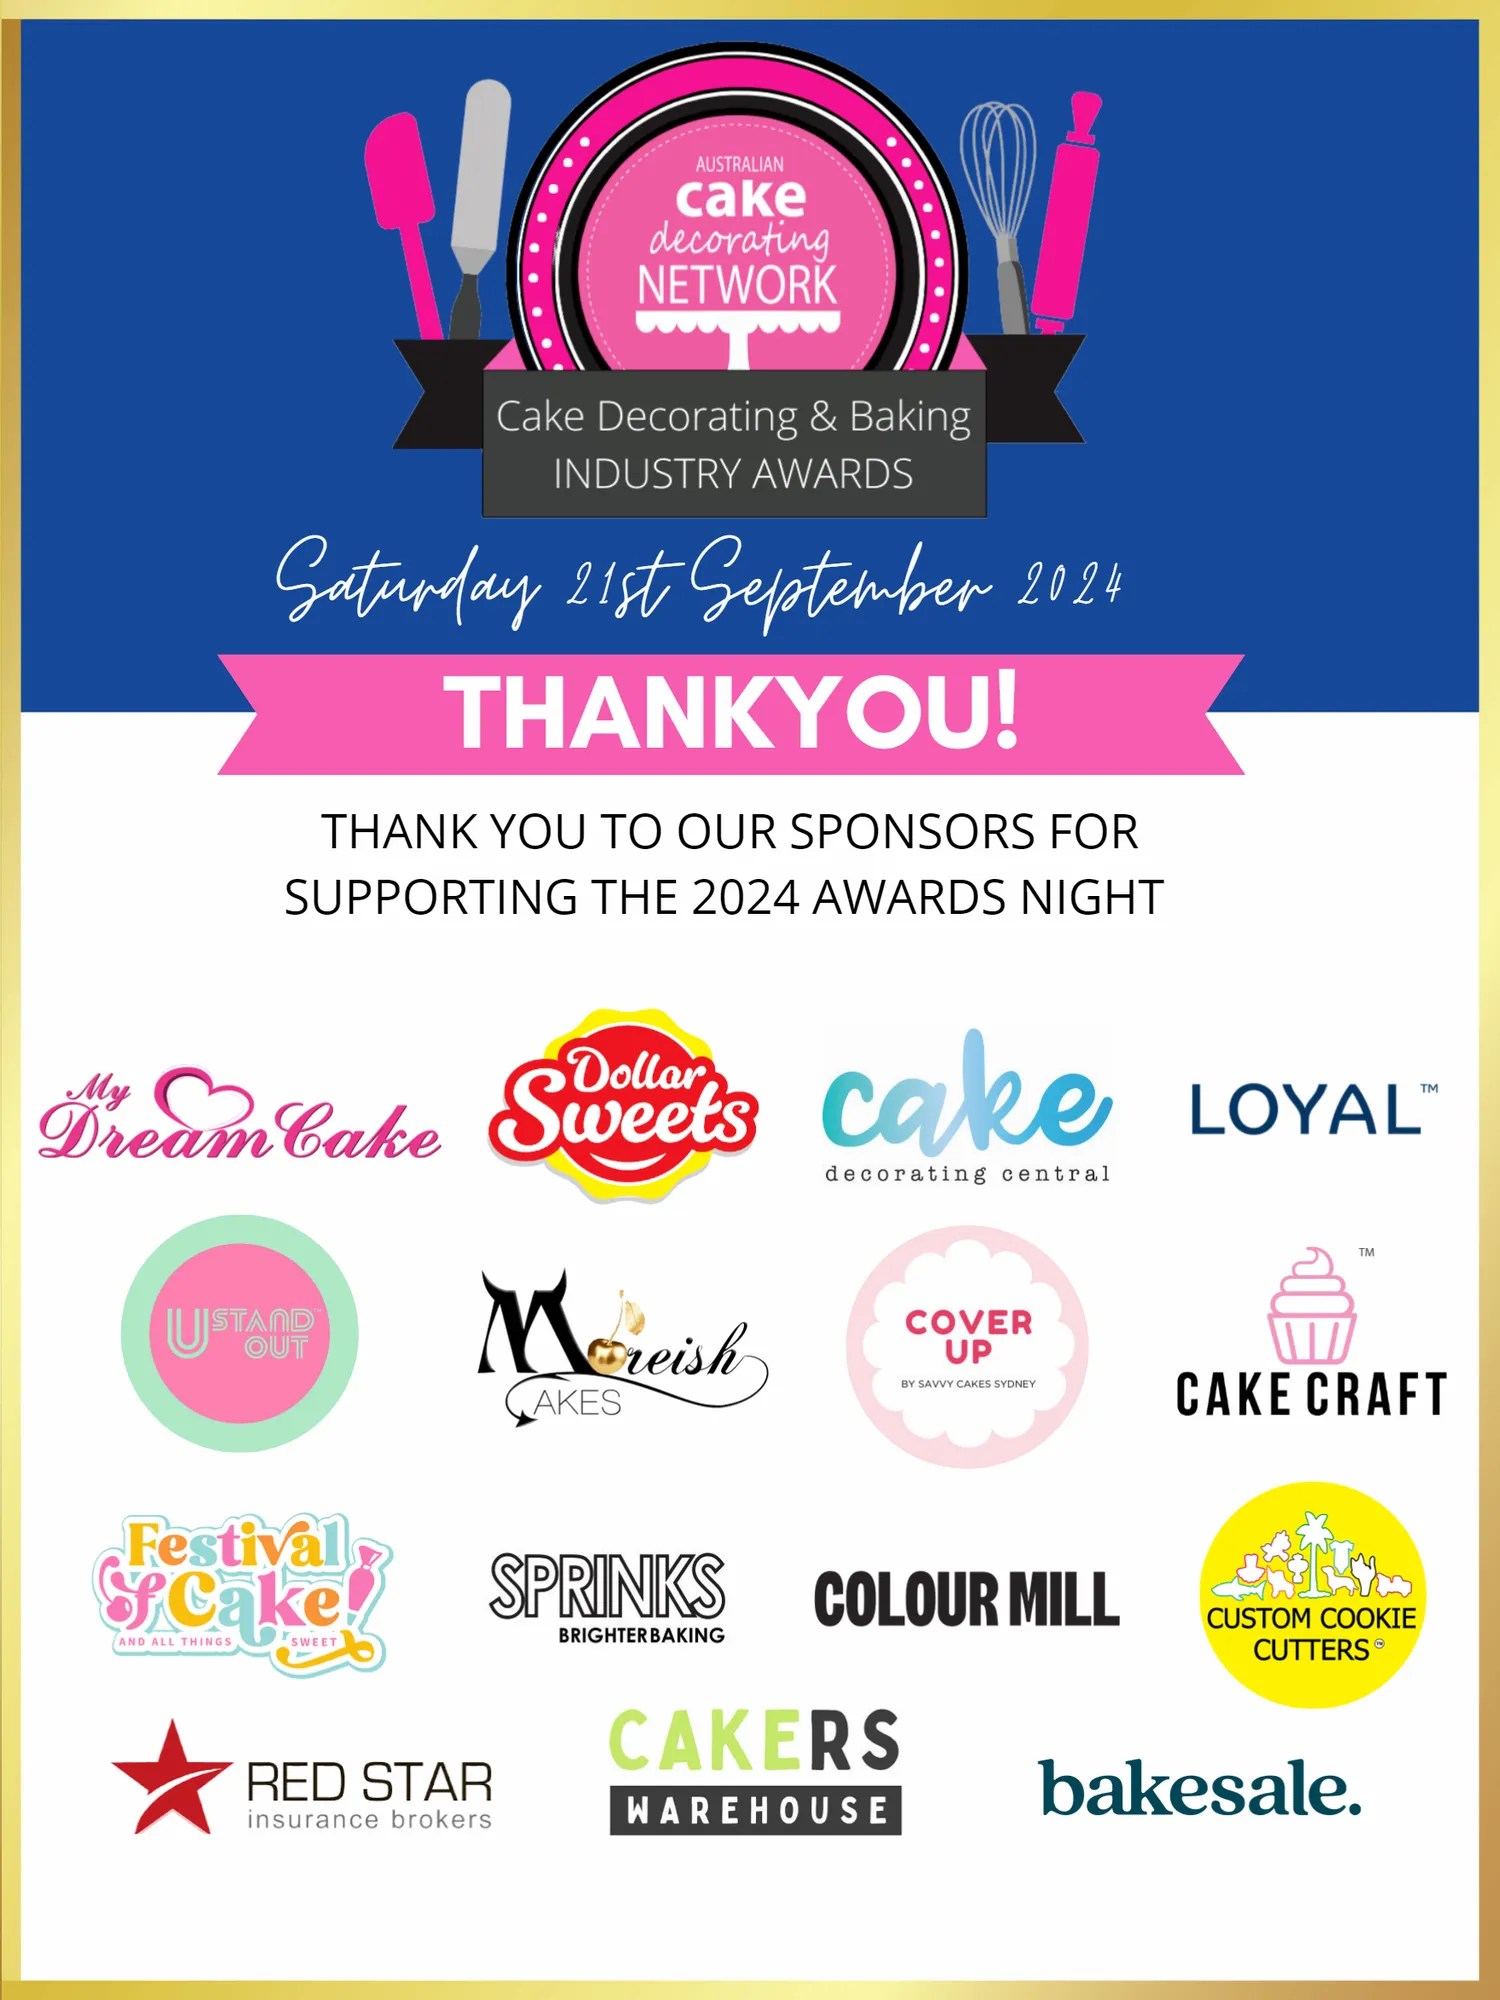
Saturday 21st September 2024

Page 59 text
Saturday 21st September 2024

Page 60 text
NAVIGATING THE CHALLENGES OF FINDING YOUR NICHE IN CAKE DECORATING Gosh, where do I even start? Running a cake decorating business has been quite the journey, and if there’s one challenge that stands out, it’s been identifying and refining my
Page 61 text
Cake Chat Cake Chat with Amber Comadira-Smith Amber shares her cake expertise so you amazing cakes with confidence! journey, and if there’s one challenge that stands out, it’s been identifying and refining my
Page 62 text
4. Celebrate finding your niche Once you find your niche, celebrate the heck out of it! Use this as a foundation to build your brand and connect with your audience. A clear focus can help you stand out and attract clients who are excited about what you offer. Now I’m thrilled in the last year to have established my new niche in creating and teaching realistic and novelty food cakes. This focus not only gives me a renewed sense of purpose but also allows me to showcase something distinctive and engaging.


Page 63 text
Once you find your niche, celebrate the heck 2024 out of it! Use this as a foundation to build your brand and connect with your audience. A clear PREFERRED focus can help you stand out and attract clients who are excited about what you offer. SUPPLIERS Now I’m thrilled in the last year to have established my new niche in creating and teaching realistic and novelty food cakes. This MEMBER focus not only gives me a renewed sense of purpose but also allows me to showcase something distinctive and engaging. DISCOUNTS




Page 69 text
2024 PREFERRED SUPPLIERS MEMBER DISCOUNTS
Page 76 text
Baking Box Subscription Baking Box Subscription


Page 77 text
Baking Box Subscription Baking Box Subscription A QUARTERLY SUBSCRIPTION OF CAKE AND BAKING GOODIES DELIVERED TO YOUR DOOR!


Page 80 text
$199



Page 82 text
2 0 2 4 P R E F E R R E D S U P P L I E R S M E M B E R D I S C O U N T S Become a member of the Australian Cake Decorating Network and SAVE with great DISCOUNTS from our Preferred Suppliers Join us here !


Page 83 text
2024 PREFERRED SUPPLIERS MEMBER DISCOUNTS