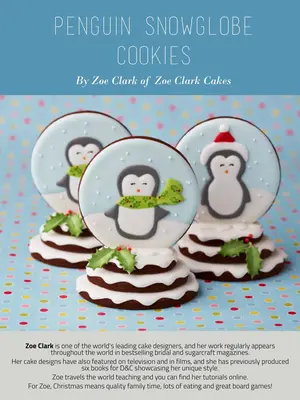
Zoe Clark is one of the world's leading cake designers, and her work regularly appears throughout the world in bestselling bridal and sugarcraft magazines. Her cake designs have also featured on television and in films, and she has previously produced six books for D&C showcasing her unique style. Zoe travels the world teaching and you can find her tutorials online. For Zoe, Christmas means quality family time, lots of eating and great board games! f www facebook.com/zoeclarkcakes zoeclarkcakes.com
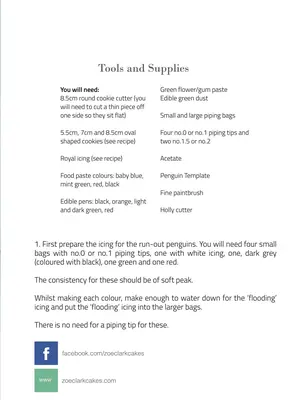
Tools and Supplies You will need:
8.5cm round cookie cutter (you will need to cut a thin piece off one side so they sit flat) Green flower/gum paste Edible green dust 5.5cm, 7cm and 8.5cm oval shaped cookies (see recipe) Four no.0 or no.1 piping tips and two no.1.5 or no.2 Royal icing (see recipe) Acetate Food paste colours: baby blue, mint green, red, black Penguin Template Edible pens: black, orange, light and dark green, red Small and large piping bags Fine paintbrush Holly cutter 1.
First prepare the icing for the run-out penguins. You will need four small bags with no.0 or no.1 piping tips, one with white icing, one, dark grey (coloured with black), one green and one red. The consistency for these should be of soft peak. Whilst making each colour, make enough to water down for the ‘flooding’ icing and put the ‘flooding’ icing into the larger bags. There is no need for a piping tip for these.
Tools and Supplies You will need:
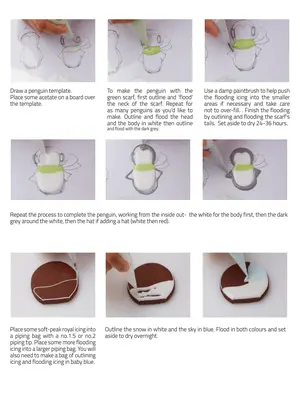
Draw a penguin template. Place some acetate on a board over the template. To make the penguin with the green scarf, first outline and ‘flood’ the neck of the scarf. Repeat for as many penguins as you'd like to make. Outline and flood the head and the body in white then outline and flood with the dark grey. Use a damp paintbrush to help push the flooding icing into the smaller areas if necessary and take care not to over-fill..
Finish the flooding by outlining and flooding the scarf's tails. Set aside to dry 24-36 hours. Repeat the process to complete the penguin, working from the inside out- the white for the body first, then the dark grey around the white, then the hat if adding a hat (white then red). Pipe tiny snowflakes with soft peak Draw the features on the penguins using the edible pens. Use black for the eyes, orange for the nose, the green and red for the holly.
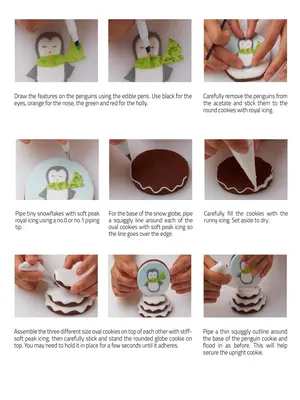
Carefully remove the penguins from the acetate and stick them to the round cookies with royal icing. Place some soft-peak royal icing into a piping bag with a no.1.5 or no.2 piping tip. Place some more flooding icing into a larger piping bag. You will also need to make a bag of outlining icing and flooding icing in baby blue. Assemble the three different size oval cookies on top of each other with stiff- royal icing using a no.0 or no.1 piping
tip. For the base of the snow globe, pipe
a squiggly line around each of the oval cookies with soft peak icing so the line goes over the edge. Carefully fill the cookies with the runny icing. Set aside to dry. Outline the snow in white and the sky in blue. Flood in both colours and set asi de to dry overnight. soft peak icing, then carefully stick and stand the rounded globe cookie on top. You may need to hold it in place for a few seconds until it adheres. Pipe a thin squiggly outline around the base of the penguin cookie and flood in as before. This will help secure the upright cookie.
Draw the features on the penguins using the edible pens. Use black for the eyes, orange for the nose, the green and red for the holly. Pipetiny snowflakes with soft peak royal icing using a no.0 or no. 1 piping
tip.
Assemble the three different size oval cookies on top of each other with stiff- top. You may need to hold it in place for a few seconds until it adheres. Carefully remove the penguins from the acetate and stick them to the round cookies with royal icing. For the base of the snow globe, pipe a squiggly line around each of the oval cookies with soft peak icing so the line goes over the edge.
Carefully fill the cookies with the runny icing. Set aside to dry. Pipe a thin squiggly outline around the base of the penguin cookie and flood in as before. This will help secure the upright cookie.
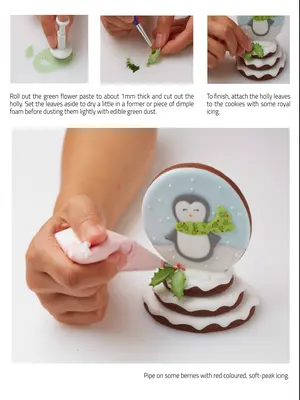
Roll out the green flower paste to about 1mm thick and cut out the holly. Set the leaves aside to dry a little in a former or piece of dimple foam before dusting them lightly with edible green dust. To finish, attach the holly leaves to the cookies with some royal icing. Pipe on some berries with red coloured, soft-peak icing. cake dec solutions ad