Step 1:
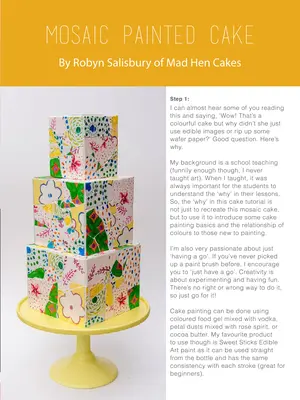
I can almost hear some of you reading this and saying, Wow! That's a colourful cake but why didn't she just use edible images or rip up some wafer paper?' Good question. Here's why. My background is a school teaching (funnily enough though, I never taught art). When I taught, it was always important for the students to understand the 'why' in their lessons. So, the ‘why' in this cake tutorial is not just to recreate this mosaic cake, but to use it to introduce some cake painting basics and the relationship of colours to those new to painting.
I'm also very passionate about just ‘having a go'. If you've never picked up a paint brush before, I encourage you to 'just have a go'. Creativity is about experimenting and having fun. There's no right or wrong way to do it, so just go for it! Cake painting can be done using coloured food gel mixed with vodka, petal dusts mixed with rose spirit, or cocoa butter. My favourite product to use though is Sweet Sticks Edible Art paint as it can be used straight from the bottle and has the same consistency with each stroke (great for beginners).
Step 2: USING A COLOUR WHEEL Step 3: PREPARING THE TILES FOR PAINTING
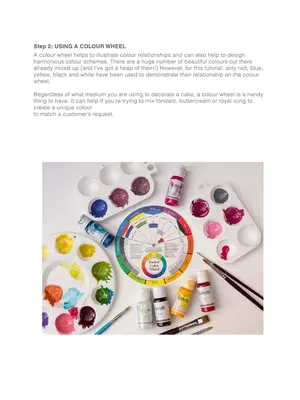
A colour wheel helps to illustrate colour relationships and can also help to design harmonious colour schemes. There are a huge number of beautiful colours out there already mixed up (and I've got a heap of them!) However, for this tutorial, only red, blue, yellow, black and white have been used to demonstrate their relationship on the colour wheel. The tiles will need to be prepared in advance for this cake.
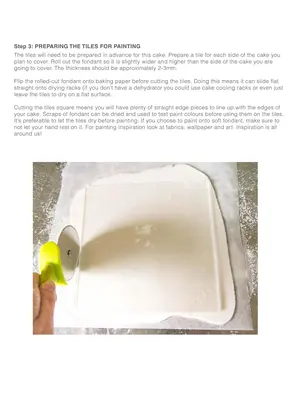
Prepare a tile for each side of the cake you Regardless of what medium you are using to decorate a cake, a colour wheel is a handy thing to have. It can help if you're trying to mix fondant, buttercream or royal icing to create a unique colour to match a customer's request. plan to cover. Roll out the fondant so it is slightly wider and higher than the side of the cake you are going to cover.
The thickness should be approximately 2-3mm. Flip the rolled-out fondant onto baking paper before cutting the tiles. Doing this means it can slide flat straight onto drying racks (if you don't have a dehydrator you could use cake cooling racks or even just leave the tiles to dry on a flat surface. Cutting the tiles square means you will have plenty of straight edge pieces to line up with the edges of your cake.
Scraps of fondant can be dried and used to test paint colours before using them on the tiles. It's preferable to let the tiles dry before painting. If you choose to paint onto soft fondant, make sure to not let your hand rest on it. For painting inspiration look at fabrics, wallpaper and art. Inspiration is all around us!
Step3:PREPARINGTHETILESFORPAINTING The tiles will need to be prepared in advance for this cake. Prepare a tile for each side of the cake you plan to cover. Roll out the fondant so it is slightly wider and higher than the side of the cake you are goingtocover.Thethicknessshouldbeapproximately2-3mm. Flip the rolled-out fondant onto baking paperbefore cutting the tiles. Doing this means it can slide flat straight onto drying racks (if you don't have a dehydrator you could use cake cooling racks or even just leave the tiles to dry on a flat surface.
Step 4: PAINTING THE TILES
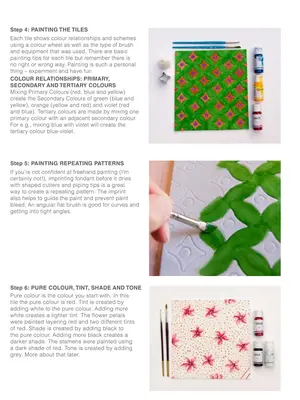
Each tile shows colour relationships and schemes using a colour wheel as well as the type of brush and equipment that was used. There are basic painting tips for each tile but remember there is no right or wrong way. Painting is such a personal thing – experiment and have fun.
Colour relationships: primary, secondary and tertiary colours
Mixing Primary Colours (red, blue and yellow) create the Secondary Colours of green (blue and yellow), orange (yellow and red) and violet (red and blue). Tertiary colours are made by mixing one primary colour with an adjacent secondary colour. For e.g., mixing blue with violet will create the tertiary colour blue-violet.
Step 5: PAINTING REPEATING PATTERNS
If you're not confident at freehand painting (I'm certainly not!), imprinting fondant before it dries with shaped cutters and piping tips is a great way to create a repeating pattern. The imprint also helps to guide the paint and prevent paint bleed. An angular flat brush is good for curves and getting into tight angles.
Step 6: PURE COLOUR, TINT, SHADE AND TONE
Pure colour is the colour you start with. In this tile the pure colour is red. Tint is created by adding white to the pure colour. Adding more white creates a lighter tint. The flower petals were painted layering red and two different tints of red. Shade is created by adding black to the pure colour. Adding more black creates a darker shade. The stamens were painted using a dark shade of red. Tone is created by adding grey. More about that later.
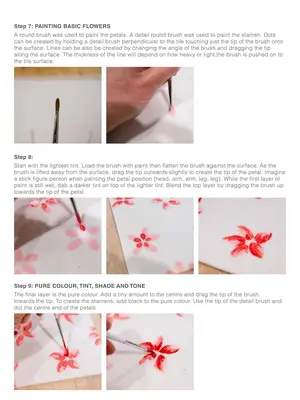
Step 7: PAINTING BASIC FLOWERS
A round brush was used to paint the petals. A detail round brush was used to paint the stamen. Dots can be created by holding a detail brush perpendicular to the tile touching just the tip of the brush onto the surface. Lines can be also be created by changing the angle of the brush and dragging the tip along the surface. The thickness of the line will depend on how heavy or light the brush is pushed on to the tile surface.
Step 8:
Start with the lightest tint. Load the brush with paint then flatten the brush against the surface. As the brush is lifted away from the surface, drag the tip outwards slightly to create the tip of the petal. Imagine a stick figure person when painting the petal position (head, arm, arm, leg, leg). While the first layer of paint is still wet, dab a darker tint on top of the lighter tint. Blend the top layer by dragging the brush up towards the tip of the petal.
Step 9: PURE COLOUR, TINT, SHADE AND TONE
The final layer is the pure colour. Add a tiny amount to the centre and drag the tip of the brush towards the tip. To create the stamens, add black to the pure colour. Use the tip of the detail brush and dot the centre end of the petals.
Blend the top layer by dragging the brush up towardsthetip of thepetal. Step9:PURECOLOUR,TINT,SHADEANDTONE The final layer is the pure colour. Add a tiny amount to the centre and drag the tip of the brush towards the tip. To create the stamens, add black to the pure colour. Use the tip of the detail brush and dotthe centre end of thepetals.
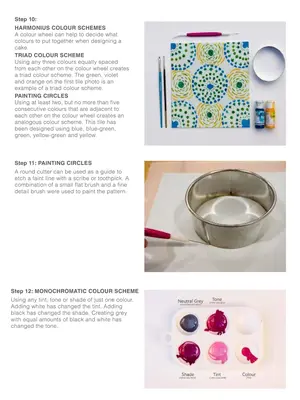
Step 10:
Harmonius colour schemes
A colour wheel can help to decide what colours to put together when designing a cake.
Triad colour scheme
Using any three colours equally spaced from each other on the colour wheel creates a triad colour scheme. The green, violet and orange on the first tile photo is an example of a triad colour scheme.
Painting circles
Using at least two, but no more than five consecutive colours that are adjacent to each other on the colour wheel creates an analogous colour scheme. This tile has been designed using blue, blue-green, green, yellow-green and yellow.
Step 11: PAINTING CIRCLES
A round cutter can be used as a guide to etch a faint line with a scribe or toothpick. A combination of a small flat brush and a fine detail brush were used to paint the pattern.
Step 12: MONOCHROMATIC COLOUR SCHEME
Using any tint, tone or shade of just one colour. Adding white has changed the tint. Adding black has changed the shade. Creating grey with equal amounts of black and white has changed the tone.
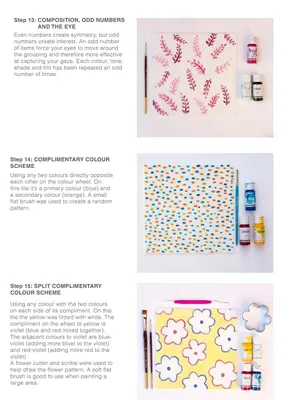
Step 13: C OMPOSITION, ODD NUMBERS AND THE EYE
Even numbers create symmetry, but odd numbers create interest. An odd number of items force your eyes to move around the grouping and therefore more effective at capturing your gaze. Each colour, tone, shade and tint has been repeated an odd number of times.
Step 14: COMPLIMENTARY COLOUR SCHEME
Using any two colours directly opposite each other on the colour wheel. On this tile it's a primary colour (blue) and a secondary colour (orange). A small flat brush was used to create a random pattern.
Step 15: SPLIT COMPLIMENTARY COLOUR SCHEME
Using any colour with the two colours on each side of its compliment. On this tile the yellow was tinted with white. The compliment on the wheel to yellow is violet (blue and red mixed together). The adjacent colours to violet are blue- violet (adding more bluet to the violet) and red-violet (adding more red to the violet). A flower cutter and scribe were used to help draw the flower pattern. A soft flat brush is good to use when painting a large area.
Step13:COMPOSITION,ODDNUMBERS
Andtheeye
Scheme
Using any two colours directlyopposite each other on the colourwheel.On this tile it's a primary colour (blue)and a secondary colour (orange). A small flat brush was used to create a random pattern. Step15:SPLITCOMPLIMENTARY
Colourscheme
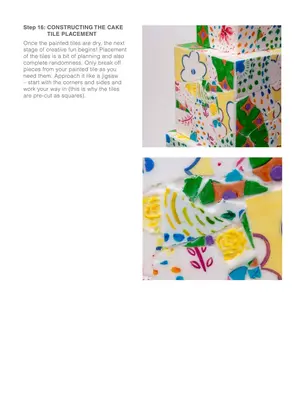
Step 16: C ONSTRUCTING THE CAKE
TILE PLACEMENT Step 17: ‘GLUING AND GROUTING’ THE
Tiles
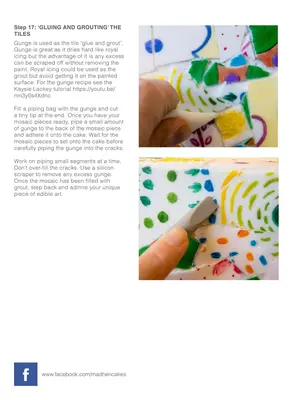
Once the painted tiles are dry, the next stage of creative fun begins! Placement of the tiles is a bit of planning and also complete randomness. Only break off pieces from your painted tile as you need them. Approach it like a jigsaw – start with the corners and sides and work your way in (this is why the tiles are pre-cut as squares). Gunge is used as the tile ‘glue and grout’.
Gunge is great as it dries hard like royal icing but the advantage of it is any excess can be scraped off without removing the paint. Royal icing could be used as the grout but avoid getting it on the painted surface. For the gunge recipe see the Kaysie Lackey tutorial https://youtu.be/ nm3y0s4Xdnc Fill a piping bag with the gunge and cut a tiny tip at the end. Once you have your mosaic pieces ready, pipe a small amount of gunge to the back of the mosaic piece and adhere it onto the cake.
Wait for the mosaic pieces to set onto the cake before carefully piping the gunge into the cracks. Work on piping small segments at a time. Don't over-fill the cracks. Use a silicon scraper to remove any excess gunge. Once the mosaic has been filled with grout, step back and admire your unique piece of edible art. f www.facebook.com/madhencakes
Step17:“GLUING ANDGROUTING'THE
Tiles
Once you have your mosaic pieces ready, pipe a small amount of gunge to the backof the mosaic piece and adhere it onto the cake. Wait for the mosaic pieces to set onto the cake before carefully piping the gunge into the cracks. Work on piping small segments at a time. Don't over-fill the cracks. Use a silicon scraperto remove any excess gunge Once the mosaic has been filled with grout, step back and admire your unique piece ofedible art. www.facebook.com/madhencakes