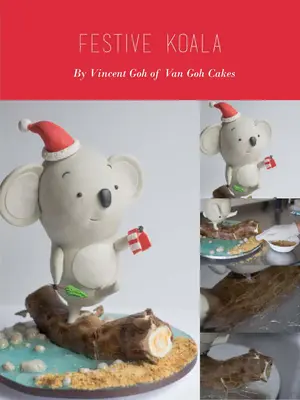
You will need:
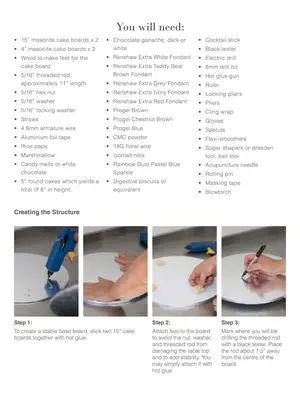
- 15” masonite cake boards x 2
- 4” masonite cake boards x 2
- Wood to make feet for the
cake board
- 5/16” threaded rod,
approximately 11” length
- 5/16” hex nut
- Renshaw Extra Ivory Fondant
- Locking pliers
- 5/16” washer
- Renshaw Extra Red Fondant
- Pliers
- 5/16” locking washer
- Progel Brown
- Cling wrap
- Straws
- Progel Chestnut Brown
- Gloves
- 4.8mm armature wire
- Progel Blue
- Spatula
- Aluminium foil tape
- CMC powder
- Flexi-smoothers
- Rice pops
- 18G floral wire
- Marshmallow
- Isomalt nibs
- Sugar shapers or dresden
- Candy melts or white
chocolate • Rainbow Dust Pastel Blue
- 5” round cakes which yields a
total of 8” in height. • Digestive biscuits or
- Chocolate ganache; dark or
white • Cocktail stick
- Renshaw Extra White Fondant
- Electric drill
- Renshaw Extra Teddy Bear
Brown Fondant • 8mm drill bit
- Renshaw Extra Grey Fondant
- Ruler
Sparkle • Acupuncture needle equivalent • Masking tape
- Black texter
- Hot glue gun
tool, ball tool
- Rolling pin
- Blowtorch
Creating the Structure
To create a stable base board, stick two 15” cake boards together with hot glue. Attach feet to the board to avoid the nut, washer, and threaded rod from damaging the table top and to add stability. You may simply attach it with hot glue. Mark where you will be drilling the threaded rod with a black texter. Place the rod about 1.5” away from the centre of the board Tighten the nuts on both
Step 4:
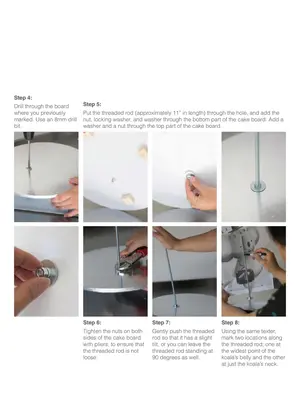
Drill through the board where you previously marked. Use an 8mm drill bit.
Step 5:
Put the threaded rod (approximately 11” in length) through the hole, and add the nut, locking washer, and washer through the bottom part of the cake board. Add a washer and a nut through the top part of the cake board. sides of the cake board with pliers, to ensure that the threaded rod is not loose. Gently push the threaded rod so that it has a slight tilt, or you can leave the threaded rod standing at 90 degrees as well. Using the same texter, mark two locations along the threaded rod; one at the widest point of the koala's belly and the other at just the koala's neck.
Step 4:
Drill through the board whereyou previously marked.Usean8mmdrill bit.
Step 6:
Tighten the nuts on both sides of the cake board with pliers, to ensure that the threaded rod is not loose. Step5: Put the threaded rod (approximately 11" in length) through the hole, and add the nut, locking washer, and washer through the bottom part of the cake board. Add a washerand anutthroughthetop partof the cake board.
Step 7:
Step 8:
Step 9 & 10:
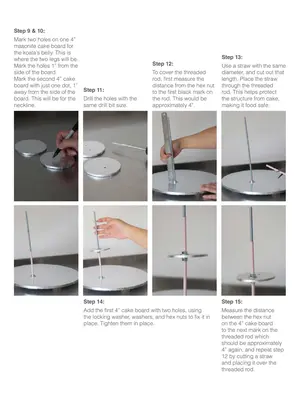
Mark two holes on one 4” masonite cake board for the koala's belly. This is where the two legs will be. Mark the holes 1” from the side of the board. Mark the second 4” cake board with just one dot, 1” away from the side of the board. This will be for the Drill the holes with the neckline.
Step 11:
same drill bit size.
Step 12:
To cover the threaded rod, first measure the distance from the hex nut to the first black mark on the rod. This would be approximately 4”.
Step 13:
Use a straw with the same diameter, and cut out that length. Place the straw through the threaded rod. This helps protect the structure from cake, making it food safe.
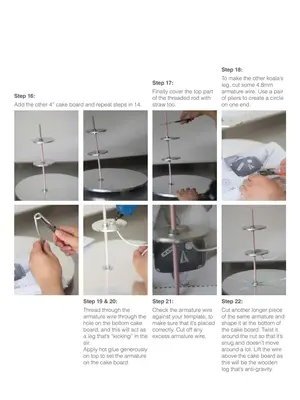
Step 14: Step 15: Step 19 & 20: Step 21: Step 22:
Add the first 4” cake board with two holes, using the locking washer, washers, and hex nuts to fix it in place. Tighten them in place. Measure the distance between the hex nut on the 4” cake board to the next mark on the threaded rod which should be approximately 4” again, and repeat step 12 by cutting a straw and placing it over the
Step 18:
Finally cover the top part of the threaded rod with straw too. To make the other koala's leg, cut some 4.8mm armature wire. Use a pair of pliers to create a circle on one end.
Step 17:
Step 16:
Add the other 4” cake board and repeat steps in 14. threaded rod. Thread through the armature wire through the hole on the bottom cake board, and this will act as a leg that's “kicking” in the air. Apply hot glue generously on top to set the armature on the cake board. Check the armature wire against your template, to make sure that it's placed correctly. Cut off any excess armature wire.
Cut another longer piece of the same armature and shape it at the bottom of the cake board. Twist it around the nut so that it's snug and doesn't move around a lot. Lift the wire above the cake board as this will be the wooden log that's anti-gravity.
Step 16:
Add the other4"cake board and repeat steps in 14.
Step 17:
Finally coverthe top part of the threaded rod with strawtoo.
Step 18:
To make the other koala's leg,cutsome4.8mm armature wire. Use a pair of pliersto create acircle on one end. Step19&20: Thread through the armature wire through the hole on the bottom cake board, and this will act as alegthat's"kicking"inthe air. Applyhotgluegenerously ontoptosetthearmature on the cake board.
Step 21:
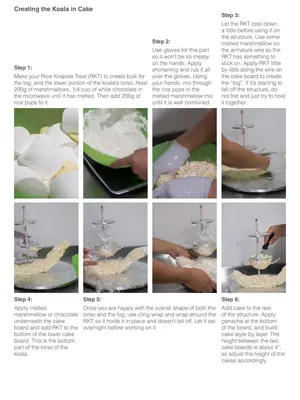
Creating the Koala in Cake
Step 1:
Make your Rice Krispies Treat (RKT) to create bulk for over the gloves. Using the log, and the lower portion of the koala's torso. Heat your hands, mix through 200g of marshmallows, 1/4 cup of white chocolate in the microwave until it has melted. Then add 200g of rice pops to it. until it is well combined. Let the RKT cool down a little before using it on the structure.
Use some melted marshmallow on the armature wire so the RKT has something to stick on. Apply RKT little by little along the wire on the cake board to create the “log”. If it's starting to fall off the structure, do not fret and just try to hold it together.
Step 2:
Step 3:
Use gloves for this part so it won't be so messy on the hands. Apply shortening and rub it all the rice pops in the melted marshmallow mix
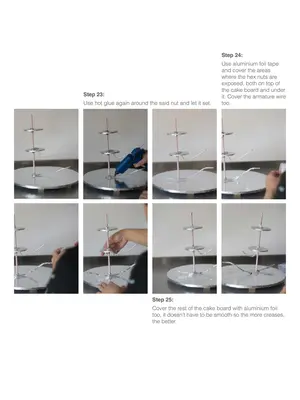
Step 23:
Use hot glue again around the said nut and let it set.
Step 24:
Use aluminium foil tape and cover the areas where the hex nuts are exposed, both on top of the cake board and under it. Cover the armature wire too.
Cover the rest of the cake board with aluminium foil too, it doesn't have to be smooth so the more creases, the better. Apply melted marshmallow or chocolate underneath the cake board and add RKT to the bottom of the lower cake board. This is the bottom part of the torso of the koala. Once you are happy with the overall shape of both the torso and the log, use cling wrap and wrap around the RKT so it holds it in place and doesn't fall off.
Let it set overnight before working on it. Add cake to the rest of the structure. Apply ganache at the bottom of the board, and build cake layer by layer. The height between the two cake boards is about 4”, so adjust the height of the cakes accordingly.
Creatingthe Koala inCake
Step 1:
Step 3:
Let the RKT cool down a little before using it on the structure. Use some melted marshmallow on the armature wire so the RKT has something to stick on.ApplyRKTlittle by little along the wireon the cakeboard to create the "log".If it's starting to fall off the structure, do not fret and just try to hold it together.
Step 4:
Step 5:
Once you are happywith the overall shape of both the torso and the log, use cling wrap and wrap around the RKT so it holds it in place and doesn't fall off. Let it set overnight before working on it.
Step 6:
Add cake to the rest of the structure. Apply ganache at the bottom of the board, and build cake layer by layer. The height between thetwo cake boards is about 4" so adjust the height of the cakes accordingly.
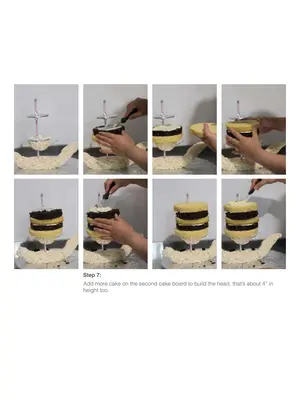
Step 8:
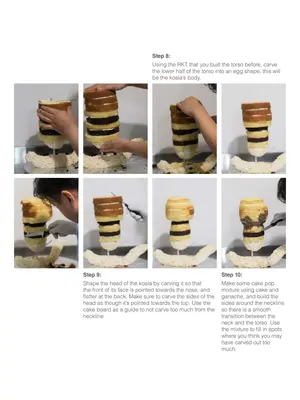
Using the RKT that you built the torso before, carve the lower half of the torso into an egg shape, this will be the koala's body.
Add more cake on the second cake board to build the head, that's about 4” in height too. Shape the head of the koala by carving it so that the front of its face is pointed towards the nose, and flatter at the back. Make sure to carve the sides of the head as though it's pointed towards the top. Use the cake board as a guide to not carve too much from the neckline.
Make some cake pop mixture using cake and ganache, and build the sides around the neckline so there is a smooth transition between the neck and the torso. Use the mixture to fill in spots where you think you may have carved out too much.
Step 8:
Step10: Make some cakepop mixture using cake and ganache, and build the sides around the neckline so there is a smooth transition between the neckandthetorso.Use the mixture to fill inspots whereyouthinkyoumay have carved outtoo much.
Step 11:
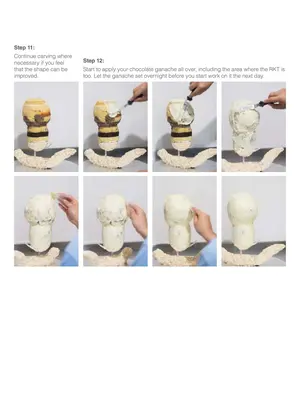
Continue carving where necessary if you feel that the shape can be improved.
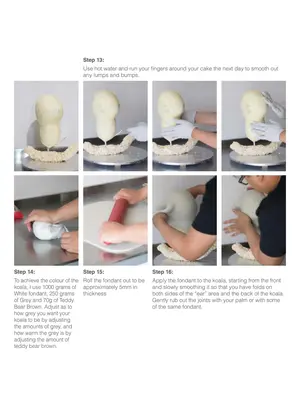
Start to apply your chocolate ganache all over, including the area where the RKT is too. Let the ganache set overnight before you start work on it the next day. Use hot water and run your fingers around your cake the next day to smooth out any lumps and bumps.
Step 14:
To achieve the colour of the Roll the fondant out to be koala, I use 1000 grams of approximately 5mm in White fondant, 250 grams of Grey and 70g of Teddy Bear Brown. Adjust as to how grey you want your koala to be by adjusting the amounts of grey, and how warm the grey is by adjusting the amount of teddy bear brown.
Step 15:
thickness
Step 16:
Apply the fondant to the koala, starting from the front and slowly smoothing it so that you have folds on both sides of the “ear” area and the back of the koala. Gently rub out the joints with your palm or with some of the same fondant.
Step13: Use hot water and run your fingers around your cake the next day to smooth out any lumps and bumps. Step14: To achieve the colour of the koala,luse1000gramsof White fondant, 250 grams of Grey and 70g of Teddy Bear Brown. Adjust as to how grey you want your koala to be by adjusting the amounts of grey, and how warmthe greyisby adjusting the amount of teddy bear brown. Step15: Roll the fondant out to be approximately5mmin thickness Step16: Applythe fondantto thekoala, starting from the front both sidesof the“ear"area and the back of thekoala. Gently rub out the joints with your palm or with some of the same fondant.
Step 17:
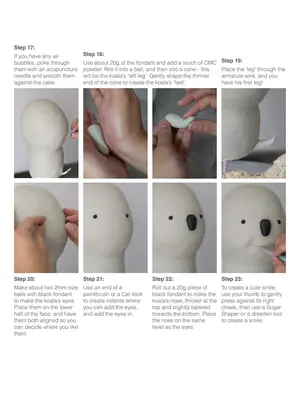
If you have any air bubbles, poke through them with an acupuncture needle and smooth them against the cake. Step 18: Use about 20g of the fondant and add a touch of CMC Make about two 2mm size balls with black fondant to make the koala's eyes. Place them on the lower half of the face, and have them both aligned so you can decide where you like them. Use an end of a powder.
Roll it into a ball, and then into a cone - this will be the koala's ‘left leg’. Gently shape the thinner end of the cone to create the koala's ‘feet’. Step 19: Step 20: Step 21: Step 22: Step 23: Step 26: Step 27: paintbrush or a Cel stick to create indents where you can add the eyes, and add the eyes in. Roll out a 20g piece of black fondant to make the koala's nose, thicker at the top and slightly tapered towards the bottom.
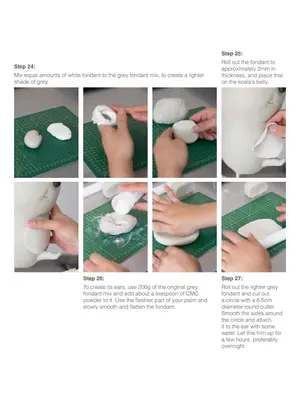
Place the nose on the same level as the eyes. To create a cute smile, overnight. Place the ‘leg’ through the armature wire, and you have his first leg! use your thumb to gently press against its right cheek, then use a Sugar Shaper or a dresden tool to create a smile. To create its ears, use 200g of the original grey
Step 24:
Mix equal amounts of white fondant to the grey fondant mix, to create a lighter shade of grey. Roll out the fondant to approximately 2mm in thickness, and place that on the koala's belly.
Step 25:
fondant mix and add about a teaspoon of CMC powder to it. Use the fleshier part of your palm and slowly smooth and flatten the fondant. Roll out the lighter grey fondant and cut out a circle with a 6.5cm diameter round cutter. Smooth the sides around the circle and attach it to the ear with some water. Let this firm up for a few hours, preferably
Step 24:
Step 27:
Roll outthe lightergrey fondant and cut out acirclewith a6.5cm diameterround cutter. Smooth the sides around the circle andattach ittotheearwithsome water. Let this firm up for a few hours, preferably overnight.
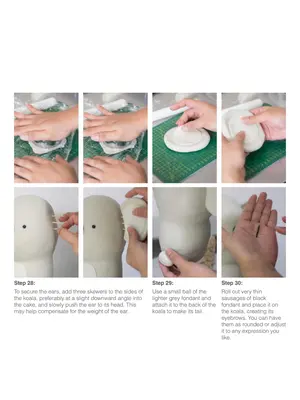
To secure the ears, add three skewers to the sides of the koala, preferably at a slight downward angle into the cake, and slowly push the ear to its head. This may help compensate for the weight of the ear. Use a small ball of the lighter grey fondant and attach it to the back of the koala to make its tail. Roll out very thin sausages of black fondant and place it on the koala, creating its eyebrows. You can have them as rounded or adjust it to any expression you like. Cover the other side of
Step 32:
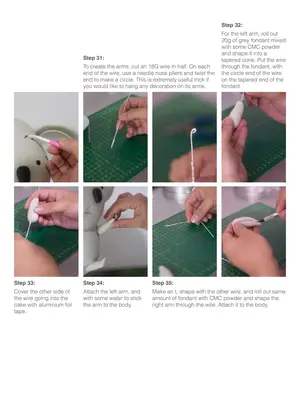
Step 31:
To create the arms, cut an 18G wire in half. On each end of the wire, use a needle nose pliers and twist the end to make a circle. This is extremely useful trick if you would like to hang any decoration on its arms. For the left arm, roll out 20g of grey fondant mixed with some CMC powder and shape it into a tapered cone. Put the wire through the fondant, with the circle end of the wire on the tapered end of the fondant. the wire going into the cake with aluminium foil tape.
Attach the left arm, and with some water to stick the arm to the body. Make an L shape with the other wire, and roll out same amount of fondant with CMC powder and shape the right arm through the wire. Attach it to the body.
Step 31:
To create thearms,cutan18G wire inhalf.On each endof the wire, use a needle nose pliers andtwistthe endto make a circle. This is extremely useful trick if you would like to hang any decoration on its arms.
Step 33:
Coverthe other side of the wire going into the cake with aluminium foil tape.
Step 32:
For the left arm, roll out 20g of grey fondant mixed withsomeCMCpowder and shape it into a taperedcone.Putthewire through the fondant, with the circle end of the wire onthetapered endof the fondant.
Step 34:
Attachtheleftarm,and with some water to stick the arm to the body.
Step 35:
Make an L shape with the otherwire,and roll out same amountoffondantwithCMCpowderand shapethe right arm through the wire. Attach it to the body.
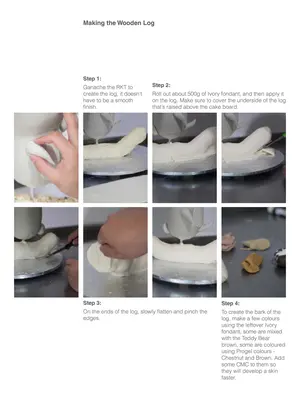
Making the Wooden Log
Step 1:
Ganache the RKT to create the log, it doesn't have to be a smooth finish.
Step 2:
Roll out about 500g of Ivory fondant, and then apply it on the log. Make sure to cover the underside of the log that's raised above the cake board.
On the ends of the log, slowly flatten and pinch the edges. To create the bark of the log, make a few colours using the leftover Ivory fondant, some are mixed with the Teddy Bear brown, some are coloured using Progel colours - Chestnut and Brown. Add some CMC to them so they will develop a skin faster. Use your rolling pin and slowly roll it out in both
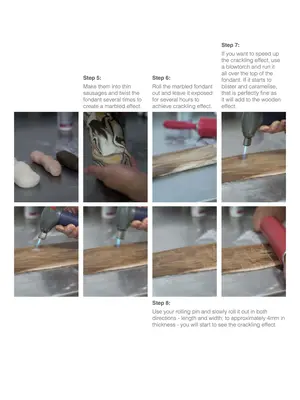
Make them into thin sausages and twist the fondant several times to create a marbled effect. Roll the marbled fondant out and leave it exposed for several hours to achieve crackling effect. If you want to speed up the crackling effect, use a blowtorch and run it all over the top of the fondant. If it starts to blister and caramelise, that is perfectly fine as it will add to the wooden effect.
Step 7:
directions - length and width; to approximately 4mm in thickness - you will start to see the crackling effect.
Step5: Make them into thin sausages and twistthe fondant several times to create a marbled effect. Step6: Roll the marbled fondant out and leave it exposed for several hours to achieve crackling effect.
Step 7:
If you want to speed up the crackling effect, use a blowtorch and run it all overthetop ofthe fondant. If it starts to blisterand caramelise, that is perfectly fine as it will add to the wooden effect.
Step 8:
Use your rolling pin and slowly roll it out in both directions -length and width; to approximately 4mm in thickness - you will start to see the crackling effect.
Finish Cake Board
Step 1:
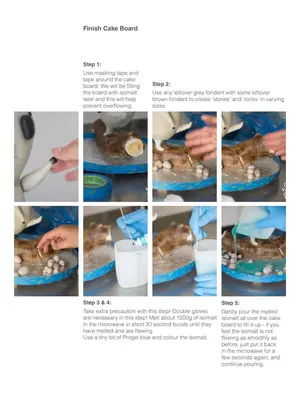
tape around the cake board. We will be filling the board with isomalt later and this will help are necessary in this step! Melt about 1000g of isomalt in the microwave in short 30 second bursts until they have melted and are flowing. Use a tiny bit of Progel blue and colour the isomalt. Gently pour the melted isomalt all over the cake board to fill it up - if you feel the isomalt is not flowing as smoothly as before, just put it back in the microwave for a few seconds again, and continue pouring.
Step 2:
Use any leftover grey fondant with some leftover brown fondant to create ‘stones’ and ‘rocks’ in varying sizes.
Step 9:
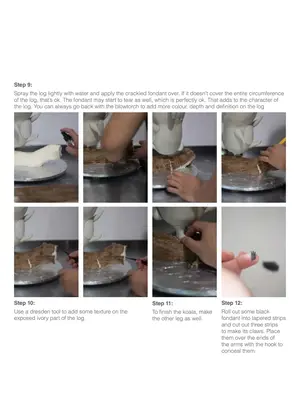
Spray the log lightly with water and apply the crackled fondant over. If it doesn't cover the entire circumference of the log, that's ok. The fondant may start to tear as well, which is perfectly ok. That adds to the character of the log. You can always go back with the blowtorch to add more colour, depth and definition on the log Use masking tape and prevent overflowing. Step 10: Step 11: Step 12: Step 3 & 4: Step 5: Use a dresden tool to add some texture on the exposed ivory part of the log.
To finish the koala, make the other leg as well. Roll out some black fondant into tapered strips and cut out three strips to make its claws. Place them over the ends of the arms with the hook to conceal them. Take extra precaution with this step! Double gloves
Finish Cake Board
Step 1:
Use masking tape and tape around the cake board. We will be filling the board with isomalt later and this will help prevent overflowing.
Step 2:
Use any leftover greyfondant with some leftover brown fondant to create'stones'and'rocks'in varying sizes. Step3&4: Take extra precaution with this step!Double gloves are necessaryin this step!Melt about 1000g of isomalt in the microwave in short 30 second bursts until they have melted and are flowing. Use a tiny bit of Progel blue and colour the isomalt.
Step 5:
Gently pour the melted isomalt all over the cake boardto fill itup-if you feel the isomalt is not flowing as smoothly as before, just put it back inthemicrowavefora few seconds again, and continue pouring.
Adding Celebration Cheer - Christmas
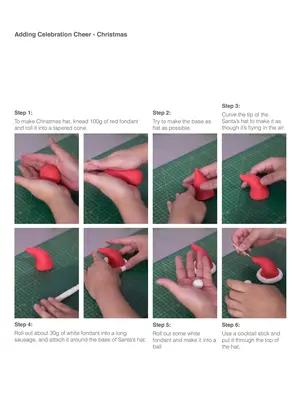
Step 1: Step 2: To make Christmas hat, knead 100g of red fondant
and roll it into a tapered cone. Try to make the base as flat as possible. Curve the tip of the Santa's hat to make it as though it's flying in the air. sausage, and attach it around the base of Santa's hat. Roll out some white fondant and make it into a ball Use a cocktail stick and put it through the top of the hat.
Step 3:
Step 6:
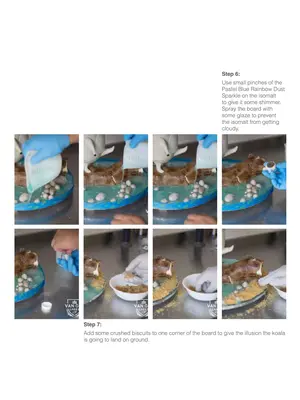
Use small pinches of the Pastel Blue Rainbow Dust Sparkle on the isomalt to give it some shimmer. Spray the board with some glaze to prevent the isomalt from getting cloudy.
Add some crushed biscuits to one corner of the board to give the illusion the koala is going to land on ground. Roll out about 30g of white fondant into a long
AddingCelebrationCheer-Christmas Step1: To make Christmas hat, knead 100g of red fondant and roll it into a tapered cone.
Step 2:
Trytomakethebaseas flat as possible
Step 3:
Curve the tip of the Santa's hat to make it as though it's flying in the air.
Step 4:
Roll out about 3Og of white fondant into a long sausage, and attach it around the base of Santa's hat.
Step 5:
Roll out some white fondant and make it into a ball
Step 6:
Use a cocktail stick and put it through the top of the hat.
Step 7:
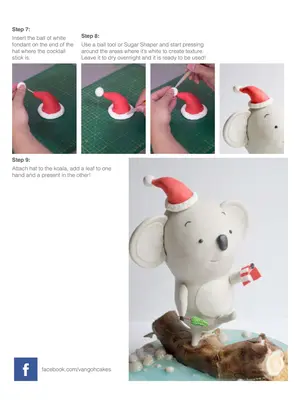
Insert the ball of white fondant on the end of the hat where the cocktail stick is.
Step 8:
Use a ball tool or Sugar Shaper and start pressing around the areas where it's white to create texture. Leave it to dry overnight and it is ready to be used!
Step 9:
Attach hat to the koala, add a leaf to one hand and a present in the other! f facebook.com/vangohcakes
Subcsribe here for free!
to have each issue of Cake! magazine sent straight to your inbox! To advertise in Cake! magazine, contact [email protected]