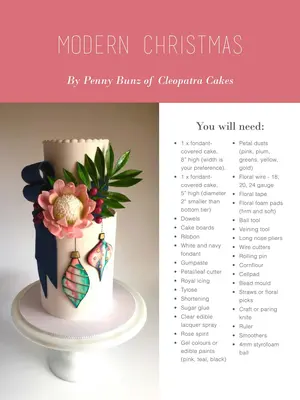
You will need:
1 x fondant- covered cake, 8" high (width is your preference). 1 x fondant- covered cake, 5"high (diameter · Floral tape 2"smaller than bottom tier) Dowels Cake boards Ribbon White and navy fondant Gumpaste Petal/leafcutter Royal icing Tylose Shortening Sugar glue Clear edible lacquerspray Rose spirit Gel colours or edible paints (pink,teal,black) Petal dusts (pink, plum, greens, yellow, gold) Floralwire-18, 20, 24 gauge.Floral foam pads (firm and soft) Ball tool Veining tool Long nosepliers Wire cutters Rolling pin Cornflour Cellpad Bead mould Straws or floral picks Craft or paring knife Ruler Smoothers 4mmstyrofoam ball
Step 1:
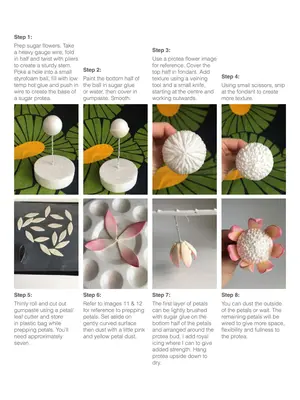
Prep sugar flowers. Take a heavy gauge wire, fold in half and twist with pliers to create a sturdy stem. Poke a hole into a small styrofoam ball, fill with low temp hot glue and push in wire to create the base of a sugar protea. Step 2: Paint the bottom half of the ball in sugar glue or water, then cover in gumpaste. Smooth. Use a protea flower image
Step 3:
for reference. Cover the top half in fondant. Add texture using a veining tool and a small knife, starting at the centre and working outwards. Step 4: Step 9: Using small scissors, snip at the fondant to create more texture. Step 5: Step 6: Step 7: Thinly roll and cut out gumpaste using a petal/ leaf cutter and store in plastic bag while prepping petals. You'll need approximately seven. Refer to images 11 & 12 for reference to prepping petals.
Set aside on gently curved surface then dust with a little pink and yellow petal dust. The first layer of petals can be lightly brushed with sugar glue on the bottom half of the petals and arranged around the protea bud. I add royal icing where I can to give added strength. Hang protea upside down to dry. Remaining protea petals
You can dust the outside of the petals or wait. The remaining petals will be wired to give more space, flexibility and fullness to the protea. Once petals are dry, dust
Step 11:
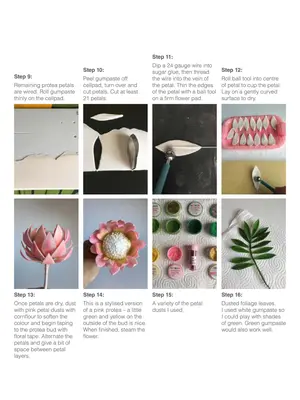
are wired. Roll gumpaste thinly on the cellpad. Peel gumpaste off cellpad, turn over and cut petals. Cut at least 21 petals. Dip a 24 gauge wire into sugar glue, then thread the wire into the vein of the petal. Thin the edges of the petal with a ball tool on a firm flower pad. Roll ball tool into centre of petal to cup the petal. Lay on a gently curved surface to dry. with pink petal dusts with cornflour to soften the colour and begin taping to the protea bud with floral tape.
Alternate the petals and give a bit of space between petal layers. This is a stylised version of a pink protea – a little green and yellow on the outside of the bud is nice. When finished, steam the flower. A variety of the petal dusts I used. Dusted foliage leaves. I used white gumpaste so I could play with shades of green. Green gumpaste would also work well.
Step 10:
Step 12:
Step 9:
Remaining protea petals are wired. Roll gumpaste thinly on the cellpad.
Step 13:
Once petals are dry, dust withpink petal dustswith cornflourto soften the colour and begin taping to the protea bud with floral tape. Alternate the petals and give a bit of space between petal layers.
Step 10:
Peel gumpaste off cellpad, turn over and cut petals. Cut at least 21 petals. Step14: This is a stylised version of apinkprotea-a little green and yellow on the outside of thebud is nice When finished, steam the flower.
Step 11:
Dip a 24 gauge wire into sugar glue, then thread the wire into the vein of the petal. Thin the edges of the petal with a ball tool on a firm flower pad. Step15: A variety of the petal dusts I used. Step12: Roll ball tool into centre of petal to cup the petal. Lay on a gently curved surface to dry. Step16: Dustedfoliage leaves I used white gumpaste so I could play with shades of green. Green gumpaste would also work well.
Step 17: Step 18: Step 19: Making of the wired
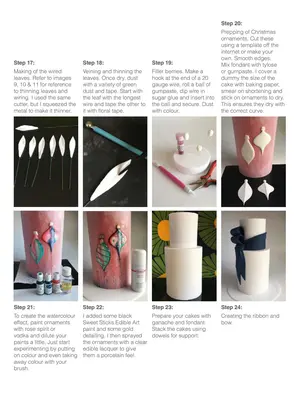
leaves. Refer to images 9, 10 & 11 for reference to thinning leaves and wiring. I used the same cutter, but I squeezed the metal to make it thinner. Veining and thinning the To create the watercolour effect, paint ornaments with rose spirit or vodka and dilute your paints a little. Just start experimenting by putting on colour and even taking away colour with your brush. I added some black
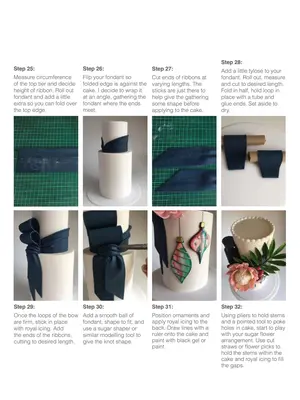
Step 25: Step 26: Step 27: Measure circumference
of the top tier and decide height of ribbon. Roll out fondant and add a little extra so you can fold over the top edge. Flip your fondant so leaves. Once dry, dust with a variety of green dust and tape. Start with the leaf with the longest wire and tape the other to it with floral tape. Filler berries. Make a Sweet Sticks Edible Art paint and some gold detailing.
I then sprayed the ornaments with a clear edible lacquer to give them a porcelain feel. Prepare your cakes with folded edge is against the cake. I decide to wrap it at an angle, gathering the fondant where the ends meet. Cut ends of ribbons at hook at the end of a 20 gauge wire, roll a ball of gumpaste, dip wire in sugar glue and insert into the ball and secure.
Dust with colour. Prepping of Christmas ganache and fondant. Stack the cakes using dowels for support. Creating the ribbon and varying lengths. The sticks are just there to help give the gathering some shape before applying to the cake. Add a little tylose to your
Step 20:
ornaments. Cut these using a template off the internet or make your own. Smooth edges. Mix fondant with tylose or gumpaste. I cover a dummy the size of the cake with baking paper, smear on shortening and stick on ornaments to dry. This ensures they dry with the correct curve. Step 21: Step 22: Step 23: Step 24: Step 29: Step 30: Step 31: Step 32: bow. Once the loops of the bow are firm, stick in place with royal icing.
Add the ends of the ribbons, cutting to desired length. Add a smooth ball of fondant, shape to fit, and use a sugar shaper or similar modelling tool to give the knot shape. Position ornaments and apply royal icing to the back. Draw lines with a ruler onto the cake and paint with black gel or paint. Using pliers to hold stems and a pointed tool to poke holes in cake, start to play with your sugar flower arrangement. Use cut straws or flower picks to hold the stems within the cake and royal icing to fill the gaps.
Step 28:
fondant. Roll out, measure and cut to desired length. Fold in half, hold loop in place with a tube and glue ends. Set aside to dry.
Step 25:
Step 26:
Step 27:
Cut ends of ribbons at varying lengths. The sticks are just there to help give the gathering some shape before applying to the cake.
Step 28:
Step 29:
Once the loops of the bow are firm, stick in place with royal icing. Add the ends of the ribbons, cutting to desired length.
Step 30:
Step 31:
Position ornaments and apply royalicing to the back. Draw lines with a ruler onto the cake and paintwith black gel or paint.
Step 32:
Step 33:
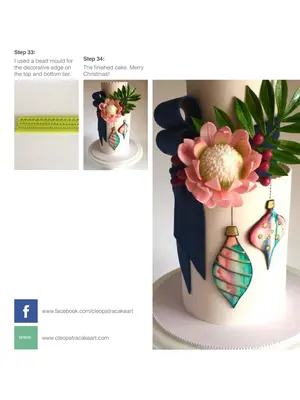
I used a bead mould for the decorative edge on the top and bottom tier.
Step 34:
The finished cake. Merry Christmas! f www.facebook.com/cleopatracakeart www www.cleopatracakeart.com